THEFT DETERRENT / KEYLESS ENTRY THEFT DETERRENT SYSTEM Glass Breakage Sensor Circuit
DESCRIPTION
When the glass breakage sensor detects that the back door glass, quarter window assembly LH or RH is tapped or broken, the sensor will set off the alarm.
WIRING DIAGRAM
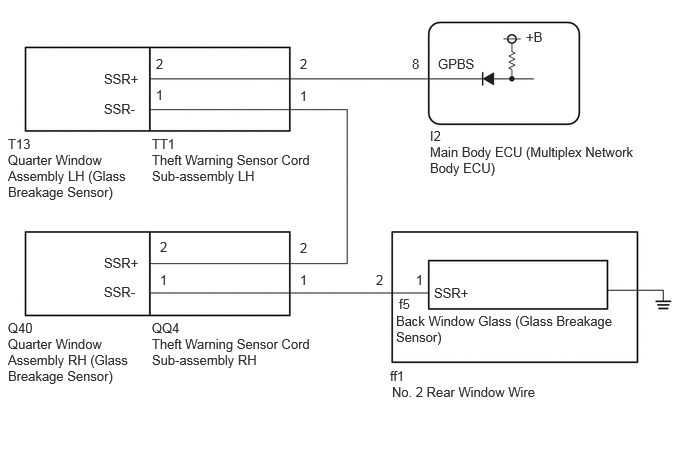
CAUTION / NOTICE / HINT
- NOTICE:
-
If the main body ECU (multiplex network body ECU) is replaced, refer to the Service Bulletin.
PROCEDURE
According to the display on the GTS, read the Data List.
- Body Electrical > Main Body > Data List
-
Tester Display Measurement Item Range Normal Condition Diagnostic Note Glass Breakage Sensor Glass breakage sensor connecting With or Without With: Glass breakage sensor connected
Without: Glass breakage sensor not connected-
- Body Electrical > Main Body > Data List
-
Tester Display Glass Breakage Sensor - 50003 449 99
- OK:
-
"With" (glass breakage sensor connecting) appears on GTS screen.
- Result:
-
Proceed to OK NG
OK
for LHD: Click herePower Source / Network>POWER DISTRIBUTION>MAIN BODY ECU (for LHD)>REMOVAL
for RHD: Click herePower Source / Network>POWER DISTRIBUTION>MAIN BODY ECU (for RHD)>REMOVAL
NG
Disconnect the TT1 theft warning sensor cord sub-assembly LH connector.
Measure the resistance according to the value(s) in the table below.
- Standard Resistance:
-
Tester Connection Condition Specified Condition Click Location & Routing(TT1)Location & Routingewd_type=routing;type=w;code=TT1
Click Connector(TT1)Body>No. 3 Floor Wire / Theft Warning Sensor Cord Sub-Assembly>Theft Warning Sensor Cord Sub-Assembly and No. 3 Floor Wireewd_type=component;type=w;code=TT1;pinno=2,1
TT1-2 - TT1-1 Always Below 3.5 Ω
- Result:
-
Proceed to OK NG
OK
NG
Disconnect the QQ4 theft warning sensor cord sub-assembly RH connector.
Measure the resistance according to the value(s) in the table below.
- Standard Resistance:
-
Tester Connection Condition Specified Condition Click Location & Routing(QQ4)Location & Routingewd_type=routing;type=w;code=QQ4
QQ4-2 - QQ4-1 Always Below 3.5 Ω
- Result:
-
Proceed to OK NG
OK
NG
Disconnect the ff1 No.2 rear window wire connector.
Measure the resistance according to the value(s) in the table below.
- Standard Resistance:
-
Tester Connection Condition Specified Condition Click Location & Routing(ff1)Location & Routingewd_type=routing;type=w;code=ff1
Click Connector(ff1)Body>No. 1 Back Door Wire / No. 2 Rear Window Wire>No. 1 Back Door Wire and No. 2 Rear Window Wireewd_type=component;type=w;code=ff1;pinno=2,1
ff1-2 - ff1-1 Always Below 70 Ω
- Result:
-
Proceed to OK NG
OK
NG
Disconnect the I2 main body ECU (multiplex network body ECU) connector.
Disconnect the TT1 theft warning sensor cord sub-assembly LH connector.
Disconnect the QQ4 theft warning sensor cord sub-assembly RH connector.
Disconnect the ff1 No.2 rear window wire connector.
Measure the resistance according to the value(s) in the table below.
- Standard Resistance:
-
Tester Connection Condition Specified Condition Click Location & Routing(I2,TT1,QQ4,ff1)Location & Routingewd_type=routing;type=c,w,w,w;code=I2,TT1,QQ4,ff1
Click Connector(TT1)Body>No. 3 Floor Wire / Theft Warning Sensor Cord Sub-Assembly>Theft Warning Sensor Cord Sub-Assembly and No. 3 Floor Wireewd_type=component;type=w;code=TT1;pinno=2,1
Click Connector(ff1)Body>No. 1 Back Door Wire / No. 2 Rear Window Wire>No. 1 Back Door Wire and No. 2 Rear Window Wireewd_type=component;type=w;code=ff1;pinno=2,1
I2-8 (GPBS) - TT1-2 Always Below 1 Ω TT1-1 - QQ4-2 Always Below 1 Ω QQ4-1 - ff1-2 Always Below 1 Ω ff1-1 - Body ground Always Below 1 Ω
- Result:
-
Proceed to OK NG
OK
for LHD: Click herePower Source / Network>POWER DISTRIBUTION>MAIN BODY ECU (for LHD)>REMOVAL
for RHD: Click herePower Source / Network>POWER DISTRIBUTION>MAIN BODY ECU (for RHD)>REMOVAL
NG
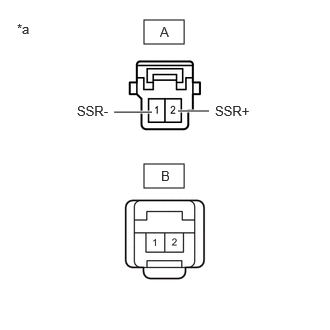
| *a | Component without harness connected (Theft Warning Sensor Cord Sub-assembly LH) |
Remove the theft warning sensor cord sub-assembly LH.
Click hereVehicle Exterior>WINDOW / GLASS>QUARTER WINDOW GLASS>REMOVAL
Measure the resistance according to the value(s) in the table below.
- Standard Resistance:
-
Tester Connection Condition Specified Condition A-2(SSR+) - B-2 Always Below 1 Ω A-1(SSR-) - B-1 Always Below 1 Ω
- Result:
-
Proceed to OK NG
OK
NG
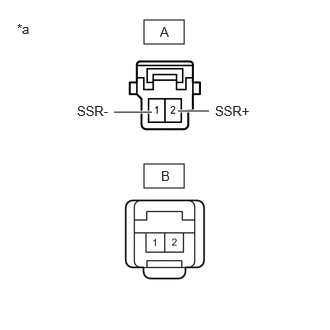
| *a | Component without harness connected (Theft Warning Sensor Cord Sub-assembly RH) |
Remove the theft warning sensor cord sub-assembly RH.
Click hereVehicle Exterior>WINDOW / GLASS>QUARTER WINDOW GLASS>REMOVAL
Measure the resistance according to the value(s) in the table below.
- Standard Resistance:
-
Tester Connection Condition Specified Condition A-2(SSR+) - B-2 Always Below 1 Ω A-1(SSR-) - B-1 Always Below 1 Ω
- Result:
-
Proceed to OK NG
OK
NG
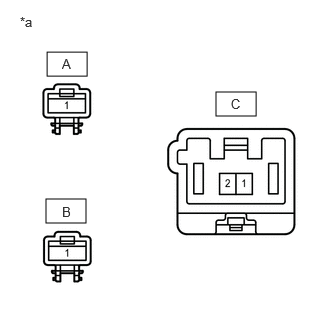
| *a | Component without harness connected (No. 2 Rear Window Wire) |
Remove the No. 2 rear window wire.
Click hereVehicle Exterior>WINDOW / GLASS>BACK DOOR GLASS>REMOVAL
Measure the resistance according to the value(s) in the table below.
- Standard Resistance:
-
Tester Connection Condition Specified Condition C-2 - A-1 Always Below 1 Ω C-1 - B-1 Always Below 1 Ω
- Result:
-
Proceed to OK NG
OK
NG