PARK ASSIST / MONITORING BLIND SPOT MONITOR SYSTEM U023287 Lost Communication with Side Obstacle Detection Control Module "A" Missing Message
DESCRIPTION
This DTC is stored when the blind spot monitor sensor LH (B) judges that there is a communication problem with the blind spot monitor sensor RH (A).
| DTC No. | Detection Item | DTC Detection Condition | Trouble Area | DTC Output from | Priority |
|---|---|---|---|---|---|
| U023287 | Lost Communication with Side Obstacle Detection Control Module "A" Missing Message | The blind spot monitor sensor LH (B) cannot receive signals from the blind spot monitor sensor RH (A) |
·
Open or short in CAN bus main wire or connector
·
Open or short in No. 3 CAN junction connector
·
Blind spot monitor sensor LH (B)
·
Power source circuit of blind spot monitor sensor RH (A)
·
Blind spot monitor sensor RH (A) ground circuit
·
Blind spot monitor sensor RH (A) |
Blind Spot Monitor "B" | A |
- HINT:
-
If the DTCs are output simultaneously, the inspection area can be narrowed down.
| Pattern | DTC Output Part Name (Display on GTS) |
Suspected Area (Malfunction Status) | |||
|---|---|---|---|---|---|
| Clearance Warning ECU Assembly (Clearance Warning) | Blind spot monitor sensor LH (B) (Blind Spot Monitor "B") | Blind spot monitor sensor RH (A) (Blind Spot Monitor "A") | |||
| U117787 | U117887 | U023287 | U023387 | ||
|
○: DTC is output -: DTC is not output |
|||||
| Pattern 1 | ○ | ○ | ○ | ○ |
·
Local bus (short)
·
Clearance warning ECU assembly (Internal malfunction)
·
Blind spot monitor sensor RH (A) (Internal malfunction)
·
Blind spot monitor sensor LH (B) (Internal malfunction) |
| Pattern 2 | ○ | ○ | - | - |
·
Local bus (Open)
·
Clearance warning ECU assembly (Internal malfunction) |
| Pattern 3 | ○ | - | ○ | - |
·
Local bus (Open)
·
Power source circuit of blind spot monitor sensor RH (A)
·
Blind spot monitor sensor RH (A) (Internal malfunction) |
| Pattern 4 | - | ○ | - | ○ |
·
Local bus (Open)
·
Blind spot monitor sensor LH (B) (Internal malfunction) |
| Pattern 5 | - | - | ○ | - | Blind spot monitor sensor LH (B) (Internal malfunction) |
| Pattern 6 | - | - | - | ○ | Blind spot monitor sensor RH (A) (Internal malfunction) |
| Pattern | DTC Output Part Name (Display on GTS) |
Suspected Area (Malfunction Status) | |
|---|---|---|---|
| Blind spot monitor sensor LH (B) (Blind Spot Monitor "B") | Blind spot monitor sensor RH (A) (Blind Spot Monitor "A") | ||
| U023287 | U023387 | ||
|
○: DTC is output -: DTC is not output |
|||
| Pattern 1 | ○ | - |
·
Local bus (Open or Short)
·
Power source circuit of blind spot monitor sensor RH (A)
·
Blind spot monitor sensor RH (A) (Internal malfunction)
·
Blind spot monitor sensor LH (B) (Internal malfunction) |
| Pattern 2 | - | ○ | Blind spot monitor sensor RH (A) (Internal malfunction) |
WIRING DIAGRAM
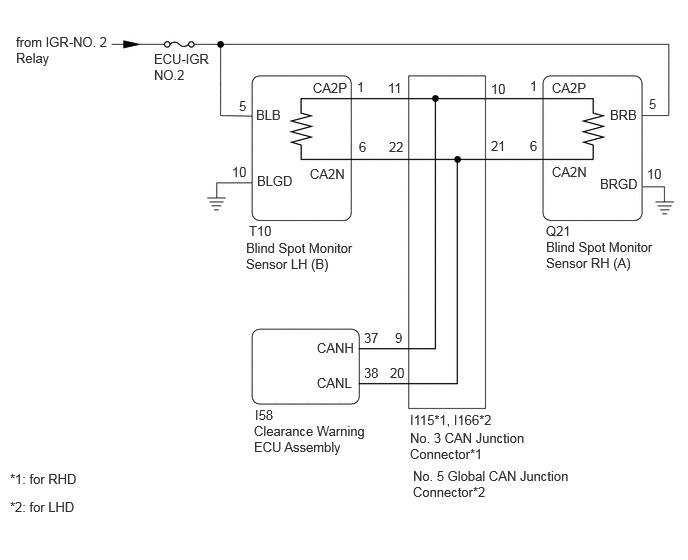
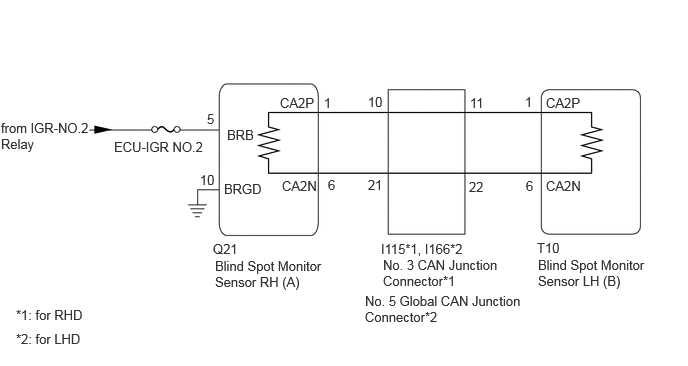
CAUTION / NOTICE / HINT
- NOTICE:
-
·
When checking for DTCs, make sure that the blind spot monitor system is turned on.
·Inspect the fuses for circuits related to this system before performing the following procedure.
·Before measuring the resistance of the CAN bus, turn the ignition switch off and leave the vehicle for 1 minute or more without operating the key or any switches, or opening or closing the doors. After that, disconnect the cable from the negative (-) battery terminal and leave the vehicle for 1 minute or more before measuring the resistance.
·After the ignition switch is turned off, there may be a waiting time before disconnecting the negative (-) battery terminal.
Click hereGeneral>SETUP>WHEN DISCONNECTING OR RECONNECTING BATTERY TERMINAL>BEFORE DISCONNECTING BATTERY
·When disconnecting and reconnecting the battery
Click hereGeneral>SETUP>WHEN DISCONNECTING OR RECONNECTING BATTERY TERMINAL>WORK PROCEDURE
- HINT:
-
When disconnecting and reconnecting the battery, there is an automatic learning function that completes learning when the respective system is used.
-
Click hereGeneral>SETUP>WHEN DISCONNECTING OR RECONNECTING BATTERY TERMINAL>AUTOMATIC LEARNING CHART
- HINT:
-
·
Operating the ignition switch, any other switches or a door triggers related ECU and sensor communication on the CAN. This communication will cause the resistance value to change.
·Even after DTCs are cleared, if a DTC is stored again after driving the vehicle for a while, the malfunction may be occurring due to vibration of the vehicle. In such a case, wiggling the ECUs or wire harness while performing the inspection below may help determine the cause of the malfunction.
PROCEDURE
Choose the model to be inspected.
- Result:
-
Result Proceed to w/ Parking Support Brake System (Rear Crossing Vehicles) A w/o Parking Support Brake System (Rear Crossing Vehicles) B
A
B
Check if blind spot monitor system DTCs are output.
- Body Electrical > Blind Spot Monitor "B" > Trouble Codes
- 50001 460
- Body Electrical > Blind Spot Monitor "A" > Trouble Codes
- 50001 461
Check if parking support brake system DTCs are output.
- Body Electrical > Clearance Warning > Trouble Codes
- 50001 438
Check for DTCs and the output pattern according to the following table.
| Pattern | DTC Output Part Name (Display on GTS) |
|||
|---|---|---|---|---|
| Clearance Warning ECU Assembly (Clearance Warning) | Blind spot monitor sensor LH (B) (Blind Spot Monitor "B") | Blind spot monitor sensor RH (A) (Blind Spot Monitor "A") | ||
| U117787 | U117887 | U023287 | U023387 | |
|
○: DTC is output -: DTC is not output |
||||
| Pattern 1 | ○ | ○ | ○ | ○ |
| Pattern 2 | ○ | ○ | - | - |
| Pattern 3 | ○ | - | ○ | - |
| Pattern 4 | - | ○ | - | ○ |
| Pattern 5 | - | - | ○ | - |
| Pattern 6 | - | - | - | ○ |
- Result:
-
Result Proceed to Pattern 1 A Pattern 2 Pattern 3 Pattern 4 Pattern 5 B Pattern 6 C
A
B
C
Check if blind spot monitor system DTCs are output.
- Body Electrical > Blind Spot Monitor "B" > Trouble Codes
- 50001 460
- Result:
-
Result Proceed to U023287 is output A U023287 is not output B
A
B
Click hereGeneral>INTRODUCTION>HOW TO TROUBLESHOOT ECU CONTROLLED SYSTEMS>HOW TO PROCEED WITH TROUBLESHOOTING
Check vehicle condition.
- Result:
-
Result Proceed to for LHD A for RHD B
A
B
Pre-procedure1
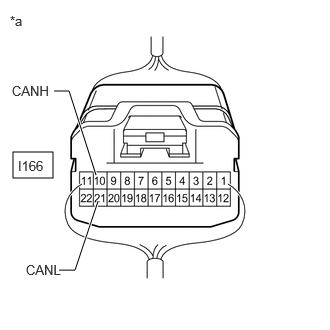
| *a | Component with harness connected (No. 5 Global CAN Junction Connector) |
Turn the ignition switch off.
Disconnect the cable from the negative (-) battery terminal.
Procedure1
Measure the resistance according to the value(s) in the table below.
- Standard Resistance:
-
Tester Connection Condition Specified Condition Click Location & Routing(I166,I76)Location & Routingewd_type=routing;type=c,c;code=I166,I76
I166-10 (CANH) - I166-21 (CANL) Cable disconnected from negative (-) battery terminal 54 to 69 Ω I166-10 (CANH) - I76-4 (CG) Cable disconnected from negative (-) battery terminal 200 Ω or higher I166-21 (CANL) - I76-4 (CG) Cable disconnected from negative (-) battery terminal 200 Ω or higher I166-10 (CANH) - I76-16 (BAT) Cable disconnected from negative (-) battery terminal 6 kΩ or higher I166-21 (CANL) - I76-16 (BAT) Cable disconnected from negative (-) battery terminal 6 kΩ or higher
- Result:
-
Result Proceed to I166-10 (CANH) - I166-21 (CANL) is more than or equal to 70 Ω A I166-10 (CANH) - I166-21 (CANL) is less than or equal to 54 Ω B I166-10 (CANH) - Body ground is less than or equal to 200 Ω C I166-21 (CANL) - Body ground is less than or equal to 200 Ω D I166-10 (CANH) - +B is less than or equal to 6 kΩ E I166-21 (CANL) - +B is less than or equal to 6 kΩ F None of the above conditions are met G
A
B
C
D
E
F
G
Pre-procedure1
Disconnect the I166 No. 5 global CAN junction connector.
Procedure1
Measure the resistance according to the value(s) in the table below.
- Standard Resistance:
-
Tester Connection Condition Specified Condition Click Location & Routing(I166)Location & Routingewd_type=routing;type=c;code=I166
I166-11 (CANH) - I166-22 (CANL) Cable disconnected from negative (-) battery terminal 108 to 132 Ω
- Result:
-
Proceed to OK NG
Post-procedure1
None
OK
NG
Pre-procedure1
Disconnect the I166 No. 5 global CAN junction connector.
Procedure1
Measure the resistance according to the value(s) in the table below.
- Standard Resistance:
-
Tester Connection Condition Specified Condition Click Location & Routing(I166)Location & Routingewd_type=routing;type=c;code=I166
I166-10 (CANH) - I166-21 (CANL) Cable disconnected from negative (-) battery terminal 108 to 132 Ω
- Result:
-
Proceed to OK NG
Post-procedure1
None
OK
NG
Pre-procedure1
Reconnect the I166 No. 5 global CAN junction connector.
Disconnect the T10 blind spot monitor sensor LH (B) connector.
Procedure1
Measure the resistance according to the value(s) in the table below.
- Standard Resistance:
-
Tester Connection Condition Specified Condition Click Location & Routing(T10)Location & Routingewd_type=routing;type=c;code=T10
Click Connector(T10)Body>No. 3 Floor Wire / Theft Warning Sensor Cord Sub-Assembly>Blind Spot Monitor Sensor LHewd_type=component;type=c;code=T10;pinno=1,6
T10-1 (CA2P) - T10-6 (CA2N) Cable disconnected from negative (-) battery terminal 108 to 132 Ω
- Result:
-
Proceed to OK NG
Post-procedure1
None
OK
NG
Pre-procedure1
Reconnect the I166 No. 5 global CAN junction connector.
Disconnect the Q21 blind spot monitor sensor RH (A) connector.
Procedure1
Measure the resistance according to the value(s) in the table below.
- Standard Resistance:
-
Tester Connection Condition Specified Condition Click Location & Routing(Q21)Location & Routingewd_type=routing;type=c;code=Q21
Q21-1 (CA2P) - Q21-6 (CA2N) Cable disconnected from negative (-) battery terminal 108 to 132 Ω
- Result:
-
Proceed to OK NG
Post-procedure1
None
OK
NG
Pre-procedure1
Disconnect the I166 No. 5 global CAN junction connector.
Procedure1
Measure the resistance according to the value(s) in the table below.
- Standard Resistance:
-
Tester Connection Condition Specified Condition Click Location & Routing(I166)Location & Routingewd_type=routing;type=c;code=I166
I166-11 (CANH) - I166-22 (CANL) Cable disconnected from negative (-) battery terminal 108 to 132 Ω
- Result:
-
Proceed to OK NG
Post-procedure1
None
OK
NG
Pre-procedure1
Disconnect the I166 No. 5 global CAN junction connector.
Procedure1
Measure the resistance according to the value(s) in the table below.
- Standard Resistance:
-
Tester Connection Condition Specified Condition Click Location & Routing(I166)Location & Routingewd_type=routing;type=c;code=I166
I166-10 (CANH) - I166-21 (CANL) Cable disconnected from negative (-) battery terminal 108 to 132 Ω
- Result:
-
Proceed to OK NG
Post-procedure1
None
OK
NG
Pre-procedure1
Reconnect the I166 No. 5 global CAN junction connector.
Disconnect the T10 blind spot monitor sensor LH (B) connector.
Procedure1
Measure the resistance according to the value(s) in the table below.
- Standard Resistance:
-
Tester Connection Condition Specified Condition Click Location & Routing(T10)Location & Routingewd_type=routing;type=c;code=T10
Click Connector(T10)Body>No. 3 Floor Wire / Theft Warning Sensor Cord Sub-Assembly>Blind Spot Monitor Sensor LHewd_type=component;type=c;code=T10;pinno=1,6
T10-1 (CA2P) - T10-6 (CA2N) Cable disconnected from negative (-) battery terminal 108 to 132 Ω
- Result:
-
Proceed to OK NG
Post-procedure1
None
OK
NG
Pre-procedure1
Reconnect the I166 No. 5 global CAN junction connector.
Disconnect the Q21 blind spot monitor sensor RH (A) connector.
Procedure1
Measure the resistance according to the value(s) in the table below.
- Standard Resistance:
-
Tester Connection Condition Specified Condition Click Location & Routing(Q21)Location & Routingewd_type=routing;type=c;code=Q21
Q21-1 (CA2P) - Q21-6 (CA2N) Cable disconnected from negative (-) battery terminal 108 to 132 Ω
- Result:
-
Proceed to OK NG
Post-procedure1
None
OK
NG
Pre-procedure1
Disconnect the I166 No. 5 global CAN junction connector.
Procedure1
Measure the resistance according to the value(s) in the table below.
- Standard Resistance:
-
Tester Connection Condition Specified Condition Click Location & Routing(I166,I76)Location & Routingewd_type=routing;type=c,c;code=I166,I76
I166-11 (CANH) - I76-4 (CG) Cable disconnected from negative (-) battery terminal 200 Ω or higher I166-22 (CANL) - I76-4 (CG) Cable disconnected from negative (-) battery terminal 200 Ω or higher I166-11 (CANH) - I76-16 (BAT) Cable disconnected from negative (-) battery terminal 6 kΩ or higher I166-22 (CANL) - I76-16 (BAT) Cable disconnected from negative (-) battery terminal 6 kΩ or higher
- Result:
-
Proceed to OK NG
Post-procedure1
None
OK
NG
Pre-procedure1
Disconnect the I166 No. 5 global CAN junction connector.
Procedure1
Measure the resistance according to the value(s) in the table below.
- Standard Resistance:
-
Tester Connection Condition Specified Condition Click Location & Routing(I166,I76)Location & Routingewd_type=routing;type=c,c;code=I166,I76
I166-10 (CANH) - I76-4 (CG) Cable disconnected from negative (-) battery terminal 200 Ω or higher I166-21 (CANL) - I76-4 (CG) Cable disconnected from negative (-) battery terminal 200 Ω or higher I166-10 (CANH) - I76-16 (BAT) Cable disconnected from negative (-) battery terminal 6 kΩ or higher I166-21 (CANL) - I76-16 (BAT) Cable disconnected from negative (-) battery terminal 6 kΩ or higher
- Result:
-
Proceed to OK NG
Post-procedure1
None
OK
NG
Pre-procedure1
Reconnect the I166 No. 5 global CAN junction connector.
Disconnect the T10 blind spot monitor sensor LH (B) connector.
Procedure1
Measure the resistance according to the value(s) in the table below.
- Standard Resistance:
-
Tester Connection Condition Specified Condition Click Location & Routing(T10,I76)Location & Routingewd_type=routing;type=c,c;code=T10,I76
Click Connector(T10)Body>No. 3 Floor Wire / Theft Warning Sensor Cord Sub-Assembly>Blind Spot Monitor Sensor LHewd_type=component;type=c;code=T10;pinno=1,6
T10-1 (CA2P) - I76-4 (CG) Cable disconnected from negative (-) battery terminal 200 Ω or higher T10-6 (CA2N) - I76-4 (CG) Cable disconnected from negative (-) battery terminal 200 Ω or higher T10-1 (CA2P) - I76-16 (BAT) Cable disconnected from negative (-) battery terminal 6 kΩ or higher T10-6 (CA2N) - I76-16 (BAT) Cable disconnected from negative (-) battery terminal 6 kΩ or higher
- Result:
-
Proceed to OK NG
Post-procedure1
None
OK
NG
Pre-procedure1
Reconnect the I166 No. 5 global CAN junction connector.
Disconnect the Q21 blind spot monitor sensor RH (A) connector.
Procedure1
Measure the resistance according to the value(s) in the table below.
- Standard Resistance:
-
Tester Connection Condition Specified Condition Click Location & Routing(Q21,I76)Location & Routingewd_type=routing;type=c,c;code=Q21,I76
Q21-1 (CA2P) - I76-4 (CG) Cable disconnected from negative (-) battery terminal 200 Ω or higher Q21-6 (CA2N) - I76-4 (CG) Cable disconnected from negative (-) battery terminal 200 Ω or higher Q21-1 (CA2P) - I76-16 (BAT) Cable disconnected from negative (-) battery terminal 6 kΩ or higher Q21-6 (CA2N) - I76-16 (BAT) Cable disconnected from negative (-) battery terminal 6 kΩ or higher
- Result:
-
Proceed to OK NG
Post-procedure1
None
OK
NG
Pre-procedure1
Disconnect the blind spot monitor sensor RH (A) connector.
Procedure1
Measure the Q21 resistance according to the value(s) in the table below.
- Standard Resistance:
-
Tester Connection Condition Specified Condition Click Location & Routing(Q21)Location & Routingewd_type=routing;type=c;code=Q21
Q21-10 (BRGD) - Body ground Always Below 1 Ω
- Result:
-
Proceed to OK NG
Post-procedure1
None
OK
NG
Pre-procedure1
Disconnect the Q21 blind spot monitor sensor RH (A) connector.
Procedure1
Measure the voltage according to the value(s) in the table below.
- Standard Voltage:
-
Tester Connection Switch Condition Specified Condition Click Location & Routing(Q21)Location & Routingewd_type=routing;type=c;code=Q21
Q21-5 (BRB) - Body ground Ignition switch ON 11 to 14 V Q21-5 (BRB) - Body ground Ignition switch off Below 1 V
- Result:
-
Proceed to OK NG
Post-procedure1
None
OK
NG
Pre-procedure1
Disconnect the Q21 blind spot monitor sensor RH (A) connector.
Procedure1
Using an oscilloscope, check the waveform.
- OK:
-
Tester Connection Condition Tool Setting Specified Condition Click Location & Routing(Q21)Location & Routingewd_type=routing;type=c;code=Q21
Q21-1 (CA2P) - Q21-6 (CA2N) Ignition switch ON 1 V/DIV., 100 μs./DIV. Pulse generation
- Result:
-
Proceed to OK NG
Post-procedure1
None
OK
NG
Pre-procedure1
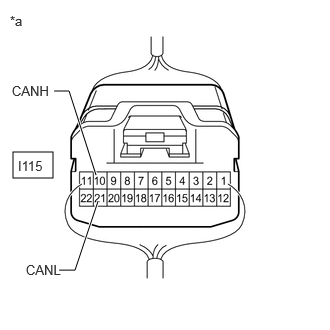
| *a | Component with harness connected (No. 3 CAN Junction Connector) |
Turn the ignition switch off.
Disconnect the cable from the negative (-) battery terminal.
Procedure1
Measure the resistance according to the value(s) in the table below.
- Standard Resistance:
-
Tester Connection Condition Specified Condition Click Location & Routing(I115,I76)Location & Routingewd_type=routing;type=c,c;code=I115,I76
I115-10 (CANH) - I115-21 (CANL) Cable disconnected from negative (-) battery terminal 54 to 69 Ω I115-10 (CANH) - I76-4 (CG) Cable disconnected from negative (-) battery terminal 200 Ω or higher I115-21 (CANL) - I76-4 (CG) Cable disconnected from negative (-) battery terminal 200 Ω or higher I115-10 (CANH) - I76-16 (BAT) Cable disconnected from negative (-) battery terminal 6 kΩ or higher I115-21 (CANL) - I76-16 (BAT) Cable disconnected from negative (-) battery terminal 6 kΩ or higher
- Result:
-
Result Proceed to I115-10 (CANH) - I115-21 (CANL) is more than or equal to 70 Ω A I115-10 (CANH) - I115-21 (CANL) is less than or equal to 54 Ω B I115-10 (CANH) - Body ground is less than or equal to 200 Ω C I115-21 (CANL) - Body ground is less than or equal to 200 Ω D I115-10 (CANH) - +B is less than or equal to 6 kΩ E I115-21 (CANL) - +B is less than or equal to 6 kΩ F None of the above conditions are met G
A
B
C
D
E
F
G
Pre-procedure1
Disconnect the I115 No. 3 CAN junction connector.
Procedure1
Measure the resistance according to the value(s) in the table below.
- Standard Resistance:
-
Tester Connection Condition Specified Condition Click Location & Routing(I115)Location & Routingewd_type=routing;type=c;code=I115
I115-11 (CANH) - I115-22 (CANL) Cable disconnected from negative (-) battery terminal 108 to 132 Ω
- Result:
-
Proceed to OK NG
Post-procedure1
None
OK
NG
Pre-procedure1
Disconnect the I115 No. 3 CAN junction connector.
Procedure1
Measure the resistance according to the value(s) in the table below.
- Standard Resistance:
-
Tester Connection Condition Specified Condition Click Location & Routing(I115)Location & Routingewd_type=routing;type=c;code=I115
I115-10 (CANH) - I115-21 (CANL) Cable disconnected from negative (-) battery terminal 108 to 132 Ω
- Result:
-
Proceed to OK NG
Post-procedure1
None
OK
NG
Pre-procedure1
Reconnect the I115 No. 3 CAN junction connector.
Disconnect the T10 blind spot monitor sensor LH (B) connector.
Procedure1
Measure the resistance according to the value(s) in the table below.
- Standard Resistance:
-
Tester Connection Condition Specified Condition Click Location & Routing(T10)Location & Routingewd_type=routing;type=c;code=T10
Click Connector(T10)Body>No. 3 Floor Wire / Theft Warning Sensor Cord Sub-Assembly>Blind Spot Monitor Sensor LHewd_type=component;type=c;code=T10;pinno=1,6
T10-1 (CA2P) - T10-6 (CA2N) Cable disconnected from negative (-) battery terminal 108 to 132 Ω
- Result:
-
Proceed to OK NG
Post-procedure1
None
OK
NG
Pre-procedure1
Reconnect the I115 No. 3 CAN junction connector.
Disconnect the Q21 blind spot monitor sensor RH (A) connector.
Procedure1
Measure the resistance according to the value(s) in the table below.
- Standard Resistance:
-
Tester Connection Condition Specified Condition Click Location & Routing(Q21)Location & Routingewd_type=routing;type=c;code=Q21
Q21-1 (CA2P) - Q21-6 (CA2N) Cable disconnected from negative (-) battery terminal 108 to 132 Ω
- Result:
-
Proceed to OK NG
Post-procedure1
None
OK
NG
Pre-procedure1
Disconnect the I115 No. 3 CAN junction connector.
Procedure1
Measure the resistance according to the value(s) in the table below.
- Standard Resistance:
-
Tester Connection Condition Specified Condition Click Location & Routing(I115)Location & Routingewd_type=routing;type=c;code=I115
I115-11 (CANH) - I115-22 (CANL) Cable disconnected from negative (-) battery terminal 108 to 132 Ω
- Result:
-
Proceed to OK NG
Post-procedure1
None
OK
NG
Pre-procedure1
Disconnect the I115 No. 3 CAN junction connector.
Procedure1
Measure the resistance according to the value(s) in the table below.
- Standard Resistance:
-
Tester Connection Condition Specified Condition Click Location & Routing(I115)Location & Routingewd_type=routing;type=c;code=I115
I115-10 (CANH) - I115-21 (CANL) Cable disconnected from negative (-) battery terminal 108 to 132 Ω
- Result:
-
Proceed to OK NG
Post-procedure1
None
OK
NG
Pre-procedure1
Reconnect the I115 No. 3 CAN junction connector.
Disconnect the T10 blind spot monitor sensor LH (B) connector.
Procedure1
Measure the resistance according to the value(s) in the table below.
- Standard Resistance:
-
Tester Connection Condition Specified Condition Click Location & Routing(T10)Location & Routingewd_type=routing;type=c;code=T10
Click Connector(T10)Body>No. 3 Floor Wire / Theft Warning Sensor Cord Sub-Assembly>Blind Spot Monitor Sensor LHewd_type=component;type=c;code=T10;pinno=1,6
T10-1 (CA2P) - T10-6 (CA2N) Cable disconnected from negative (-) battery terminal 108 to 132 Ω
- Result:
-
Proceed to OK NG
Post-procedure1
None
OK
NG
Pre-procedure1
Reconnect the I115 No. 3 CAN junction connector.
Disconnect the Q21 blind spot monitor sensor RH (A) connector.
Procedure1
Measure the resistance according to the value(s) in the table below.
- Standard Resistance:
-
Tester Connection Condition Specified Condition Click Location & Routing(Q21)Location & Routingewd_type=routing;type=c;code=Q21
Q21-1 (CA2P) - Q21-6 (CA2N) Cable disconnected from negative (-) battery terminal 108 to 132 Ω
- Result:
-
Proceed to OK NG
Post-procedure1
None
OK
NG
Pre-procedure1
Disconnect the I115 No. 3 CAN junction connector.
Procedure1
Measure the resistance according to the value(s) in the table below.
- Standard Resistance:
-
Tester Connection Condition Specified Condition Click Location & Routing(I115,I76)Location & Routingewd_type=routing;type=c,c;code=I115,I76
I115-11 (CANH) - I76-4 (CG) Cable disconnected from negative (-) battery terminal 200 Ω or higher I115-22 (CANL) - I76-4 (CG) Cable disconnected from negative (-) battery terminal 200 Ω or higher I115-11 (CANH) - I76-16 (BAT) Cable disconnected from negative (-) battery terminal 6 kΩ or higher I115-22 (CANL) - I76-16 (BAT) Cable disconnected from negative (-) battery terminal 6 kΩ or higher
- Result:
-
Proceed to OK NG
Post-procedure1
None
OK
NG
Pre-procedure1
Disconnect the I115 No. 3 CAN junction connector.
Procedure1
Measure the resistance according to the value(s) in the table below.
- Standard Resistance:
-
Tester Connection Condition Specified Condition Click Location & Routing(I115,I76)Location & Routingewd_type=routing;type=c,c;code=I115,I76
I115-10 (CANH) - I76-4 (CG) Cable disconnected from negative (-) battery terminal 200 Ω or higher I115-21 (CANL) - I76-4 (CG) Cable disconnected from negative (-) battery terminal 200 Ω or higher I115-10 (CANH) - I76-16 (BAT) Cable disconnected from negative (-) battery terminal 6 kΩ or higher I115-21 (CANL) - I76-16 (BAT) Cable disconnected from negative (-) battery terminal 6 kΩ or higher
- Result:
-
Proceed to OK NG
Post-procedure1
None
OK
NG
Pre-procedure1
Reconnect the I115 No. 3 CAN junction connector.
Disconnect the T10 blind spot monitor sensor LH (B) connector.
Procedure1
Measure the resistance according to the value(s) in the table below.
- Standard Resistance:
-
Tester Connection Condition Specified Condition Click Location & Routing(T10,I76)Location & Routingewd_type=routing;type=c,c;code=T10,I76
Click Connector(T10)Body>No. 3 Floor Wire / Theft Warning Sensor Cord Sub-Assembly>Blind Spot Monitor Sensor LHewd_type=component;type=c;code=T10;pinno=1,6
T10-1 (CA2P) - I76-4 (CG) Cable disconnected from negative (-) battery terminal 200 Ω or higher T10-6 (CA2N) - I76-4 (CG) Cable disconnected from negative (-) battery terminal 200 Ω or higher T10-1 (CA2P) - I76-16 (BAT) Cable disconnected from negative (-) battery terminal 6 kΩ or higher T10-6 (CA2N) - I76-16 (BAT) Cable disconnected from negative (-) battery terminal 6 kΩ or higher
- Result:
-
Proceed to OK NG
Post-procedure1
None
OK
NG
Pre-procedure1
Reconnect the I115 No. 3 CAN junction connector.
Disconnect the Q21 blind spot monitor sensor RH (A) connector.
Procedure1
Measure the resistance according to the value(s) in the table below.
- Standard Resistance:
-
Tester Connection Condition Specified Condition Click Location & Routing(Q21,I76)Location & Routingewd_type=routing;type=c,c;code=Q21,I76
Q21-1 (CA2P) - I76-4 (CG) Cable disconnected from negative (-) battery terminal 200 Ω or higher Q21-6 (CA2N) - I76-4 (CG) Cable disconnected from negative (-) battery terminal 200 Ω or higher Q21-1 (CA2P) - I76-16 (BAT) Cable disconnected from negative (-) battery terminal 6 kΩ or higher Q21-6 (CA2N) - I76-16 (BAT) Cable disconnected from negative (-) battery terminal 6 kΩ or higher
- Result:
-
Proceed to OK NG
Post-procedure1
None
OK
NG
Pre-procedure1
Disconnect the blind spot monitor sensor RH (A) connector.
Procedure1
Measure the Q21 resistance according to the value(s) in the table below.
- Standard Resistance:
-
Tester Connection Condition Specified Condition Click Location & Routing(Q21)Location & Routingewd_type=routing;type=c;code=Q21
Q21-10 (BRGD) - Body ground Always Below 1 Ω
- Result:
-
Proceed to OK NG
Post-procedure1
None
OK
NG
Pre-procedure1
Disconnect the Q21 blind spot monitor sensor RH (A) connector.
Procedure1
Measure the voltage according to the value(s) in the table below.
- Standard Voltage:
-
Tester Connection Switch Condition Specified Condition Click Location & Routing(Q21)Location & Routingewd_type=routing;type=c;code=Q21
Q21-5 (BRB) - Body ground Ignition switch ON 11 to 14 V Q21-5 (BRB) - Body ground Ignition switch off Below 1 V
- Result:
-
Proceed to OK NG
Post-procedure1
None
OK
NG
Pre-procedure1
Disconnect the Q21 blind spot monitor sensor RH (A) connector.
Procedure1
Using an oscilloscope, check the waveform.
- OK:
-
Tester Connection Condition Tool Setting Specified Condition Click Location & Routing(Q21)Location & Routingewd_type=routing;type=c;code=Q21
Q21-1 (CA2P) - Q21-6 (CA2N) Ignition switch ON 1 V/DIV., 100 μs./DIV. Pulse generation
- Result:
-
Proceed to OK NG
Post-procedure1
None
OK
NG