SUSPENSION CONTROL STABILIZER CONTROL VALVE(for Front Side) INSTALLATION
CAUTION / NOTICE / HINT
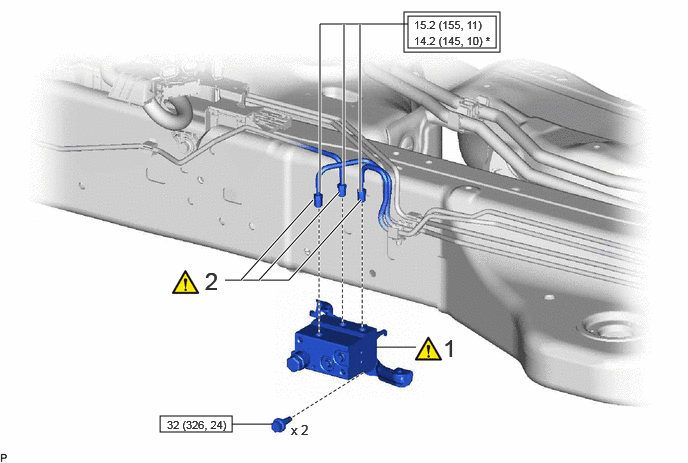
| Procedure | Part Name Code |

|

|

|
|
|---|---|---|---|---|---|
| 1 | STABILIZER CONTROL VALVE SUB-ASSEMBLY | 48005 | ( ) |
- | - |
| 2 | FRONT STABILIZER CONTROL TUBE ASSEMBLY | - | () |
- | - |

|
Tightening torque for "Major areas involving basic vehicle performance such as moving/turning/stopping": N*m (kgf*cm, ft.*lbf) |

|
N*m (kgf*cm, ft.*lbf): Specified torque |
| * | For use with a union nut wrench | - | - |
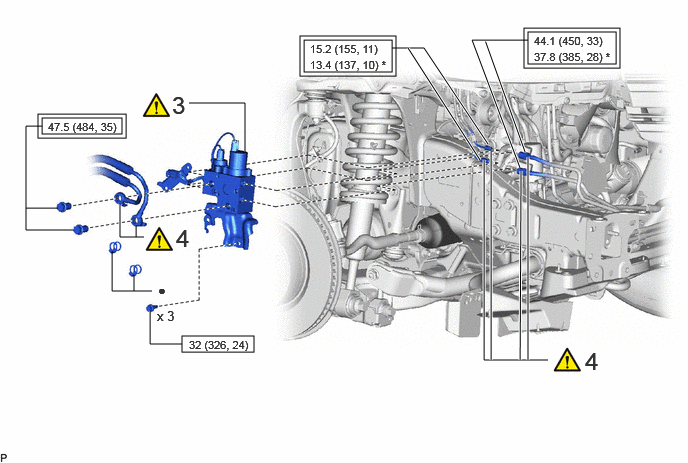
| Procedure | Part Name Code |
|
|
|
|
|---|---|---|---|---|---|
| 3 | FRONT STABILIZER HOUSING SUB-ASSEMBLY | 48006 | () |
- | - |
| 4 | FRONT STABILIZER CONTROL TUBE ASSEMBLY | - | () |
- | - |
|
|
Tightening torque for "Major areas involving basic vehicle performance such as moving/turning/stopping": N*m (kgf*cm, ft.*lbf) |
|
N*m (kgf*cm, ft.*lbf): Specified torque |
| * | For use with a union nut wrench | ● | Non-reusable part |
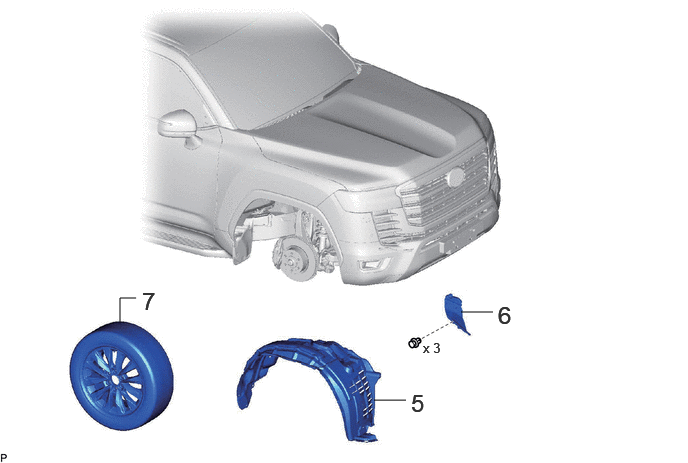
| Procedure | Part Name Code |
|
|
|
|
|---|---|---|---|---|---|
| 5 | FRONT FENDER SPLASH SHIELD SUB-ASSEMBLY RH | 53805 | - | - | - |
| 6 | FRONT FENDER APRON TRIM PACKING A | 53782 | - | - | - |
| 7 | FRONT WHEEL | - | - | - | - |
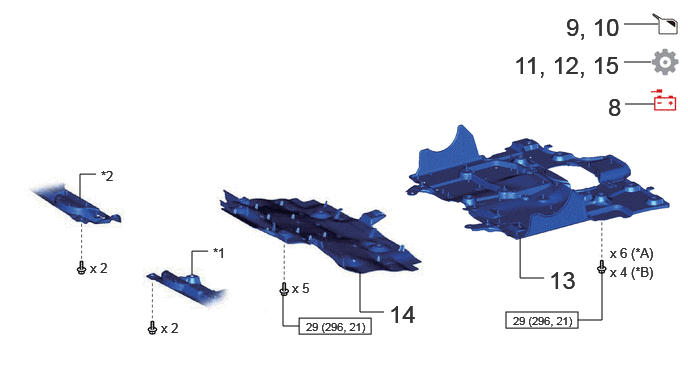
| Procedure | Part Name Code |
|
|
|
|
|---|---|---|---|---|---|
| 8 | CONNECT CABLE TO NEGATIVE BATTERY TERMINAL | - | - | - | - |
| 9 | BLEED AIR FROM SUSPENSION FLUID | - | - | () |
- |
| 10 | PRESSURE ACCORDING TO TEMPERATURE MANAGEMENT CHART WHEN FILLING FLUID | - | - | () |
- |
| 11 | INSPECT FOR SUSPENSION FLUID LEAK | - | - | - | () |
| 12 | MEASURE VEHICLE HEIGHT | - | - | - | () |
| 13 | NO. 2 ENGINE UNDER COVER ASSEMBLY | 51420 | - | - | - |
| 14 | NO. 1 ENGINE UNDER COVER ASSEMBLY | 51410 | - | - | - |
| 15 | INITIALIZATION AFTER RECONNECTING BATTERY TERMINAL | - | - | - | () |
| *A | w/ Cover | *B | w/o Cover |
| *1 | ENGINE SIDE COVER SUB-ASSEMBLY LH | *2 | ENGINE SIDE COVER SUB-ASSEMBLY RH |
|
|
N*m (kgf*cm, ft.*lbf): Specified torque | - | - |
PROCEDURE

 48005 1.INSTALL STABILIZER CONTROL VALVE SUB-ASSEMBLY
|
|
|
- Torque:
- 32 N*m (326 kgf*cm, 24 ft.*lbf)
2.CONNECT FRONT STABILIZER CONTROL TUBE ASSEMBLY
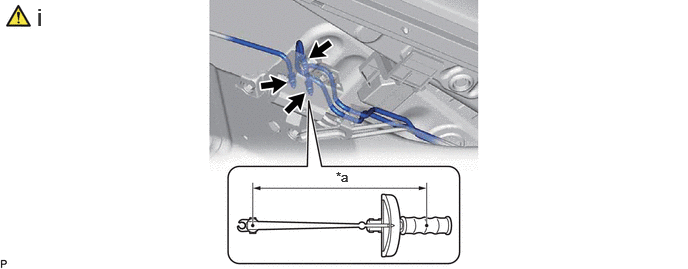
| *a | Torque Wrench Fulcrum Length | - | - |
Using a union nut wrench, connect the front stabilizer control tube assembly.
- Torque:
- Specified tightening torque : 15.2 N*m (155 kgf*cm, 11 ft.*lbf)
- NOTICE:
-
·
Do not kink or damage the front stabilizer control tube assembly.
·Do not allow any foreign matter such as dirt or dust to enter the front stabilizer control tube assembly from the connecting parts.
- HINT:
-
·
Calculate the torque wrench reading when changing the fulcrum length of the torque wrench.
Click hereGeneral>INTRODUCTION>REPAIR INSTRUCTION>PRECAUTION
·When using a union nut wrench (fulcrum length of 22 mm (0.866 in.)) + torque wrench (fulcrum length of 300 mm (11.811 in.)):
14.2 N*m (145 kgf*cm, 10 ft.*lbf)
48006 3.INSTALL FRONT STABILIZER HOUSING SUB-ASSEMBLY
|
|
|
- Torque:
- 32 N*m (326 kgf*cm, 24 ft.*lbf)
4.CONNECT FRONT STABILIZER CONTROL TUBE ASSEMBLY
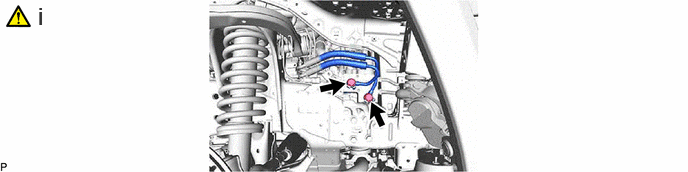
Connect the front stabilizer control tube assembly with the 2 union bolt and 2 new gasket.
- Torque:
- 47.5 N*m (484 kgf*cm, 35 ft.*lbf)
- NOTICE:
-
·
Do not kink or damage the front stabilizer control tube assembly.
·Do not allow any foreign matter such as dirt or dust to enter the front stabilizer control tube assembly from the connecting parts.
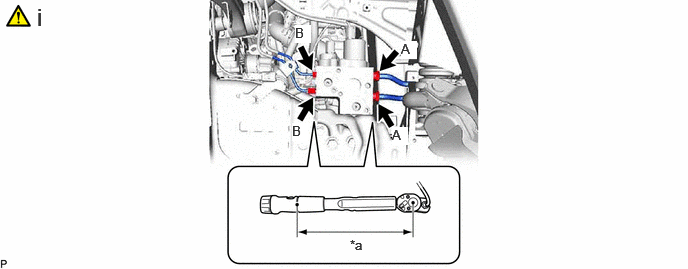
| *a | Torque Wrench Fulcrum Length | - | - |
Using a union nut wrench, connect the front stabilizer control tube assembly.
- Torque:
- Specified tightening torque (A) : 44.1 N*m (450 kgf*cm, 33 ft.*lbf)
- Specified tightening torque (B) : 15.2 N*m (155 kgf*cm, 11 ft.*lbf)
- NOTICE:
-
·
Do not kink or damage the front stabilizer control tube assembly.
·Do not allow any foreign matter such as dirt or dust to enter the front stabilizer control tube assembly from the connecting parts.
- HINT:
-
·
Calculate the torque wrench reading when changing the fulcrum length of the torque wrench.
Click hereGeneral>INTRODUCTION>REPAIR INSTRUCTION>PRECAUTION
·for Specified Tightening Torque (A):
When using a union nut wrench (fulcrum length of 30 mm (1.181 in.)) + torque wrench (fulcrum length of 180 mm (7.087 in.)):
37.8 N*m (385 kgf*cm, 28 ft.*lbf)
·for Specified Tightening Torque (B):
When using a union nut wrench (fulcrum length of 22 mm (0.866 in.)) + torque wrench (fulcrum length of 162 mm (6.38 in.)):
13.4 N*m (137 kgf*cm, 10 ft.*lbf)
53805 5.INSTALL FRONT FENDER SPLASH SHIELD SUB-ASSEMBLY RH
Use the same procedure as for the LH side.
Click hereVehicle Exterior>WIPER / WASHER>WASHER MOTOR>INSTALLATION
53782 6.INSTALL FRONT FENDER APRON TRIM PACKING A
7.INSTALL FRONT WHEEL
8.CONNECT CABLE TO NEGATIVE BATTERY TERMINAL
9.BLEED AIR FROM SUSPENSION FLUID
|
|
Click here() |
10.APPLY PRESSURE ACCORDING TO TEMPERATURE MANAGEMENT CHART WHEN FILLING FLUID
11.INSPECT FOR SUSPENSION FLUID LEAK
|
|
Click here() |
12.MEASURE VEHICLE HEIGHT
|
|
Click here() |
51420 13.INSTALL NO. 2 ENGINE UNDER COVER ASSEMBLY
51410 14.INSTALL NO. 1 ENGINE UNDER COVER ASSEMBLY
15. INITIALIZATION AFTER RECONNECTING BATTERY TERMINAL
Click hereGeneral>SETUP>WHEN DISCONNECTING OR RECONNECTING BATTERY TERMINAL>WORK PROCEDURE
- HINT:
-
When disconnecting and reconnecting the battery , there is an automatic learning function that completes learning when the respective system is used.
-
Click hereGeneral>SETUP>WHEN DISCONNECTING OR RECONNECTING BATTERY TERMINAL>AUTOMATIC LEARNING CHART