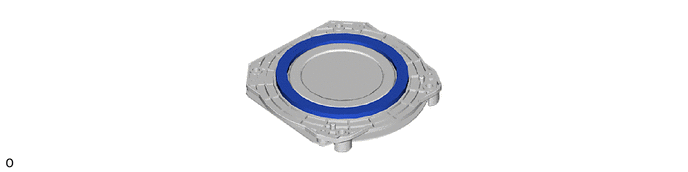
SEAT REAR NO. 1 SEAT ASSEMBLY(for 40/20/40 Split Seat Type RH Side) DISASSEMBLY
CAUTION / NOTICE / HINT
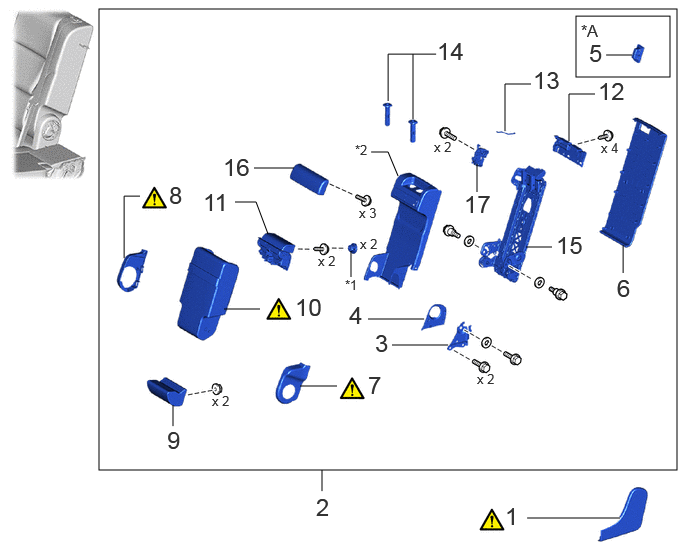
| Procedure | Part Name Code |

|

|

|
|
|---|---|---|---|---|---|
| 1 | REAR NO. 1 SEAT RECLINING COVER LH | 71834S | ( ) |
- | - |
| 2 | CENTER SEATBACK ASSEMBLY | - | - | - | - |
| 3 | SEATBACK STOPPER PLATE | 72569B | - | - | - |
| 4 | REAR SEAT HINGE COVER LH | 71486F | - | - | - |
| 5 | REAR NO. 2 SEATBACK COVER | 72996J | - | - | - |
| 6 | REAR CENTER NO. 1 SEATBACK BOARD | 71881E | - | - | - |
| 7 | CENTER ARMREST HINGE COVER LH | 72869A | () |
- | - |
| 8 | CENTER ARMREST HINGE COVER RH | 72868C | () |
- | - |
| 9 | NO. 1 SEAT NO. 1 ARMREST ASSEMBLY | 72810L | - | - | - |
| 10 | REAR CENTER SEAT ARMREST ASSEMBLY | 72830X | () |
- | - |
| 11 | CUP HOLDER ASSEMBLY | 66990V | - | - | - |
| 12 | RECLINING CONTROL LEVER RH | 72574B | - | - | - |
| 13 | FOLD SEATBACK WIRE | 79873A | - | - | - |
| 14 | REAR SEAT HEADREST SUPPORT ASSEMBLY | 71930Q | - | - | - |
| 15 | CENTER NO. 1 SEATBACK FRAME SUB-ASSEMBLY | 79103C | - | - | - |
| 16 | NO. 1 SEAT NO. 2 ARMREST ASSEMBLY | 72810M | - | - | - |
| 17 | NO. 1 SEATBACK LOCK ASSEMBLY | 72630H | - | - | - |
| *A | w/ Child Restraint System Guide | - | - |
| *1 | REAR SEAT CENTER ARMREST COVER | *2 | NO. 1 SEATBACK BOARD COVER |
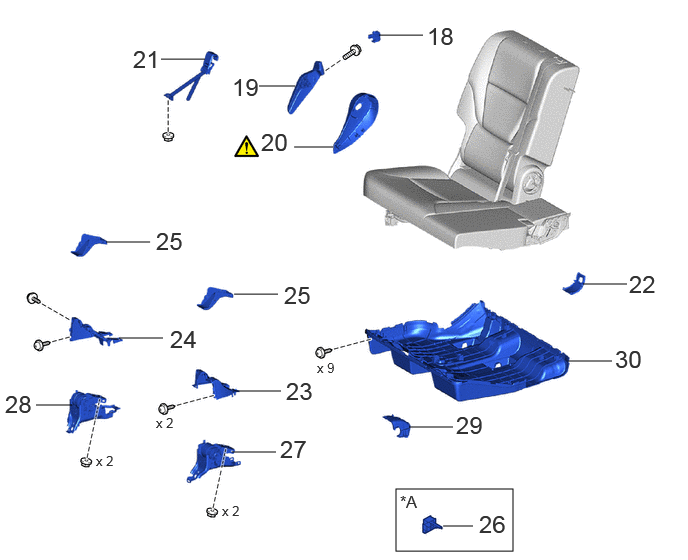
| Procedure | Part Name Code |
|
|
|
|
|---|---|---|---|---|---|
| 18 | REAR SEAT ADJUSTER BOLT COVER | 72329F | - | - | - |
| 19 | RECLINING ADJUSTER RELEASE HANDLE RH | 72525R | - | - | - |
| 20 | REAR NO. 1 SEAT RECLINING COVER RH | 71833S | () |
- | - |
| 21 | NO. 1 FOLD SEAT STOPPER BAND ASSEMBLY | 78950F | - | - | - |
| 22 | REAR UNDER COVER | 76971G | - | - | - |
| 23 | NO. 1 SEAT NO. 2 CUSHION COVER | 79952A | - | - | - |
| 24 | NO. 1 SEAT NO. 1 CUSHION COVER | 79951B | - | - | - |
| 25 | REAR NO. 1 SEAT NO. 4 LEG SIDE COVER | 79967W | - | - | - |
| 26 | REAR SEAT WIRE RH | 82193 | - | - | - |
| 27 | REAR NO. 1 SEAT HINGE SUB-ASSEMBLY LH | 71302C | - | - | - |
| 28 | REAR NO. 1 SEAT HINGE SUB-ASSEMBLY RH | 71301G | - | - | - |
| 29 | REAR SEAT CUSHION COVER RH | 72995F | - | - | - |
| 30 | REAR SEAT CUSHION UNDER COVER RH | 72927F | - | - | - |
| *A | w/o Wire Harness | - | - |
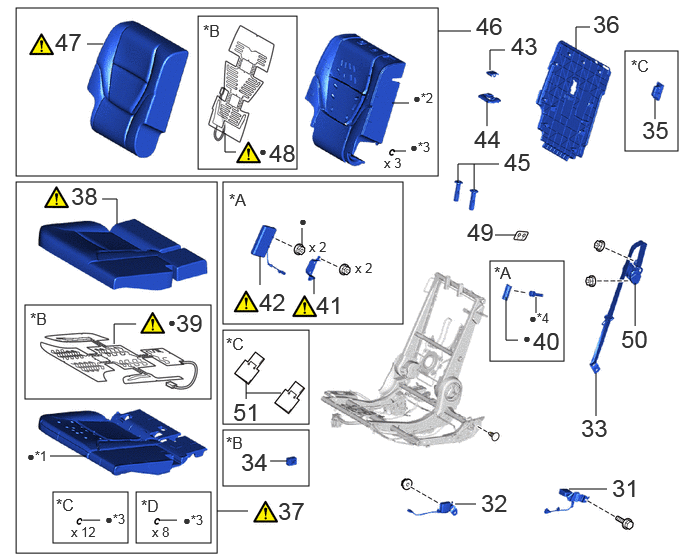
| Procedure | Part Name Code |
|
|
|
|
|---|---|---|---|---|---|
| 31 | REAR CENTER SEAT LAP TYPE BELT ASSEMBLY | 73350 | - | - | - |
| 32 | REAR NO. 1 SEAT INNER BELT ASSEMBLY RH | 73380C | - | - | - |
| 33 | REAR CENTER SEAT 3 POINT TYPE BELT ASSEMBLY (SEAT ANCHOR) | 73310D | - | - | - |
| 34 | SEAT HEATER CONTROL SUB-ASSEMBLY RH | 87501E | - | - | - |
| 35 | REAR SEATBACK COVER | 72996H | - | - | - |
| 36 | REAR SEATBACK BOARD SUB-ASSEMBLY RH | 71701A | - | - | - |
| 37 | SEPARATE TYPE REAR SEAT CUSHION ASSEMBLY RH | - | () |
- | - |
| 38 | NO. 1 SEAT CUSHION COVER SUB-ASSEMBLY RH | 71075F | () |
- | - |
| 39 | REAR NO. 1 SEAT CUSHION HEATER ASSEMBLY RH | 87510Z | () |
- | - |
| 40 | REAR SEAT COVER HANGER | 71751D | |||
| 41 | REAR SEATBACK FRAME RH | 71251 | () |
- | - |
| 42 | REAR SEAT AIRBAG ASSEMBLY RH | 73930A | () |
- | - |
| 43 | SEAT BELT ANCHOR COVER CAP | 73178A | - | - | - |
| 44 | REAR SEAT SHOULDER BELT COVER | 73373 | - | - | - |
| 45 | REAR SEAT HEADREST SUPPORT ASSEMBLY | 71930Q | - | - | - |
| 46 | SEPARATE TYPE REAR SEATBACK ASSEMBLY RH | - | - | - | - |
| 47 | NO. 1 SEATBACK COVER SUB-ASSEMBLY RH | 79013D | () |
- | - |
| 48 | REAR NO. 1 SEATBACK HEATER ASSEMBLY RH | 87530A | () |
- | - |
| 49 | REAR UPPER SEATBACK PLATE | 71293B | - | - | - |
| 50 | REAR CENTER SEAT 3 POINT TYPE BELT ASSEMBLY | 73310D | - | - | - |
| 51 | NO. 1 SEAT CUSHION CARPET | 79117D | - | - | - |
| *A | w/ Rear Seat Side Airbag | *B | w/ Seat Heater System |
| *C | w/ Child Restraint System Guide | *D | w/o Child Restraint System Guide |
| *1 | REAR NO. 1 SEAT CUSHION PAD RH | *2 | NO. 1 SEATBACK PAD RH |
| *3 | HOG RING | *4 | RIVET |
| ● | Non-reusable part | - | - |
| Procedure | Part Name Code |
|
|
|
|
|---|---|---|---|---|---|
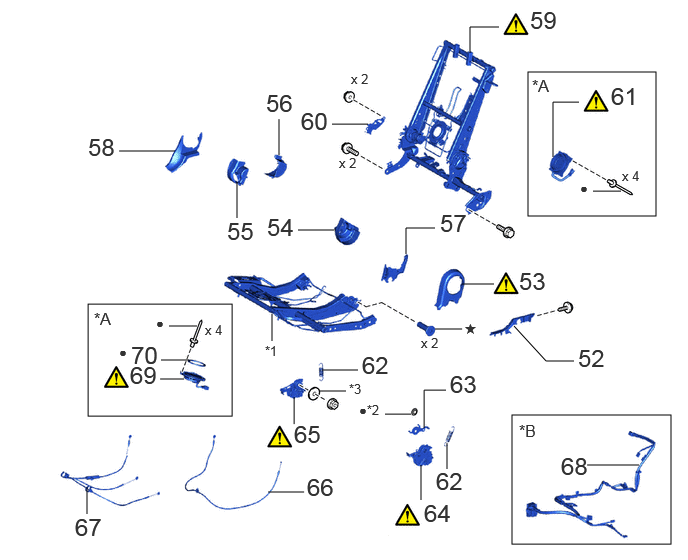
| 52 | REAR INNER SEAT CUSHION HINGE COVER LH | 71694G | - | - | - |
| 53 | REAR SEAT HINGE COVER | 71485E | () |
- | - |
| 54 | SEAT RECLINING ADJUSTER INSIDE COVER RH | 71H76L | - | - | - |
| 55 | SEAT RECLINING ADJUSTER INSIDE COVER RH | 71H75L | - | - | - |
| 56 | REAR INNER SEAT RECLINING COVER LH | 71879H | - | - | - |
| 57 | SEAT RECLINING HINGE COVER RH | 72552K | - | - | - |
| 58 | SEAT RECLINING HINGE COVER RH | 72551M | - | - | - |
| 59 | NO. 1 SEATBACK FRAME SUB-ASSEMBLY RH | 79103B | () |
- | - |
| 60 | NO. 1 RECLINING CONTROL LINK SUB-ASSEMBLY RH | 72307D | - | - | - |
| 61 | NO. 1 SEAT SEATBACK CLIMATE CONTROL BLOWER RH | 85867D | () |
- | - |
| 62 | REAR SEAT CUSHION SPRING | 71461H | - | - | - |
| 63 | REAR SEAT LOWER TRACK BRACKET RH | 72143D | - | - | - |
| 64 | REAR SEAT LOCK ASSEMBLY LH | 72660P | () |
- | - |
| 65 | REAR SEAT LOCK ASSEMBLY RH | 72650J | () |
- | - |
| 66 | NO. 1 SEAT RECLINING ADJUSTING CABLE ASSEMBLY RH | 72570E | - | - | - |
| 67 | SEAT FOLD SEAT LOCK CONTROL CABLE ASSEMBLY RH | 78910C | - | - | - |
| 68 | REAR SEAT WIRE RH | 82193 | - | - | - |
| 69 | NO. 1 SEAT CUSHION CLIMATE CONTROL BLOWER ASSEMBLY RH | 85860E | () |
- | - |
| 70 | REAR SEAT CUSHION PAD B | - | - | - | - |
| *A | w/ Climate Control Seat System | *B | w/ Wire Harness |
| *1 | NO. 1 SEAT CUSHION FRAME SUB-ASSEMBLY RH | *2 | SPRING NUT |
| *3 | PLATE WASHER | - | - |
| ★ | Precoated part | ● | Non-reusable part |
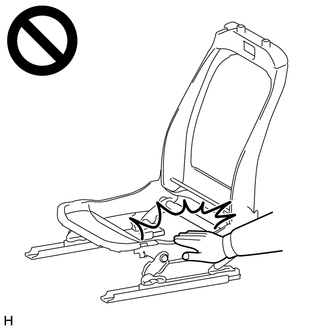
- CAUTION:
-
-
·
Wear protective gloves. Sharp areas on the parts may injure your hands.
·There is risk of injury.
PROCEDURE

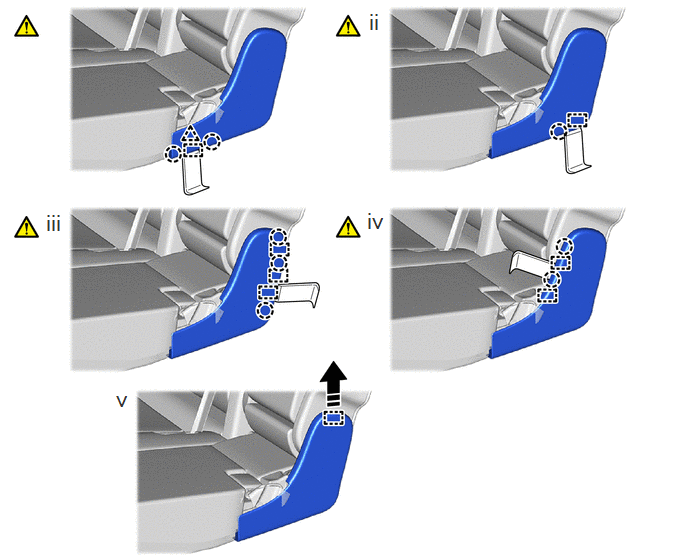
 71834S 1.REMOVE REAR NO. 1 SEAT RECLINING COVER LH

|
Remove in this Direction | - | - |
Using moulding remover D, detach the clip, claw and guide as shown in the illustration.
Using moulding remover D, detach the claw and guide as shown in the illustration.
Using moulding remover D, detach the claw and guide as shown in the illustration.
Using moulding remover D, detach the claw and guide as shown in the illustration.
Detach the guide and remove the No. 1 seat reclining cover LH as shown in the illustration.
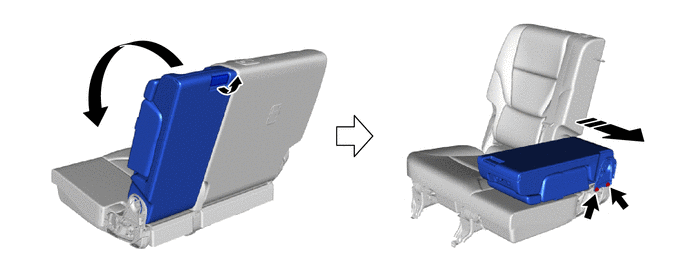
2.REMOVE CENTER SEATBACK ASSEMBLY
|
|
Remove in this Direction | - | - |
72569B 3.REMOVE SEATBACK STOPPER PLATE
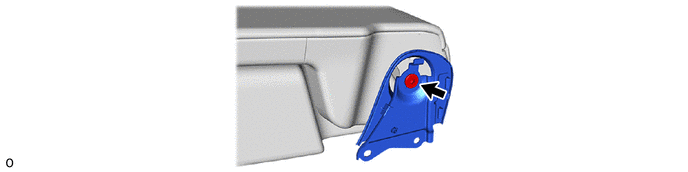
71486F 4.REMOVE REAR SEAT HINGE COVER LH
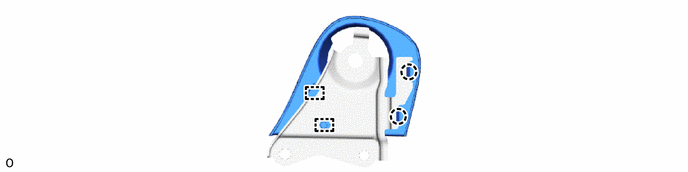
72996J 5.REMOVE REAR NO. 2 SEATBACK COVER NO.2 (w/ Child Restraint System Guide)
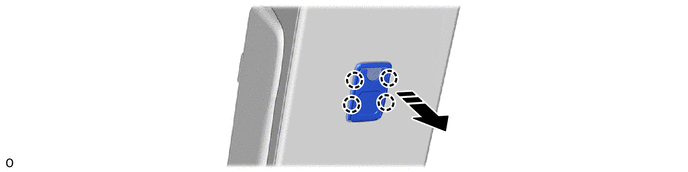
|
|
Remove in this Direction | - | - |
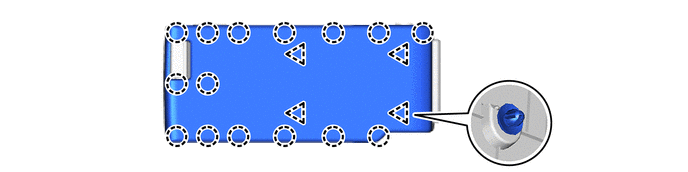
71881E 6.REMOVE REAR CENTER NO. 1 SEATBACK BOARD
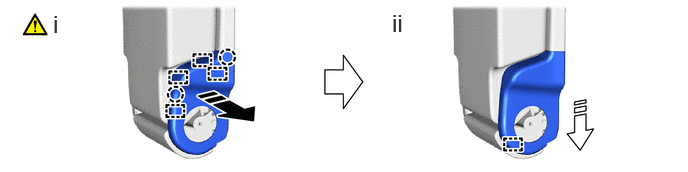
72869A 7.REMOVE CENTER ARMREST HINGE COVER LH
|
|
Remove in this Direction (1) |

|
Remove in this Direction (2) |
Pull in the removal direction (1) to detach the claw and guide as shown in the illustration.
Pull in the removal direction (2) to detach the guide and remove the center armrest hinge cover LH as shown in the illustration.
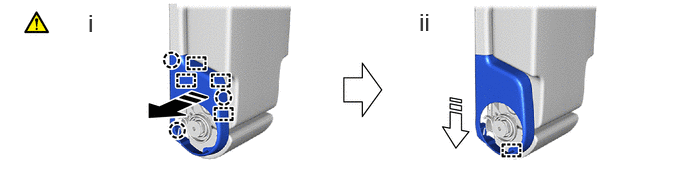
72868C 8.REMOVE CENTER ARMREST HINGE COVER RH
|
|
Remove in this Direction (1) |
|
Remove in this Direction (2) |
Pull in the removal direction (1) to detach the clip, claw and guide as shown in the illustration.
Pull in the removal direction (2) to detach the guide and remove the center armrest hinge cover RH as shown in the illustration.
72810L 9.REMOVE NO. 1 SEAT NO. 1 ARMREST ASSEMBLY
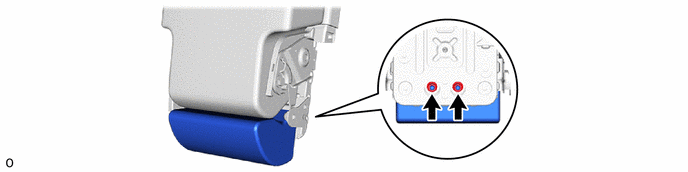
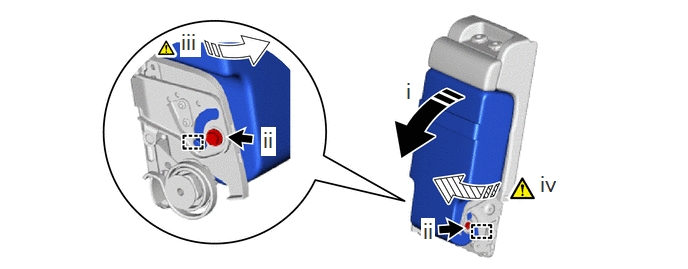
72830X 10.REMOVE REAR CENTER SEAT ARMREST ASSEMBLY
|
|
Remove in this Direction (1) |
|
Remove in this Direction (2) |

|
Remove in this Direction (3) | - | - |
Pull in the removal direction (1) to develop the rear center seat armrest assembly.
Remove the 2 bolts.
Pull in the removal direction (2) to detach the pin.
Pull in the removal direction (3) to detach the pin and remove the rear center seat armrest assembly.
66990V 11.REMOVE CUP HOLDER ASSEMBLY
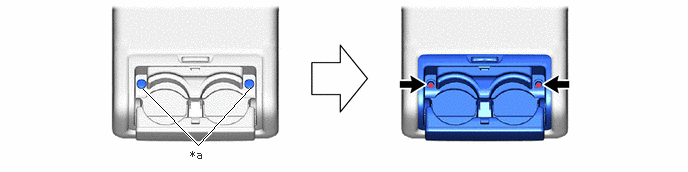
| *a | Rear Seat Center Armrest Cover | - | - |
72574B 12.REMOVE RECLINING CONTROL LEVER RH
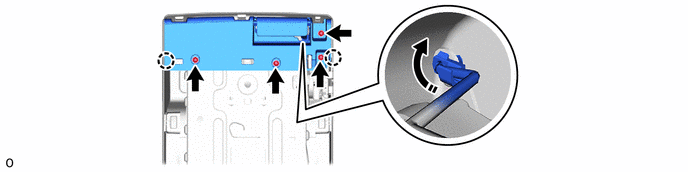
|
|
Remove in this Direction | - | - |
79873A 13.REMOVE FOLD SEATBACK WIRE
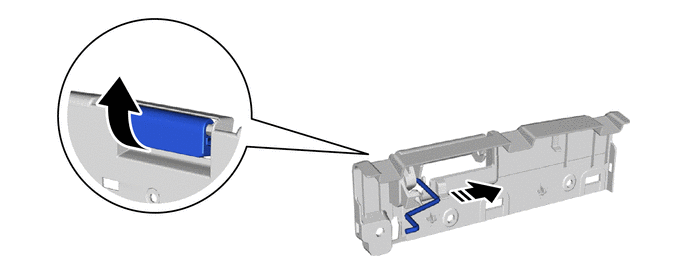
|
|
Remove in this Direction | - | - |
71930Q 14.REMOVE REAR SEAT HEADREST SUPPORT ASSEMBLY
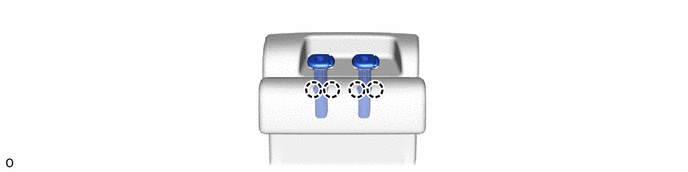
79103C 15.REMOVE CENTER NO. 1 SEATBACK FRAME SUB-ASSEMBLY
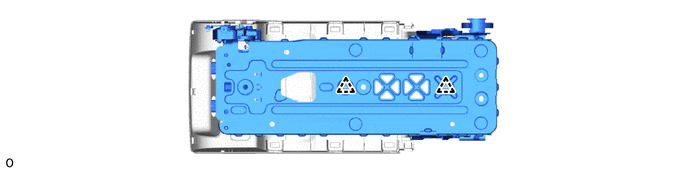
72810M 16.REMOVE NO. 1 SEAT NO. 2 ARMREST ASSEMBLY
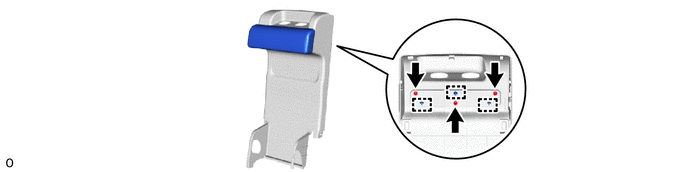
72630H 17.REMOVE NO. 1 SEATBACK LOCK ASSEMBLY
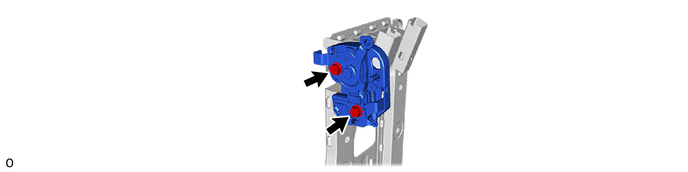
72329F 18.REMOVE REAR SEAT ADJUSTER BOLT COVER
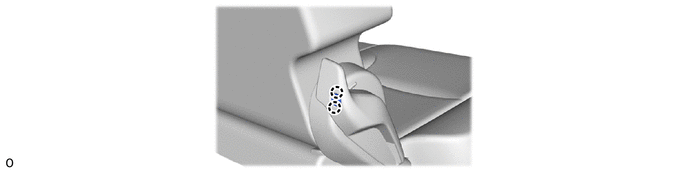
72525R 19.REMOVE RECLINING ADJUSTER RELEASE HANDLE RH
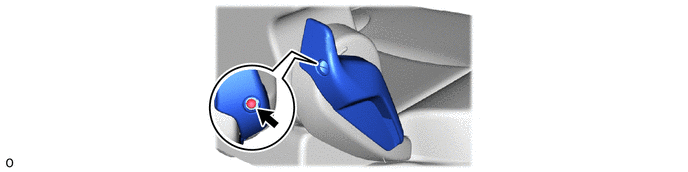
71833S 20.REMOVE REAR NO. 1 SEAT RECLINING COVER RH
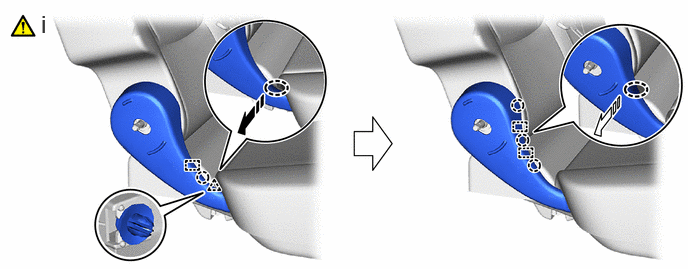

|
Place Hand Here |
|
Remove in this Direction (1) |
|
|
Remove in this Direction (2) | - | - |
Follow the procedure below to detach the claw, clip and guide.
1. Place your hand at the position shown in the illustration and pull in the removal direction (1) to detach the clip, claw and guide.
2. Place your hand at the position shown in the illustration and pull in the removal direction (2) to detach the claw and guide.
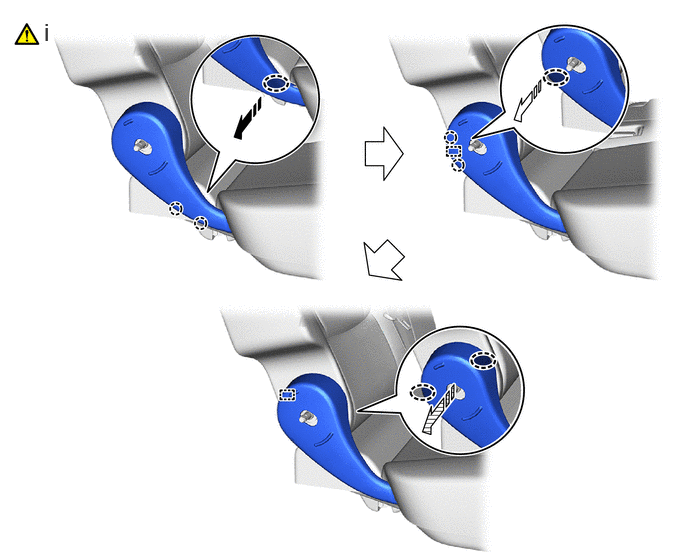
|
|
Place Hand Here |
|
Remove in this Direction (1) |
|
|
Remove in this Direction (2) |
|
Remove in this Direction (3) |
Follow the procedure below to remove the rear No. 1 seat reclining cover RH.
1. Place your hand at the position shown in the illustration and pull in the removal direction (1) to detach the claw.
2. Place your hand at the position shown in the illustration and pull in the removal direction (2) to detach the claw and guide.
3. Place your hands at the position shown in the illustration and pull in the removal direction (3) to detach the guide and remove the rear No. 1 seat reclining cover RH.
78950F 21.REMOVE NO. 1 FOLD SEAT STOPPER BAND ASSEMBLY
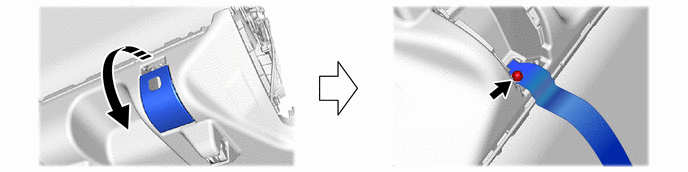
|
|
Remove in this Direction | - | - |
76971G 22.REMOVE REAR UNDER COVER

79952A 23.REMOVE NO. 1 SEAT NO. 2 CUSHION COVER
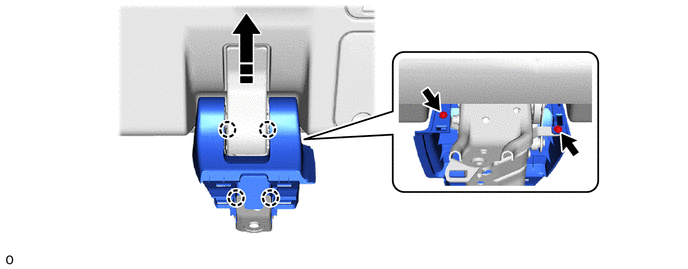
|
|
Remove in this Direction | - | - |
79951B 24.REMOVE NO. 1 SEAT NO. 1 CUSHION COVER
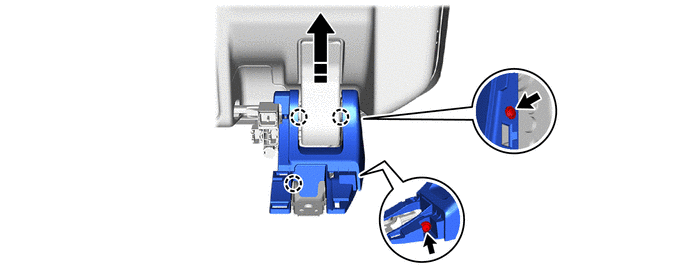
|
|
Remove in this Direction | - | - |
79967W 25.REMOVE REAR NO. 1 SEAT NO. 4 LEG SIDE COVER
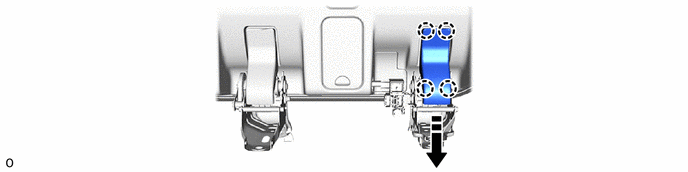
|
|
Remove in this Direction | - | - |
- HINT:
-
Use the same procedure for the other side.
82193 26.REMOVE REAR SEAT WIRE RH (w/o Wire Harness)

|
|
Remove in this Direction | - | - |
71302C 27.REMOVE REAR NO. 1 SEAT HINGE SUB-ASSEMBLY LH
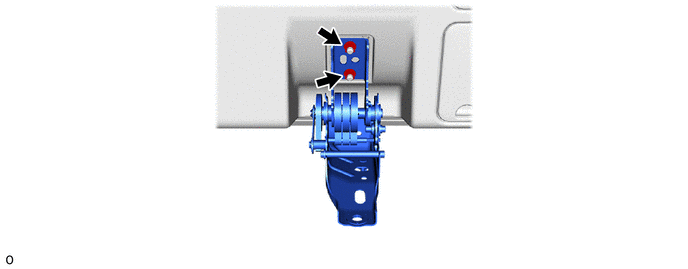
71301G 28.REMOVE REAR NO. 1 SEAT HINGE SUB-ASSEMBLY RH
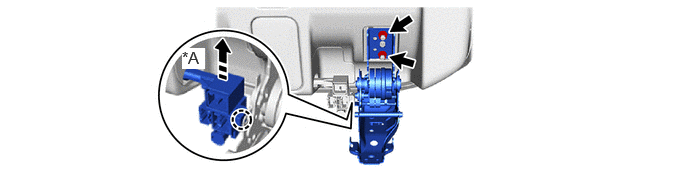
| *A | w/ Wire Harness | - | - |
|
|
Remove in this Direction | - | - |
72995F 29.REMOVE REAR SEAT CUSHION COVER RH

72927F 30.REMOVE REAR SEAT CUSHION UNDER COVER RH
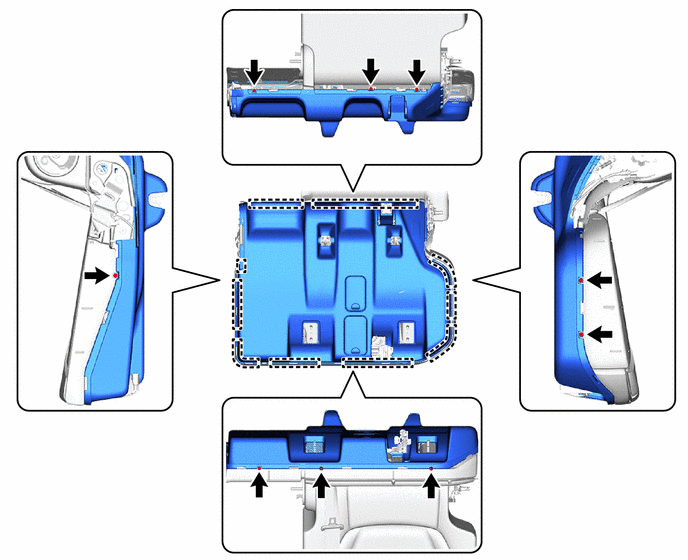
73350 31.REMOVE REAR CENTER SEAT LAP TYPE BELT ASSEMBLY
73380C 32.REMOVE REAR NO. 1 SEAT INNER BELT ASSEMBLY RH
73310D 33.DISCONNECT REAR CENTER SEAT 3 POINT TYPE BELT ASSEMBLY (SEAT ANCHOR)
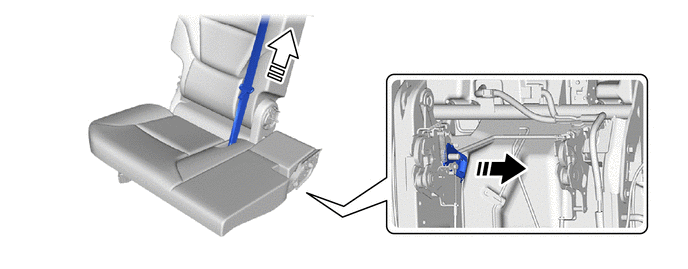
|
|
Remove in this Direction (1) |
|
Remove in this Direction (2) |
87501E 34.REMOVE SEAT HEATER CONTROL SUB-ASSEMBLY RH (w/ Seat Heater System)
72996H 35.REMOVE REAR SEATBACK COVER (w/ Child Restraint System Guide)
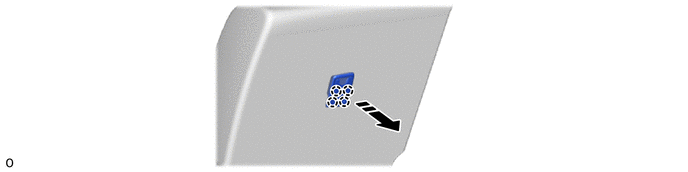
|
|
Remove in this Direction | - | - |
71701A 36.REMOVE REAR SEATBACK BOARD SUB-ASSEMBLY RH
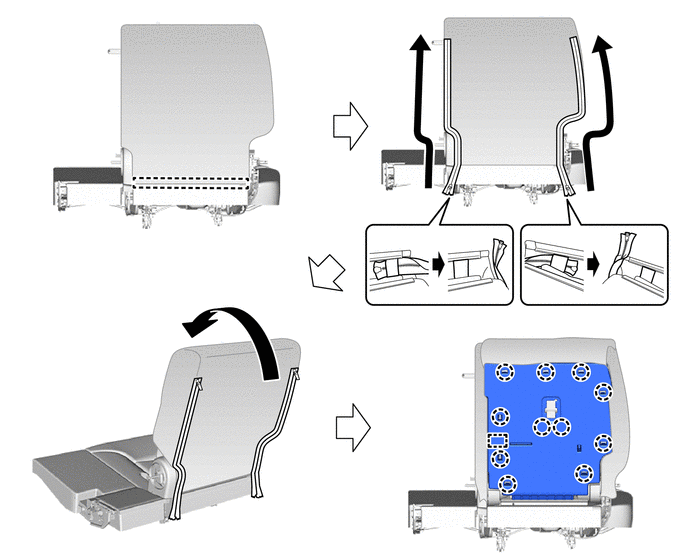
37.REMOVE SEPARATE TYPE REAR SEAT CUSHION ASSEMBLY RH
- HINT:
-
The illustrations are representative examples, and details may differ.
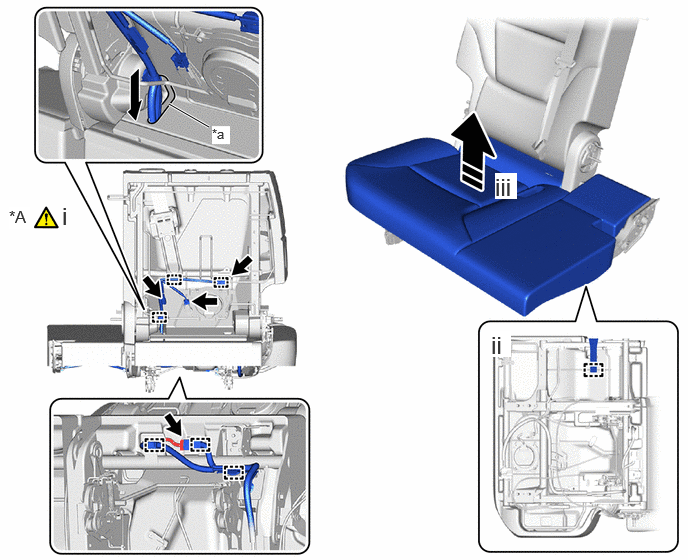
| *A | w/ Wire Harness | - | - |
| *a | Hole | - | - |
|
|
Remove in this Direction | - | - |
w/ Wire Harness:
1. Disconnect each connector and the clamp.
2. Thread the wire harness down through the holes in the No. 1 seatback pad RH and rear No. 1 seat cushion pad RH.
Detach the hook.
Remove the separate type rear seat cushion assembly RH as shown in the illustration.
71075F 38.REMOVE NO. 1 SEAT CUSHION COVER SUB-ASSEMBLY RH
|
|
|
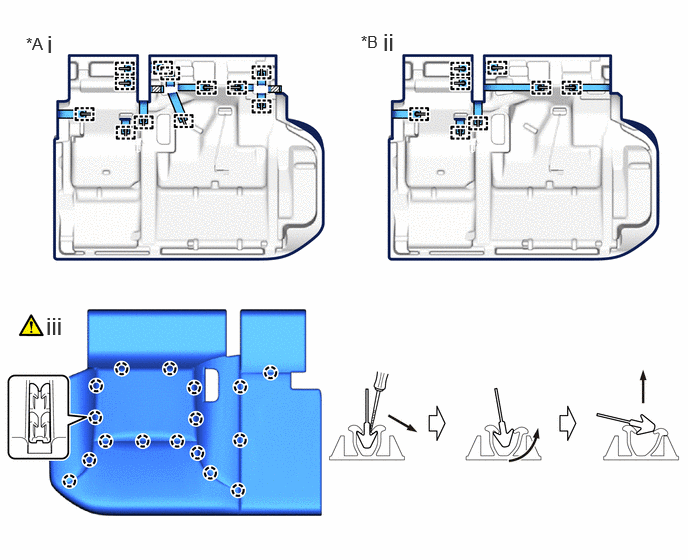
| *A | w/ Child Restraint System Guide | *B | w/o Child Restraint System Guide |

|
Fastener | - | - |
w/ Child Restraint System Guide:
1. Remove the 12 hog rings and 2 fasteners.
w/o Child Restraint System Guide:
1. Remove the 8 hog rings.
Using a thin-bladed screwdriver, detach the claw to remove the No. 1 seat cushion cover sub-assembly LH from the rear No. 1 seat cushion pad LH as shown in the illustration.
- HINT:
-
Tape the thin-bladed screwdriver tip before use.
87510Z 39.REMOVE REAR NO. 1 SEAT CUSHION HEATER ASSEMBLY RH (w/ Seat Heater System)
|
|
() |
71751D 40.REMOVE REAR SEAT COVER HANGER (w/ Rear Seat Side Airbag)
71251 41.REMOVE REAR SEATBACK FRAME RH (w/ Rear Seat Side Airbag)
|
|
() |
73930A 42.REMOVE REAR SEAT AIRBAG ASSEMBLY RH (w/ Rear Seat Side Airbag)
|
|
() |
73178A 43.REMOVE SEAT BELT ANCHOR COVER CAP
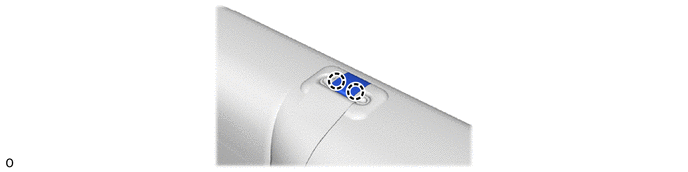
73373 44.REMOVE REAR SEAT SHOULDER BELT COVER
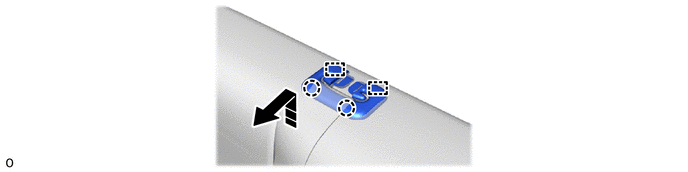
|
|
Remove in this Direction | - | - |
71930Q 45.REMOVE REAR SEAT HEADREST SUPPORT ASSEMBLY
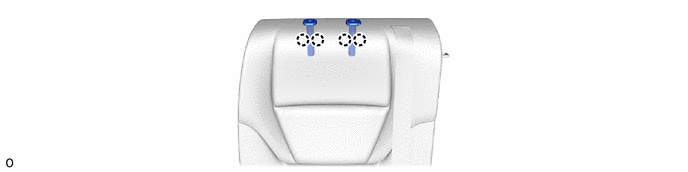
46.REMOVE SEPARATE TYPE REAR SEATBACK ASSEMBLY RH
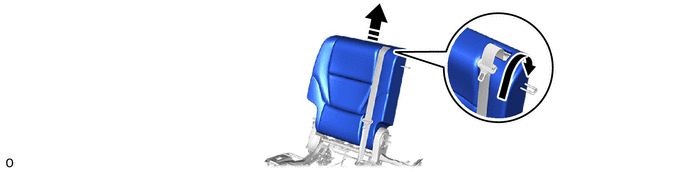
|
|
Remove in this Direction | - | - |
79013D 47.REMOVE NO. 1 SEATBACK COVER SUB-ASSEMBLY RH
|
|
|
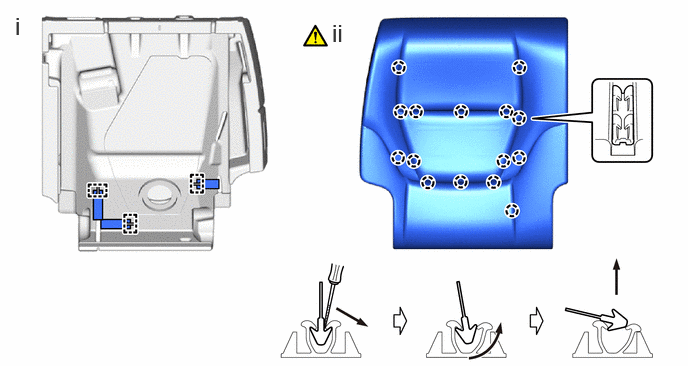
Remove the 3 hog rings.
Using a thin-bladed screwdriver, detach the claw to remove the No. 1 seatback cover sub-assembly RH from the rear No. 1 seatback pad RH as shown in the illustration.
- HINT:
-
Tape the thin-bladed screwdriver tip before use.
87530A 48.REMOVE REAR NO. 1 SEATBACK HEATER ASSEMBLY RH (w/ Seat Heater System)
|
|
() |
71293B 49.REMOVE REAR UPPER SEATBACK PLATE
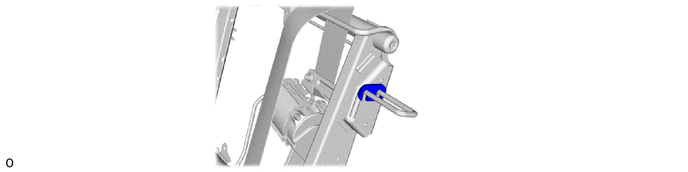
73310D 50.REMOVE REAR CENTER SEAT 3 POINT TYPE BELT ASSEMBLY
79117D 51.REMOVE NO. 1 SEAT CUSHION CARPET
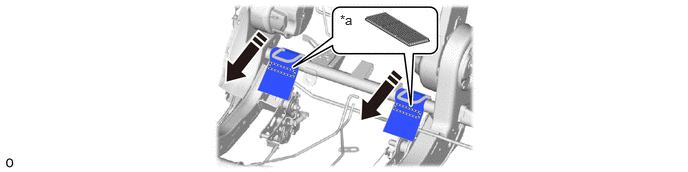
| *a | Fastener | - | - |
|
|
Remove in this Direction | - | - |
71694G 52.REMOVE REAR INNER SEAT CUSHION HINGE COVER LH
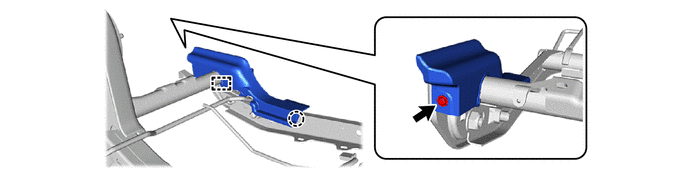
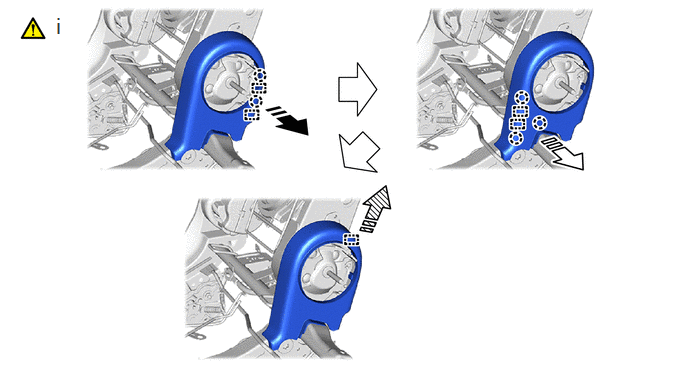
71485E 53.REMOVE REAR SEAT HINGE COVER
|
|
Remove in this Direction (1) |
|
Remove in this Direction (2) |
|
|
Remove in this Direction (3) | - | - |
Follow the procedure below to remove the rear seat hinge cover.
1. Pull in the removal direction (1) to detach the claw and guide as shown in the illustration.
2. Pull in the removal direction (2) to detach the claw and guide as shown in the illustration.
3. Pull in the removal direction (3) to detach the guide and remove the rear seat hinge cover as shown in the illustration.
71H76L 54.REMOVE SEAT RECLINING ADJUSTER INSIDE COVER RH

71H75L 55.REMOVE SEAT RECLINING ADJUSTER INSIDE COVER RH

71879H 56.REMOVE REAR INNER SEAT RECLINING COVER LH
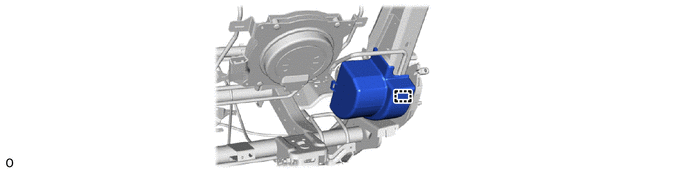
72552K 57.REMOVE SEAT RECLINING HINGE COVER RH
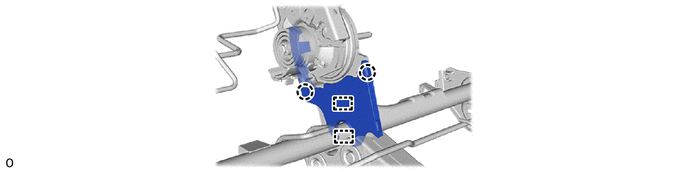
72551M 58.REMOVE SEAT RECLINING HINGE COVER RH
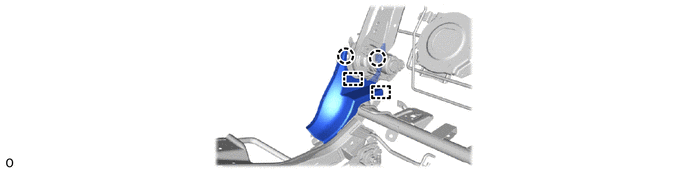
79103B 59.REMOVE NO. 1 SEATBACK FRAME SUB-ASSEMBLY RH
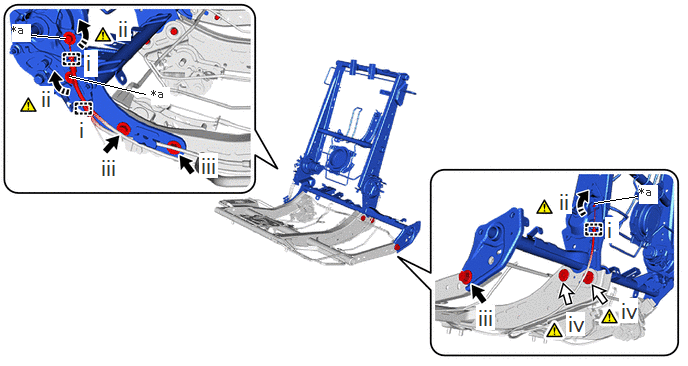
| *a | Cable End | - | - |
|
|
Remove in this Direction |

|
Bolt |

|
"TORX" Bolt | - | - |
Detach each casing cap.
Turn each cable end in the removal direction shown in the illustration and disconnect the cable end.
Remove the 3 bolts.
Using a T55H wrench torx for tamper resistant, remove the 2 "TORX" bolts and No. 1 seatback frame sub-assembly RH.
72307D 60.REMOVE NO. 1 RECLINING CONTROL LINK SUB-ASSEMBLY RH

85867D 61.REMOVE NO. 1 SEAT SEATBACK CLIMATE CONTROL BLOWER RH (w/ Climate Control Seat System)
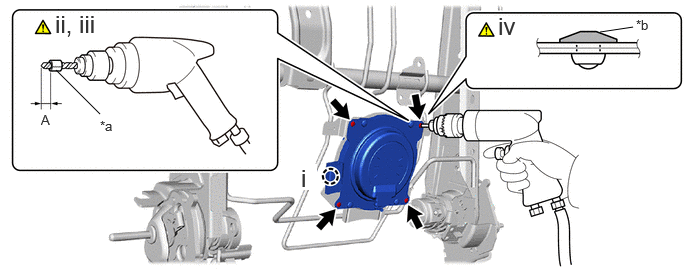
| *a | Tape | *b | Flange |
Detach the claw.
Insert a 4.0 mm (0.157 in.) drill bit into a drill.
Tape the 4.0 mm (0.157 in.) drill bit 5.0 mm (0.197 in.) from the tip as shown in the illustration.
- Standard Measurement:
-
Area Measurement Area Measurement A 5.0 mm (0.197 in.) - -
- NOTICE:
-
Tape the 4.0 mm (0.157 in.) drill bit to prevent the drill bit from going too deep.
Lightly press the drill against the rivets to drill off the rivet flanges to remove the 4 rivets and No. 1 seat seatback climate control blower RH.
- CAUTION:
-
Be careful of the drilled rivets, as they may be hot.
- NOTICE:
-
·
Pressing the drill too firmly will cause the rivet to turn and result in the rivet not being drilled through.
·Prying the rivets with the drill may damage the rivet installation holes or drill bit.
71461H 62.REMOVE REAR SEAT CUSHION SPRING
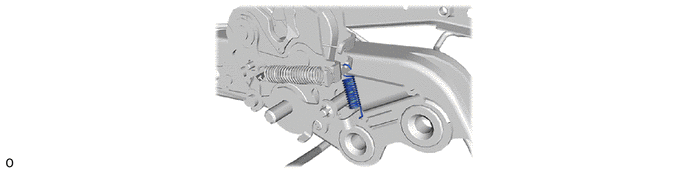
- HINT:
-
Use the same procedure for the other side.
72143D 63.REMOVE REAR SEAT LOWER TRACK BRACKET RH

72660P 64.REMOVE REAR SEAT LOCK ASSEMBLY LH

| *a | Cable End | - | - |
|
|
Remove in this Direction (1) |
|
Remove in this Direction (2) |
Detach the casing cap.
Turn the cable end in the removal direction (1) shown in the illustration and disconnect the cable end.
Slide in the removal direction (2) shown in the illustration to remove the rear seat lock assembly LH.
72650J 65.REMOVE REAR SEAT LOCK ASSEMBLY RH

| *a | Cable End | - | - |
|
|
Remove in this Direction (1) |
|
Remove in this Direction (2) |
Remove the nut.
Detach the casing cap.
Turn the cable end in the removal direction (1) shown in the illustration and disconnect the cable end.
Slide in the removal direction (2) shown in the illustration to remove the rear seat lock assembly RH.
72570E 66.REMOVE NO. 1 SEAT RECLINING ADJUSTING CABLE ASSEMBLY RH
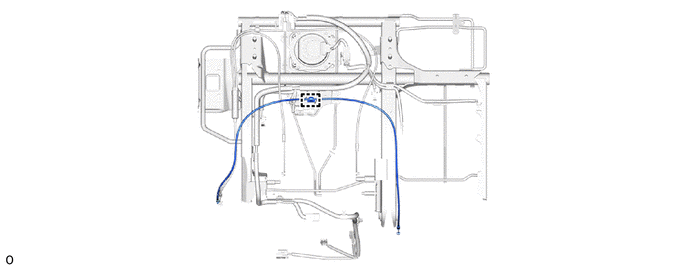
78910C 67.REMOVE SEAT FOLD SEAT LOCK CONTROL CABLE ASSEMBLY RH
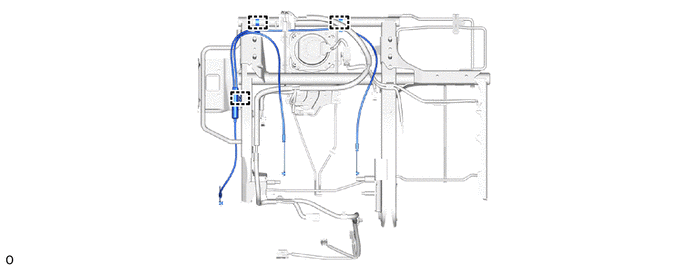
82193 68.REMOVE REAR SEAT WIRE RH (w/ Wire Harness)
- HINT:
-
The illustrations are representative examples, and details may differ.
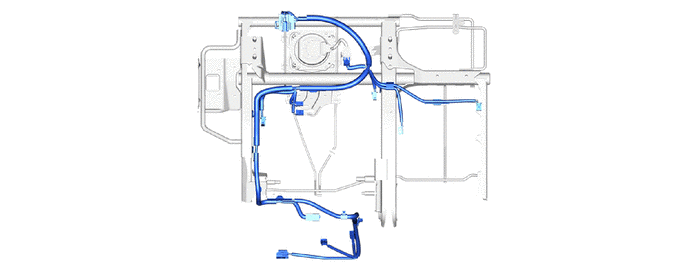
85860E 69.REMOVE NO. 1 SEAT CUSHION CLIMATE CONTROL BLOWER ASSEMBLY RH (w/ Climate Control Seat System)
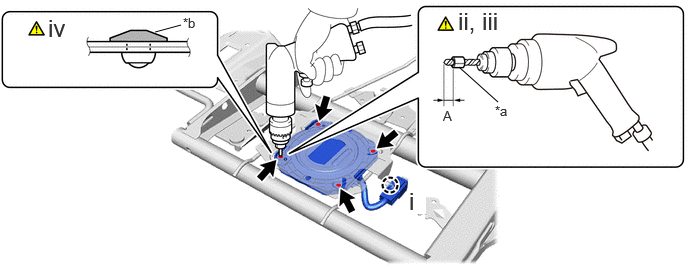
| *a | Tape | *b | Flange |
Detach the claw.
Insert a 4.0 mm (0.157 in.) drill bit into a drill.
Tape the 4.0 mm (0.157 in.) drill bit 5.0 mm (0.197 in.) from the tip as shown in the illustration.
- Standard Measurement:
-
Area Measurement Area Measurement A 5.0 mm (0.197 in.) - -
- NOTICE:
-
Tape the 4.0 mm (0.157 in.) drill bit to prevent the drill bit from going too deep.
Lightly press the drill against the rivets to drill off the rivet flanges to remove the 4 rivets and No. 1 seat cushion climate control blower assembly RH.
- CAUTION:
-
Be careful of the drilled rivets, as they may be hot.
- NOTICE:
-
·
Pressing the drill too firmly will cause the rivet to turn and result in the rivet not being drilled through.
·Prying the rivets with the drill may damage the rivet installation holes or drill bit.
70.REMOVE REAR SEAT CUSHION PAD B (w/ Climate Control Seat System)