SEAT REAR NO. 1 SEAT ASSEMBLY(for LH Side) INSTALLATION
CAUTION / NOTICE / HINT
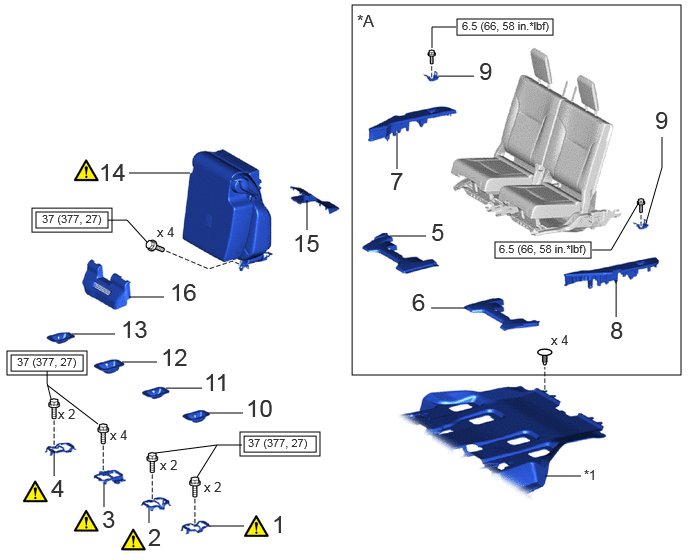
| Procedure | Part Name Code |

|

|

|
|
|---|---|---|---|---|---|
| 1 | REAR NO. 4 SEAT CUSHION LOCK STRIKER SUB-ASSEMBLY | 72607K | ( ) |
- | - |
| 2 | REAR NO. 3 SEAT CUSHION LOCK STRIKER SUB-ASSEMBLY | 72607J | () |
- | - |
| 3 | REAR NO. 2 SEAT CUSHION LOCK STRIKER SUB-ASSEMBLY | 72607H | () |
||
| 4 | REAR NO. 1 SEAT CUSHION LOCK STRIKER SUB-ASSEMBLY | 72607G | () |
- | - |
| 5 | NO. 2 SEAT NO. 1 LEG COVER RH | 79959G | - | - | - |
| 6 | NO. 2 SEAT NO. 1 LEG COVER LH | 79959J | - | - | - |
| 7 | REAR FLOOR BOARD RH | 58417B | - | - | - |
| 8 | REAR FLOOR BOARD LH | 58418H | - | - | - |
| 9 | ROPE HOOK ASSEMBLY | 66310N | - | - | - |
| 10 | REAR NO. 4 SEAT PROTECTOR | 71F95 | - | - | - |
| 11 | REAR NO. 3 SEAT PROTECTOR | 71695Y | - | - | - |
| 12 | REAR NO. 2 SEAT PROTECTOR | 71695T | - | - | - |
| 13 | REAR NO. 1 SEAT PROTECTOR | 71695S | - | - | - |
| 14 | REAR NO. 1 SEAT ASSEMBLY LH | - | () |
- | - |
| 15 | REAR NO. 4 SEAT CUSHION HINGE COVER | 71692P | - | - | - |
| 16 | REAR NO. 2 SEAT CUSHION HINGE COVER | 71691X | - | - | - |
| *A | w/ Rear No. 2 Seat | - | - |
| *1 | FRONT FLOOR CARPET ASSEMBLY | - | - |

|
Tightening torque for "Major areas involving basic vehicle performance such as moving/turning/stopping": N*m (kgf*cm, ft.*lbf) |

|
N*m (kgf*cm, ft.*lbf) : Specified torque |
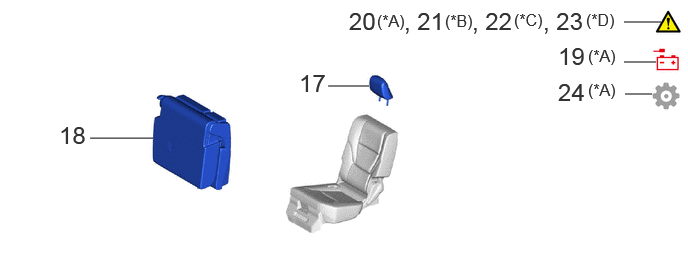
| Procedure | Part Name Code |
|
|
|
|
|---|---|---|---|---|---|
| 17 | NO. 1 SEAT HEADREST ASSEMBLY LH | 71940G | - | - | - |
| 18 | REAR NO. 1 SEAT ASSEMBLY RH | - | - | - | - |
| 19 | CONNECT CABLE TO NEGATIVE BATTERY TERMINAL | - | () |
- | - |
| 20 | CHECK SRS WARNING LIGHT | - | () |
- | - |
| 21 | INSPECT SEAT BELT WARNING SYSTEM | - | () |
- | - |
| 22 | INSPECT SEAT HEATER SYSTEM | - | () |
- | - |
| 23 | INSPECT CLIMATE CONTROL SEAT SYSTEM | - | () |
- | - |
| 24 | INITIALIZATION AFTER RECONNECTING BATTERY TERMINAL | - | - | - | () |
| *A | w/ Rear Seat Side Airbag | *B | w/ Seat Belt Warning System |
| *C | w/ Seat Heater System | *D | w/ Climate Control Seat System |
- CAUTION:
-
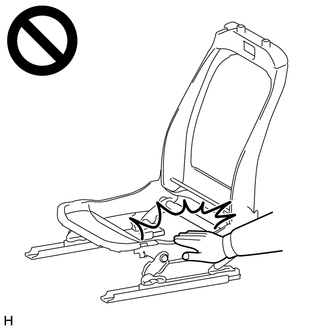
-
·
Wear protective gloves. Sharp areas on the parts may injure your hands.
·There is risk of injury.
PROCEDURE

 72607K 1.INSTALL REAR NO. 4 SEAT CUSHION LOCK STRIKER SUB-ASSEMBLY
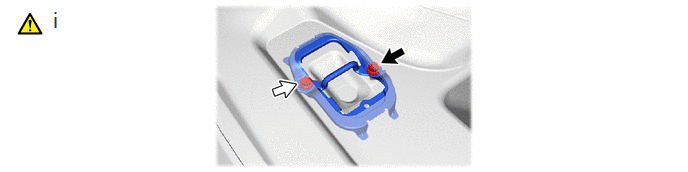

|
Bolt A |

|
Bolt B |
Following procedure to install the rear No. 4 seat cushion lock striker sub-assembly.
1. Temporarily install the rear No. 4 seat cushion lock striker sub-assembly with the bolt A.
2. Tighten the bolt B.
- Torque:
- 37 N*m (377 kgf*cm, 27 ft.*lbf)
3. Tighten the bolt A.
- Torque:
- 37 N*m (377 kgf*cm, 27 ft.*lbf)
72607J 2.INSTALL REAR NO. 3 SEAT CUSHION LOCK STRIKER SUB-ASSEMBLY
|
|
Bolt A |
|
Bolt B |
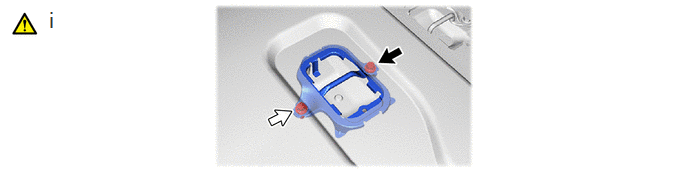
Following procedure to install the rear No. 3 seat cushion lock striker sub-assembly.
1. Temporarily install the rear No. 3 seat cushion lock striker sub-assembly with the bolt A.
2. Tighten the bolt B.
- Torque:
- 37 N*m (377 kgf*cm, 27 ft.*lbf)
3. Tighten the bolt A.
- Torque:
- 37 N*m (377 kgf*cm, 27 ft.*lbf)
72607H 3.INSTALL REAR NO. 2 SEAT CUSHION LOCK STRIKER SUB-ASSEMBLY
|
|
Bolt A |
|
Bolt B |

|
Bolt C | - |
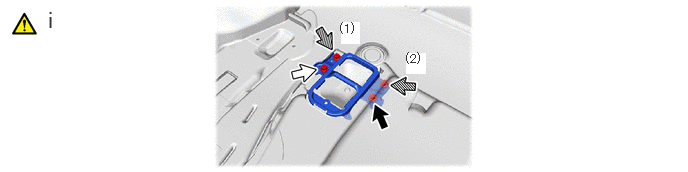
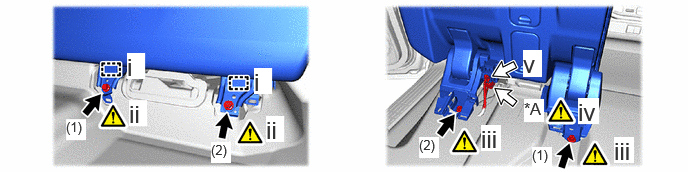
Following procedure to install the rear No. 2 seat cushion lock striker sub-assembly.
1. Temporarily install the rear No. 2 seat cushion lock striker sub-assembly with the bolt A.
2. Tighten the bolt B.
- Torque:
- 37 N*m (377 kgf*cm, 27 ft.*lbf)
3. Tighten the bolt A.
- Torque:
- 37 N*m (377 kgf*cm, 27 ft.*lbf)
4. Tighten the bolts C in the order shown in the illustration.
- Torque:
- 37 N*m (377 kgf*cm, 27 ft.*lbf)
72607G 4.INSTALL REAR NO. 1 SEAT CUSHION LOCK STRIKER SUB-ASSEMBLY
| *A | w/ Rear No. 2 Seat | - | - |

|
Cover in this Direction |
|
Bolt A |
|
|
Bolt B |
|
Clip |
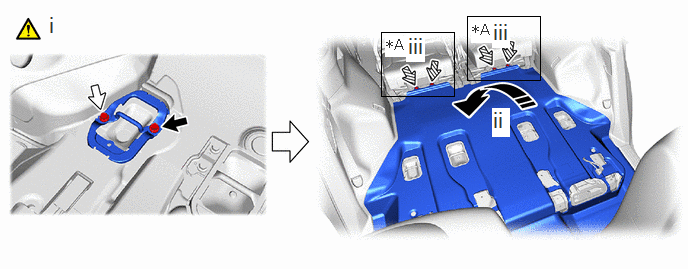
Following procedure to install the rear No. 1 seat cushion lock striker sub-assembly.
1. Temporarily install the rear No. 1 seat cushion lock striker sub-assembly with the bolt A.
2. Tighten the bolt B.
- Torque:
- 37 N*m (377 kgf*cm, 27 ft.*lbf)
3. Tighten the bolt A.
- Torque:
- 37 N*m (377 kgf*cm, 27 ft.*lbf)
Cover the front floor carpet assembly.
w/ Rear No. 2 Seat:
1. Install the 4 clips.
79959G 5.INSTALL NO. 2 SEAT NO. 1 LEG COVER RH (w/ Rear No. 2 Seat)
79959J 6.INSTALL NO. 2 SEAT NO. 1 LEG COVER LH (w/ Rear No. 2 Seat)
58417B 7.INSTALL REAR FLOOR BOARD RH (w/ Rear No. 2 Seat)
58418H 8.INSTALL REAR FLOOR BOARD LH (w/ Rear No. 2 Seat)
66310N 9.INSTALL ROPE HOOK ASSEMBLY (w/ Rear No. 2 Seat)
- Torque:
- 6.5 N*m (66 kgf*cm, 58 in.*lbf)
71F95 10.INSTALL REAR NO. 4 SEAT PROTECTOR
71695Y 11.INSTALL REAR NO. 3 SEAT PROTECTOR
71695T 12.INSTALL REAR NO. 2 SEAT PROTECTOR
71695S 13.INSTALL REAR NO. 1 SEAT PROTECTOR
14.INSTALL REAR NO. 1 SEAT ASSEMBLY LH
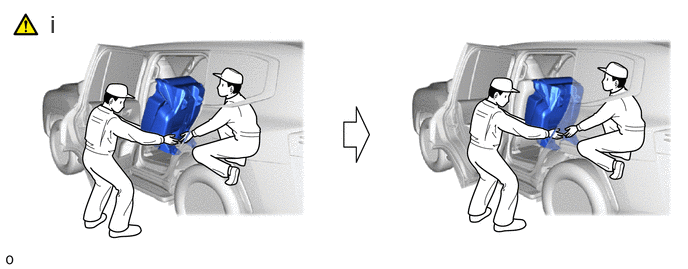
Place the rear No. 1 seat assembly LH in the vehicle.
- NOTICE:
-
·
2 or more people are required when carrying the rear No. 1 seat assembly LH into the vehicle.
·Be careful not to damage the vehicle body.
| *A | w/ Rear Seat Side Airbag | - | - |
|
|
Bolt |
|
Connector |
Insert the 2 location pins of the rear No. 1 seat assembly LH through the 2 body holes and place the rear No. 1 seat assembly LH.
Tighten the 2 bolts in the order shown in the illustration.
- Torque:
- 37 N*m (377 kgf*cm, 27 ft.*lbf)
Tighten the 2 bolts in the order shown in the illustration.
- Torque:
- 37 N*m (377 kgf*cm, 27 ft.*lbf)
w/ Rear Seat Side Airbag:
1. Connect the rear seat airbag assembly LH connector.
- HINT:
-
Refer to How to Connect or Disconnect Airbag Connector.Click hereVehicle Interior>SUPPLEMENTAL RESTRAINT SYSTEMS>AIRBAG SYSTEM>HOW TO CONNECT OR DISCONNECT AIRBAG CONNECTOR
Connect the connector.
71692P 15.INSTALL REAR NO. 4 SEAT CUSHION HINGE COVER
71691X 16.INSTALL REAR NO. 2 SEAT CUSHION HINGE COVER
71940G 17.INSTALL NO. 1 SEAT HEADREST ASSEMBLY LH
18.INSTALL REAR NO. 1 SEAT ASSEMBLY RH
for 60/40 Split Seat Type:
Click hereVehicle Interior>SEAT>REAR NO. 1 SEAT ASSEMBLY (for 60/40 Split Seat Type RH Side)>INSTALLATION
for 40/20/40 Split Seat Type:
Click hereVehicle Interior>SEAT>REAR NO. 1 SEAT ASSEMBLY (for 40/20/40 Split Seat Type RH Side)>INSTALLATION
19.CONNECT CABLE TO NEGATIVE BATTERY TERMINAL
for 1GR-FE:
for F33A-FTV:
for V35A-FTS:
20.CHECK SRS WARNING LIGHT (w/ Rear Seat Side Airbag)
|
|
() |
21.INSPECT SEAT BELT WARNING SYSTEM (w/ Seat Belt Warning System)
|
|
() |
22.INSPECT SEAT HEATER SYSTEM (w/ Seat Heater System)
|
|
() |
23.INSPECT CLIMATE CONTROL SEAT SYSTEM (w/ Climate Control Seat System)
|
|
() |
24. INITIALIZATION AFTER RECONNECTING BATTERY TERMINAL (w/ Rear Seat Side Airbag)
Click hereGeneral>SETUP>WHEN DISCONNECTING OR RECONNECTING BATTERY TERMINAL>WORK PROCEDURE
- HINT:
-
When disconnecting and reconnecting the battery, there is an automatic learning function that completes learning when the respective system is used.
-
Click hereGeneral>SETUP>WHEN DISCONNECTING OR RECONNECTING BATTERY TERMINAL>AUTOMATIC LEARNING CHART