SEAT CLIMATE CONTROL SEAT SYSTEM Climate Control System does not Operate on Rear Right Side
DESCRIPTION
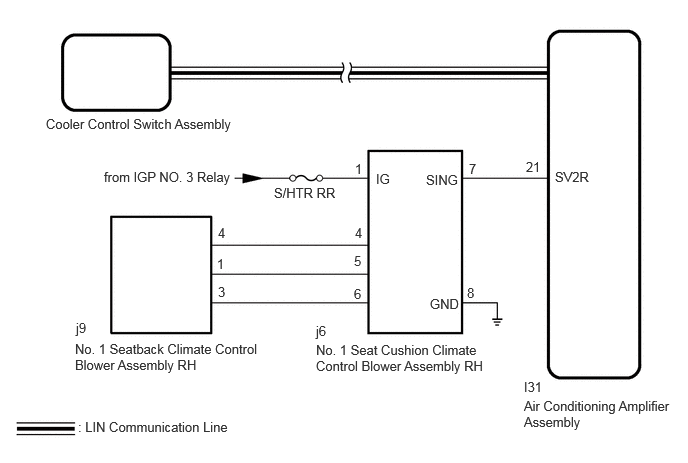
The air conditioning amplifier assembly receives ventilation volume switch signals when the ignition switch is ON, and then transmits airflow amount signals to each seat climate blower.
WIRING DIAGRAM
CAUTION / NOTICE / HINT
- NOTICE:
-
·
If the battery voltage is low, the climate control seat system may not operate. When "High Power Consumption Partial Limit on AC/Heater Operation" is displayed on the multi-information display in the combination meter assembly, inspect the battery, referring to On-vehicle Inspection for the charging system.
for 1GR-FE: Click herePower Source / Network>1GR-FE (BATTERY / CHARGING)>CHARGING SYSTEM>ON-VEHICLE INSPECTION
for V35A-FTS: Click herePower Source / Network>V35A-FTS (BATTERY / CHARGING)>CHARGING SYSTEM>ON-VEHICLE INSPECTION
for F33A-FTV: Click herePower Source / Network>F33A-FTV (BATTERY / CHARGING)>CHARGING SYSTEM>ON-VEHICLE INSPECTION
·Inspect the fuses for circuits related to this system before performing the following procedure.
PROCEDURE
Perform the Active Test according to the display on the GTS.
- Body Electrical > Air Conditioner > Active Test
-
Tester Display Measurement Item Control Range Diagnostic Note Rear Right Seat Blower Rear seat RH side seat blower operation OFF/ON -
- Body Electrical > Air Conditioner > Active Test
-
Tester Display Rear Right Seat Blower - 50004 450 23
- Result:
-
Result Proceed to Both No. 1 seat cushion seat blower and No. 1 seatback seat blower operate A Only No. 1 seat cushion seat blower does not operate B Only No. 1 seatback seat blower does not operate C Both No. 1 seat cushion seat blower and No. 1 seatback seat blower do not operate D
A
B
Click hereVehicle Interior>SEAT>REAR NO. 1 SEAT ASSEMBLY (for 40/20/40 Split Seat Type RH Side)>DISASSEMBLY
C
D
Replace the cooler control switch assembly with a new or known good one.
Click hereVehicle Interior>SEAT>SEAT HEATER SWITCH (for Rear Seat)>REMOVAL
- Result:
-
Proceed to NEXT
NEXT
Check the climate control seat operation.
Click hereVehicle Interior>SEAT>CLIMATE CONTROL SEAT SYSTEM>OPERATION CHECK
- OK:
-
The climate control seat operates normally.
- Result:
-
Proceed to OK NG
OK
NG
Click hereVehicle Interior>HEATING / AIR CONDITIONING>AIR CONDITIONING PANEL (for Rear Side)>REMOVAL
Disconnect the j9 No. 1 seatback climate control blower assembly RH connector.
Disconnect the j6 No. 1 seat cushion climate control blower assembly RH connector.
Measure the resistance according to the value(s) in the table below.
- Standard Resistance:
-
Tester Connection Condition Specified Condition Click Location & Routing(j9,j6)Location & Routingewd_type=routing;type=c,c;code=j9,j6
Click Connector(j9)Seat>Rear Seat Wire RH>RH Seat No. 1 Seat Back Climate Control Blower (Rear Seat RH)ewd_type=component;type=c;code=j9;pinno=4,1,3
Click Connector(j6)Seat>Rear Seat Wire RH>RH Seat No. 1 Seat Cushion Climate Control Blower Assembly (Rear Seat RH)ewd_type=component;type=c;code=j6;pinno=4,5,6
j9-4 (GND) - j6-4 (BFB-) Always Below 1 Ω j9-4 (GND) or j6-4 (BFB-) - Other terminals and body ground Always 10 kΩ or higher j9-1 (IG) - j6-5 (CTB) Always Below 1 Ω j9-1 (IG) or j6-5 (CTB) - Other terminals and body ground Always 10 kΩ or higher j9-3 (BFB+) - j6-6 (BBS) Always Below 1 Ω j9-3 (BFB+) or j6-6 (BBS) - Other terminals and body ground Always 10 kΩ or higher
- Result:
-
Proceed to OK NG
OK
NG
Replace the No. 1 seatback climate control blower assembly RH with a new or known good one.
Click hereVehicle Interior>SEAT>REAR NO. 1 SEAT ASSEMBLY (for 40/20/40 Split Seat Type RH Side)>DISASSEMBLY
- Result:
-
Proceed to NEXT
NEXT
Check the climate control seat operation.
Click hereVehicle Interior>SEAT>CLIMATE CONTROL SEAT SYSTEM>OPERATION CHECK
- OK:
-
The climate control seat operates normally.
- Result:
-
Proceed to OK NG
OK
NG
Click hereVehicle Interior>SEAT>REAR NO. 1 SEAT ASSEMBLY (for 40/20/40 Split Seat Type RH Side)>DISASSEMBLY
Disconnect the j6 No. 1 seat cushion climate control blower assembly RH connector.
Measure the voltage according to the value(s) in the table below.
- Standard Voltage:
-
Tester Connection Switch Condition Specified Condition Click Location & Routing(j6)Location & Routingewd_type=routing;type=c;code=j6
Click Connector(j6)Seat>Rear Seat Wire RH>RH Seat No. 1 Seat Cushion Climate Control Blower Assembly (Rear Seat RH)ewd_type=component;type=c;code=j6;pinno=1
j6-1 (IG) - Body ground Ignition switch ON 11 to 14 V j6-1 (IG) - Body ground Ignition switch off Below 1 V
Measure the resistance according to the value(s) in the table below.
- Standard Resistance:
-
Tester Connection Condition Specified Condition Click Location & Routing(j6)Location & Routingewd_type=routing;type=c;code=j6
Click Connector(j6)Seat>Rear Seat Wire RH>RH Seat No. 1 Seat Cushion Climate Control Blower Assembly (Rear Seat RH)ewd_type=component;type=c;code=j6;pinno=8
j6-8 (GND) - Body ground Always Below 1 Ω
- Result:
-
Proceed to OK NG
OK
NG
Disconnect the j6 No. 1 seat cushion climate control blower assembly RH connector.
Disconnect the I31 air conditioning amplifier assembly connector.
Measure the resistance according to the value(s) in the table below.
- Standard Resistance:
-
Tester Connection Condition Specified Condition Click Location & Routing(j6,I31)Location & Routingewd_type=routing;type=c,c;code=j6,I31
Click Connector(j6)Seat>Rear Seat Wire RH>RH Seat No. 1 Seat Cushion Climate Control Blower Assembly (Rear Seat RH)ewd_type=component;type=c;code=j6;pinno=7
j6-7 (SIGN) - I31-21 (SV2R) Always Below 1 Ω j6-7 (SIGN) or I31-21 (SV2R) - Other terminals and body ground Always 10 kΩ or higher
- Result:
-
Proceed to OK NG
OK
NG
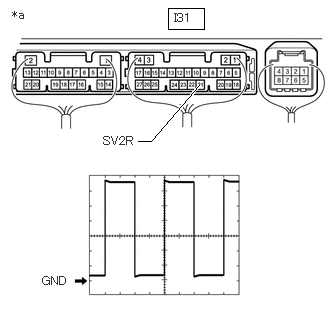
| *a | Component with harness connected (Air Conditioning Amplifier Assembly) |
Check for pulses according to the value(s) in the table below.
| Item | Content |
|---|---|
| Tester Connection | I31-21 (SV2R) - Body ground |
| Tool Setting | 1 V/DIV., 1 ms/DIV. |
| Vehicle Condition |
·
Ignition switch ON
·
Rear right side refreshing seat switch (seat blower switch) on |
- OK:
-
Waveform is similar to that shown in the illustration.
- Result:
-
Proceed to OK NG
OK
Click hereVehicle Interior>SEAT>REAR NO. 1 SEAT ASSEMBLY (for 40/20/40 Split Seat Type RH Side)>DISASSEMBLY
NG