F33A-FTV EMISSION CONTROL UREA TANK INSTALLATION
CAUTION / NOTICE / HINT
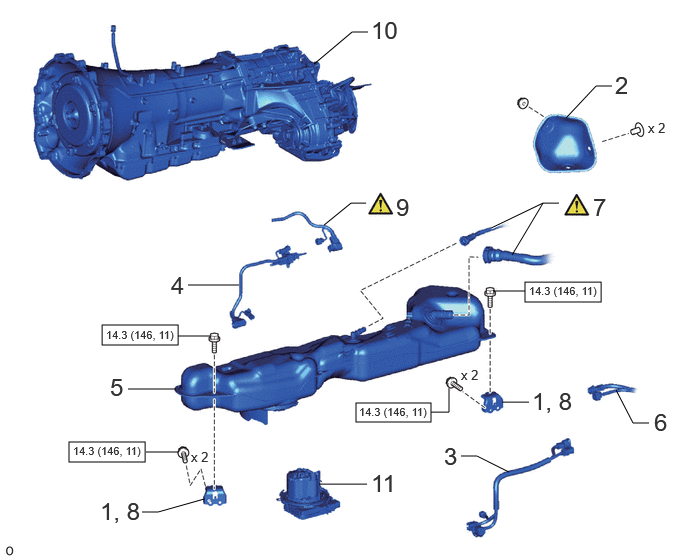
| Procedure | Part Name Code |

|

|

|
|
|---|---|---|---|---|---|
| 1 | INSTALL NO. 2 UREA TANK BRACKET | 77861A | - | - | - |
| 2 | NO. 2 UREA TANK PROTECTOR | 77852 | - | - | - |
| 3 | UREA TANK HARNESS | 77885 | - | - | - |
| 4 | UREA TUBE WITH HEATER ASSEMBLY | 77840A | - | - | - |
| 5 | UREA TANK SUB-ASSEMBLY | 77801A | - | - | - |
| 6 | FLOOR WIRE | 82161 | - | - | - |
| 7 | UREA TANK FILLER PIPE ASSEMBLY | 77910 | ( ) |
- | - |
| 8 | INSTALL NO. 2 UREA TANK BRACKET | 77862A | - | - | - |
| 9 | NO. 2 UREA TUBE WITH HEATER ASSEMBLY | 77840D | () |
- | - |
| 10 | AUTOMATIC TRANSMISSION ASSEMBLY | 35000 | - | - | - |
| 11 | UREA PUMP | 77871A | - | - | - |

|
N*m (kgf*cm, ft.*lbf): Specified torque | - | - |
PROCEDURE

 77862A 1.INSTALL NO. 2 UREA TANK BRACKET
- Torque:
- 14.3 N*m (146 kgf*cm, 11 ft.*lbf)
77852 2.INSTALL NO. 2 UREA TANK PROTECTOR
77885 3.INSTALL UREA TANK HARNESS
77840A 4.INSTALL UREA TUBE WITH HEATER ASSEMBLY
77801A 5.INSTALL UREA TANK SUB-ASSEMBLY
82161 6.CONNECT FLOOR WIRE
77910 7.CONNECT UREA TANK FILLER PIPE ASSEMBLY
|
|
|
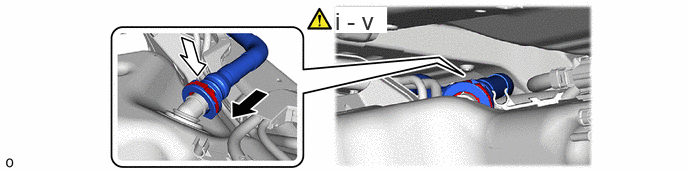
Wash the connection area of the urea tube connector with water to remove all solidified urea solution (white solids).
Wipe off the connection area of the urea tank sub-assembly with water to remove all solidified urea solution (white solids).
Align the axis of the urea tube connector with the axis of the urea tank sub-assembly. Push the urea tube connector into the urea tank sub-assembly until the urea tube connector makes a" click" sound.
Push down the retainer.
After connecting the urea tank sub-assembly and the urea tube connector, check that the urea tank sub-assembly and urea tube connector are securely connected by trying to pull them apart.
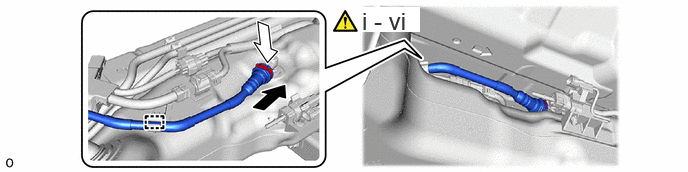
Wash the connection area of the urea tube connector with water to remove all solidified urea solution (white solids).
Wipe off the connection area of the urea tank sub-assembly with water to remove all solidified urea solution (white solids).
Align the axis of the urea tube connector with the axis of the urea tank sub-assembly. Push the urea tube connector into the urea tank sub-assembly until the urea tube connector makes a" click" sound.
Push down the retainer.
After connecting the urea tank sub-assembly and the urea tube connector, check that the urea tank sub-assembly and urea tube connector are securely connected by trying to pull them apart.
Attach the clamp and urea tank filler pipe to the urea tank sub-assembly.
77862A 8.INSTALL NO. 2 UREA TANK BRACKET
- Torque:
- 14.3 N*m (146 kgf*cm, 11 ft.*lbf)
77840D 9.CONNECT NO. 2 UREA TUBE WITH HEATER ASSEMBLY
|
|
|
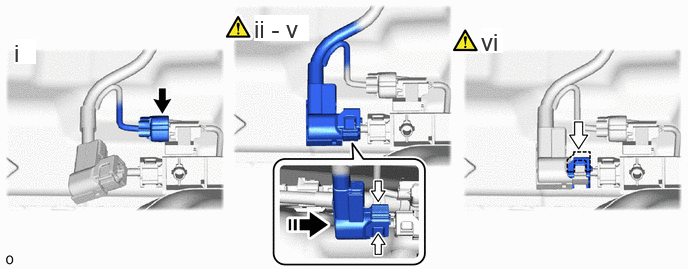
Connect the connector to the urea tank sub-assembly.
Wash the connection area of the urea tube connector with water to remove all solidified urea solution (white solids).
Wipe off the connection area of the urea pump with water to remove all solidified urea solution (white solids).
Align the axis of the urea tube connector with the axis of the urea pump. Push the urea tube connector into the urea pump until the urea tube connector makes a "click" sound.
After connecting the urea pump and the urea tube connector, check that the urea pump and urea tube connector are securely connected by trying to pull them apart.
Attach the lock claws to the urea tube connector by pushing down on the cover.
35000 10.INSTALL AUTOMATIC TRANSMISSION ASSEMBLY
77871A 11.INSTALL UREA PUMP