MIRROR (EXT) OUTER REAR VIEW MIRROR REASSEMBLY
CAUTION / NOTICE / HINT
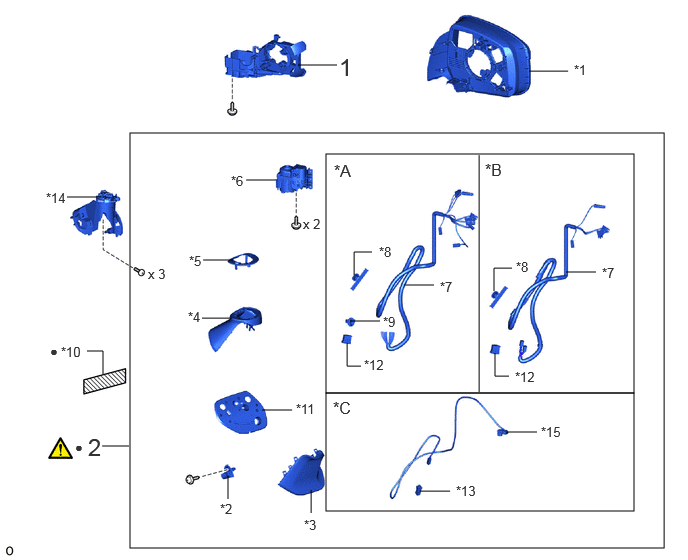
| Procedure | Part Name Code |

|

|

|
|
|---|---|---|---|---|---|
| 1 | SUPPORT | - | - | - | - |
| 2 | OUTER MIRROR RETRACTOR LH | 87966 | ( ) |
- | - |
| *A | w/ Reverse Shift-linked Mirror | *B | w/o Reverse Shift-linked Mirror |
| *C | w/ Panoramic View Monitor System | - | - |
| *1 | BODY | *2 | HOOK |
| *3 | LOWER COVER BASE | *4 | UPPER COVER BASE |
| *5 | CUT LINE SEAL | *6 | FRAME SUB-ASSEMBLY |
| *7 | HARNESS SUB-ASSEMBLY | *8 | WIRE HARNESS CLAMP |
| *9 | HARNESS CLAMP | *10 | VINYL TAPE |
| *11 | GASKET | *12 | CONNECTOR HOUSING |
| *13 | ADAPTER | *14 | BASE SUB-ASSEMBLY |
| *15 | TELEVISION CAMERA WIRE | - | - |
| ● | Non-reusable part | - | - |
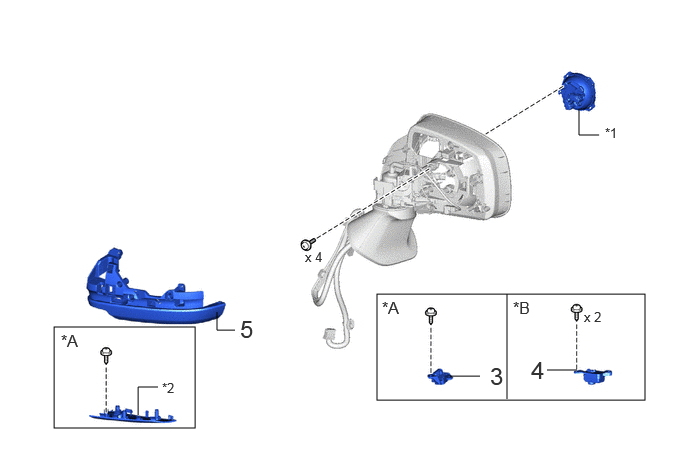
| Procedure | Part Name Code |
|
|
|
|
|---|---|---|---|---|---|
| 3 | OUTER MIRROR LIGHT ASSEMBLY LH | - | - | - | - |
| 4 | SIDE TELEVISION CAMERA ASSEMBLY LH | 86790F | - | - | - |
| 5 | COVER BODY | - | - | - | - |
| *A | w/ Foot Light | *B | w/ Panoramic View Monitor System |
| *1 | ACTUATOR SUB-ASSEMBLY | *2 | LOWER COVER BODY |
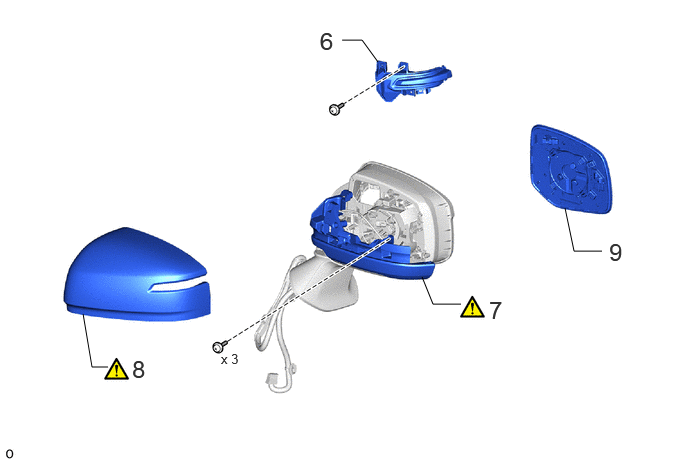
| Procedure | Part Name Code |
|
|
|
|
|---|---|---|---|---|---|
| 6 | SIDE TURN SIGNAL LIGHT ASSEMBLY LH | 81740 | - | - | - |
| 7 | COVER BODY | - | () |
- | - |
| 8 | OUTER MIRROR COVER LH | 87945 | () |
- | - |
| 9 | OUTER MIRROR LH | 87961 | - | - | - |
CAUTION / NOTICE / HINT
- HINT:
-
·
Use the same procedure for the RH and LH sides.
·The procedure listed below is for the LH side.
PROCEDURE

 1.INSTALL SUPPORT
87966 2.INSTALL OUTER MIRROR RETRACTOR LH

|
Install in this Direction | - | - |
Wind vinyl tape around the harness sub-assembly to secure it as shown in the illustration.
Insert the harness sub-assembly through the frame sub-assembly as shown in the illustration.
Attach the guide to install the frame sub-assembly as shown in the illustration.
Install the 2 screws.
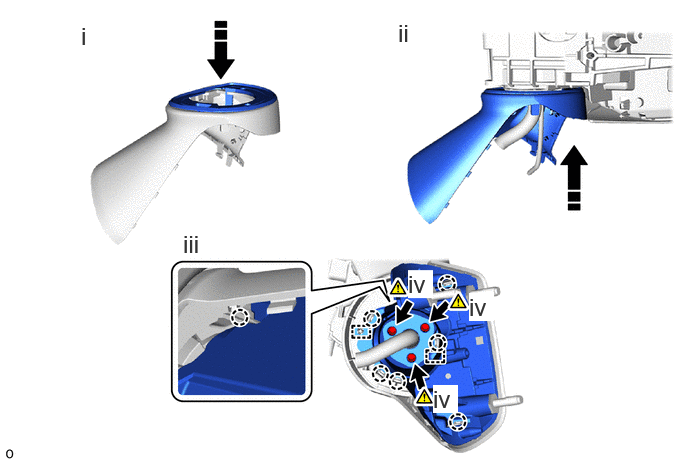
|
|
Install in this Direction | - | - |
Install the cut line seal.
Install the upper cover base.
Attach the guide and claw.
Using a T25 "TORX" socket wrench, install the base sub-assembly with 3 "TORX" screws.
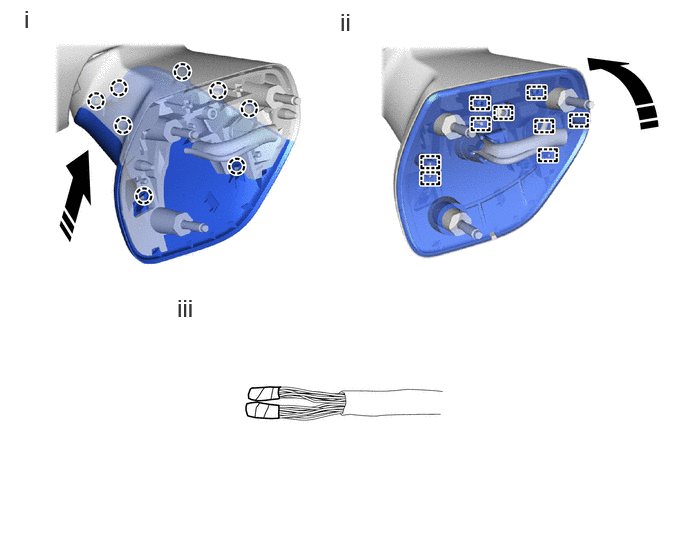
|
|
Install in this Direction | - | - |
Attach the claw to install the lower cover base as shown in the illustration.
Put back the gasket and attach the guide as shown in the illustration.
Remove the vinyl tape.
w/o Reverse Shift-linked Mirror:
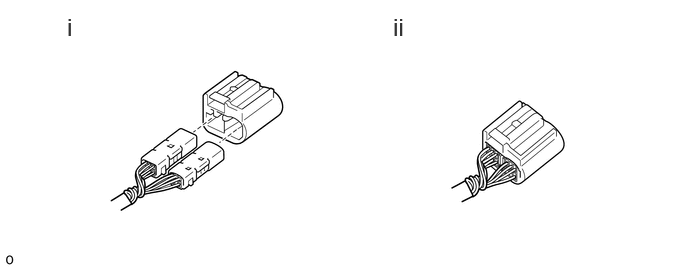
Route the longer part of the wire harness sub-assembly as shown in the illustration.
Connect each connector to the connector housing.
w/ Reverse Shift-linked Mirror:
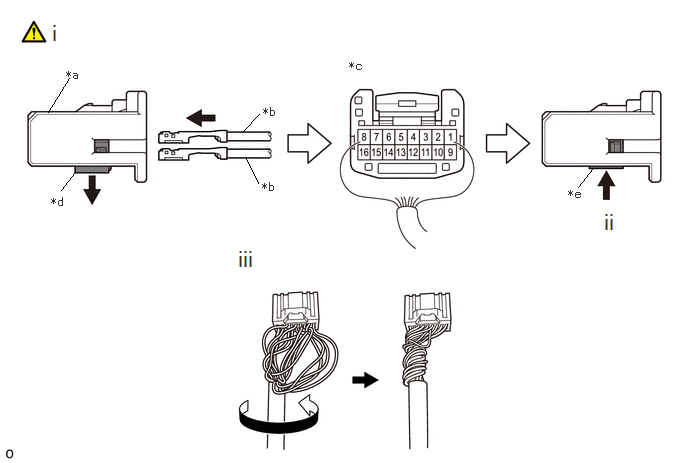
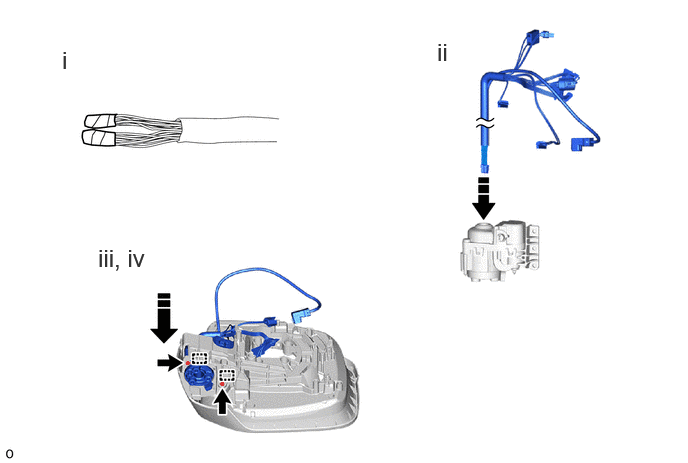
| *a | Connector Housing | *b | Wire Harness Pin |
| *c | Back View of Wire Harness Connector | *d | Retainer Unlock Position |
| *e | Retainer Lock Position | - | - |
Insert wire harness pins from the backside of the adapter until they lock.
- Wire Harness Color Chart:
-
1 2 3 4 5 6 7 8 PURPLE GREEN-RED SKY BLUE BLACK-GREEN
*1ORANGE WHITE-BLACK BLUE-YELLOW
*2BLACK-RED
*3
- Wire Harness Color Chart:
-
9 10 11 12 13 14 15 16 BROWN RED LIGHT GREEN WHITE YELLOW-BLACK GRAY BLACK-BROWN
*2PINK
*1: w/ Mirror Heater
*2: w/ EC Mirror
*3: w/ Blind Spot Monitor System
Set the retainer to the lock position.
- NOTICE:
-
·
When inserting the wire harness pins, compare with the connector that was cut off during removal to verify the insertion positions, and then make sure to insert the pins of the correct wire colors in the correct positions.
·Make sure that the wire harness pins are securely locked in position and cannot be removed.
·The wire harness pins cannot be removed after they have locked into place, so be absolutely certain to insert them in the correct positions.
Route the longer part of the wire harness sub-assembly as shown in the illustration.
w/ Panoramic View Monitor System:
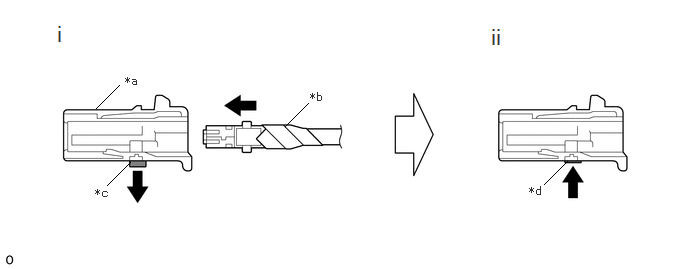
| *a | Adapter | *b | Television Camera Wire |
| *c | Retainer Unlock Position | *d | Retainer Lock Position |
Connect the television camera wire connector to the adapter.
Set the retainer to the lock position.
w/o Reverse Shift-linked Mirror:
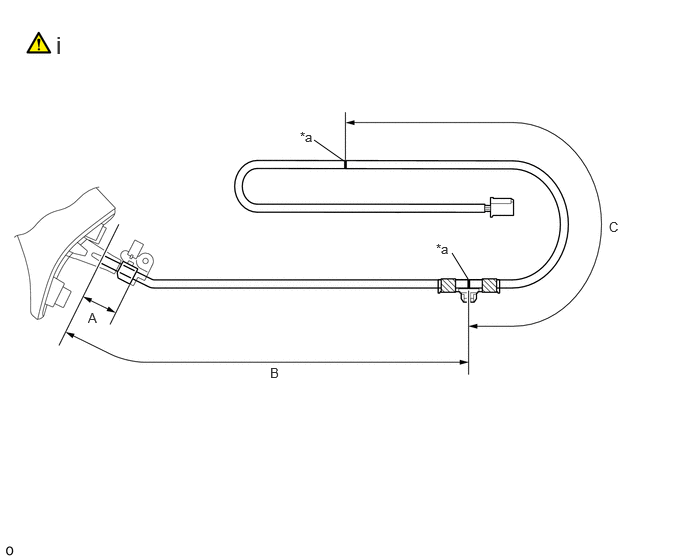
| *a | Marking | - | - |

|
Vinyl Tape | - | - |
Adjust the wire harness clamp so that the marking is at the position shown in the illustration to install it.
- NOTICE:
-
Be sure to securely install the wire harness clamp.
- Standard Measurement:
-
Area Measurement A 30 mm (1.18 in.) B 294 to 314 mm (11.57 in. to 1.03 ft.) C 187 to 207 mm (7.36 to 8.15 in.)
w/ Reverse Shift-linked Mirror:
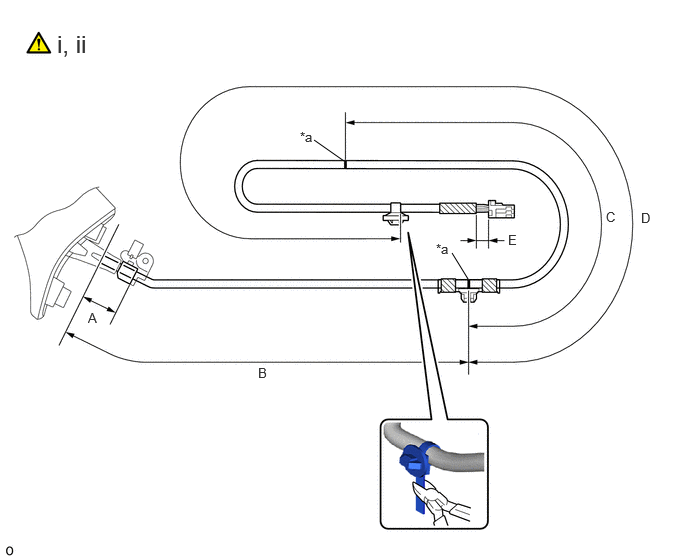
| *a | Marking | - | - |
|
|
Vinyl Tape | - | - |
Adjust the wire harness clamp and harness clamp so that the marking is at the position shown in the illustration to install it.
- NOTICE:
-
Be sure to securely install the wire harness clamp and harness clamp.
- Standard Measurement:
-
Area Measurement A 30 mm (1.18 in.) B 294 to 314 mm (11.57 in. to 1.03 ft.) C 187 to 207 mm (7.36 to 8.15 in.) D 404 to 414 mm (1.33 to 1.36 ft.) E Below 20 mm (0.79 in.)
Using a nipper, cut the position shown in the illustration.
w/ Panoramic View Monitor System:
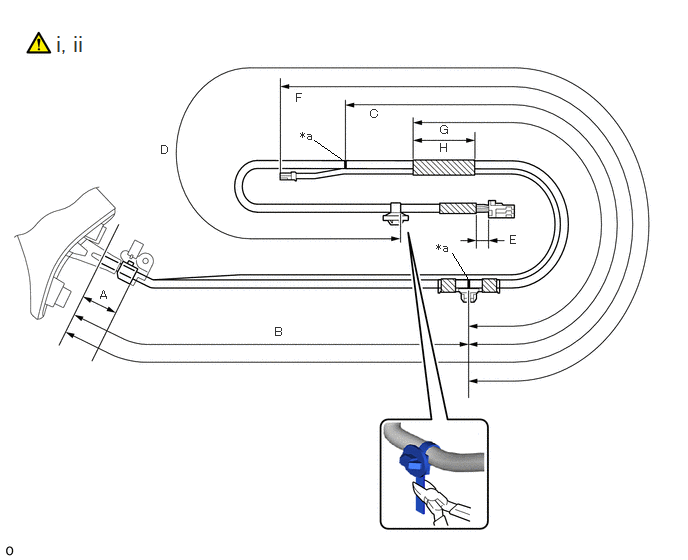
| *a | Marking | - | - |
|
|
Vinyl Tape | - | - |
Adjust the wire harness clamp and harness clamp so that the marking is at the position shown in the illustration to install it.
- NOTICE:
-
Be sure to securely install the wire harness clamp and harness clamp.
- Standard Measurement:
-
Area Measurement A 30 mm (1.18 in.) B 294 to 314 mm (11.57 in. to 1.03 ft.) C 187 to 207 mm (7.36 to 8.15 in.) D 404 to 414 mm (1.33 to 1.36 ft.) E Below 20 mm (0.79 in.) F 571 to 591 mm (1.87 to 1.94 ft.) G 142 mm (5.59 in.) H 50 mm (1.97 in.)
Using a nipper, cut the position shown in the illustration.
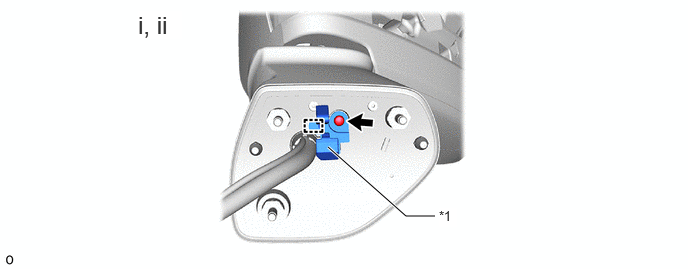
| *1 | Hook | - | - |
Attach the guide and install the hook.
Install the screw.
3.INSTALL OUTER MIRROR LIGHT ASSEMBLY LH (w/ Foot Light)
86790F 4.INSTALL SIDE TELEVISION CAMERA ASSEMBLY LH (w/ Panoramic View Monitor System)
5.INSTALL COVER BODY
81740 6.INSTALL SIDE TURN SIGNAL LIGHT ASSEMBLY LH
7.INSTALL COVER BODY
|
|
() |
87945 8.INSTALL OUTER MIRROR COVER LH
|
|
Click here() |
87961 9.INSTALL OUTER MIRROR LH