1VD-FTV ENGINE CONTROL ECD SYSTEM Injector Circuit
DESCRIPTION
The injector driver drives the injectors at high speeds with a high-voltage DC/DC converter. The ECM constantly monitors the injector driver and stops the engine if an abnormal condition is detected.
WIRING DIAGRAM
Refer to DTC P062D.
Click hereEngine / Hybrid System>1VD-FTV (ENGINE CONTROL)>ECD SYSTEM>P062D
CAUTION / NOTICE / HINT
- NOTICE:
-
Inspect the fuses for circuits related to this system before performing the following inspection procedure.
PROCEDURE
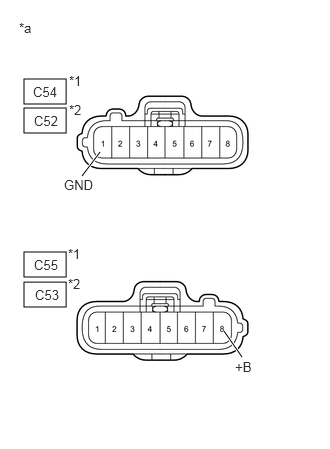
| *1 | No. 1 |
| *2 | No. 2 |
| *a | Front view of wire harness connector (to EDU) |
Disconnect the C54 and C55 No. 1 injector driver (EDU) connectors.
Disconnect the C52 and C53 No. 2 injector driver (EDU) connectors.
Measure the resistance according to the value(s) in the table below.
- Standard voltage (No. 1):
-
Tester Connection Switch Condition Specified Condition C55-8 (+B) - C54-1 (GND) Ignition switch ON 11 to 14 V
- Standard voltage (No. 2):
-
Tester Connection Switch Condition Specified Condition C53-8 (+B) - C52-1 (GND) Ignition switch ON 11 to 14 V
- Result:
-
Proceed to OK NG
OK
NG
Inspect the EDU relay (EDU 1 or EDU 2).
Click hereEngine / Hybrid System>1VD-FTV (ENGINE CONTROL)>RELAY>ON-VEHICLE INSPECTION
- Result:
-
Proceed to OK NG
OK
NG
Inspect the MAIN or MAIN 2 relay.
Click hereEngine / Hybrid System>1VD-FTV (ENGINE CONTROL)>RELAY>ON-VEHICLE INSPECTION
- Result:
-
Proceed to OK NG
OK
NG
Remove the EDU relay (EDU 1) from the engine room R/B assembly.
Remove the MAIN relay (MAIN) from the engine room R/B assembly.
Disconnect the cable from the negative (-) battery terminal.
Disconnect the cable from the positive (+) battery terminal.
Measure the resistance according to the value(s) in the table below.
- Standard resistance (No. 1):
-
Tester Connection Condition Specified Condition EDU 1 relay terminal 3 - MAIN relay terminal 3 Always Below 1 Ω MAIN relay terminal 5 - Battery positive (+) terminal Always Below 1 Ω EDU 1 relay terminal 3 or MAIN relay terminal 3 - Body ground Always 10 kΩ or higher MAIN relay terminal 5 - Body ground Always 10 kΩ or higher
Remove the EDU relay (EDU 2) from the engine room R/B assembly.
Remove the MAIN relay (MAIN2) from the engine room R/B assembly.
Disconnect the cable from the negative (-) battery terminal.
Disconnect the cable from the positive (+) battery terminal.
Measure the resistance according to the value(s) in the table below.
- Standard resistance (No. 2):
-
Tester Connection Condition Specified Condition EDU 2 relay terminal 3 - MAIN 2 relay terminal 3 Always Below 1 Ω MAIN 2 relay terminal 5 - Battery positive (+) terminal Always Below 1 Ω EDU 2 relay terminal 3 or MAIN 2 relay terminal 3 - Body ground Always 10 kΩ or higher MAIN 2 relay terminal 5 - Body ground Always 10 kΩ or higher
- Result:
-
Proceed to OK NG
OK
NG
Remove the EDU relay (EDU 1 or EDU 2) from the engine room R/B assembly.
Remove the C55 or C53 EDU connector.
Measure the resistance according to the value(s) in the table below.
- Standard resistance (No. 1):
-
Tester Connection Condition Specified Condition C55-8 (+B) - EDU 1 relay terminal 5 Always Below 1 Ω C55-8 (+B) or EDU 1 relay terminal 5 - Body ground Always 10 kΩ or higher
- Standard resistance (No. 2):
-
Tester Connection Condition Specified Condition C53-8 (+B) - EDU 2 relay terminal 5 Always Below 1 Ω C53-8 (+B) or EDU 2 relay terminal 5 - Body ground Always 10 kΩ or higher
- Result:
-
Proceed to OK NG
OK
NG
Remove the EDU relay (EDU 1 or EDU 2) from the engine room R/B assembly.
Disconnect the A29 ECM connector.
Measure the resistance according to the value(s) in the table below.
- Standard resistance (No. 1):
-
Tester Connection Condition Specified Condition A29-45 (IREL) - EDU 1 relay terminal 2 Always Below 1 Ω A29-45 (IREL) or EDU 1 relay terminal 2 - Body ground Always 10 kΩ or higher
- Standard resistance (No. 2):
-
Tester Connection Condition Specified Condition A29-46 (IRL2) - EDU 2 relay terminal 2 Always Below 1 Ω A29-46 (IRL2) or EDU 2 relay terminal 2 - Body ground Always 10 kΩ or higher
- Result:
-
Proceed to OK NG
OK
NG
Remove the EDU relay (EDU 1) from the engine room R/B assembly.
Remove the MAIN relay (MAIN) from the engine room R/B assembly.
Measure the resistance according to the value(s) in the table below.
- Standard resistance (No. 1):
-
Tester Connection Condition Specified Condition EDU 1 relay terminal 1 - MAIN relay terminal 3 Always Below 1 Ω EDU 1 relay terminal 1 or MAIN relay terminal 3 - Body ground Always 10 kΩ or higher
Remove the EDU relay (EDU 2) from the engine room R/B assembly.
Remove the MAIN relay (MAIN2) from the engine room R/B assembly.
Measure the resistance according to the value(s) in the table below.
- Standard resistance (No. 2):
-
Tester Connection Condition Specified Condition EDU 2 relay terminal 1 - MAIN2 relay terminal 3 Always Below 1 Ω EDU 2 relay terminal 1 or MAIN2 relay terminal 3 - Body ground Always 10 kΩ or higher
- Result:
-
Proceed to OK NG
OK
NG
Disconnect the C54 or C52 EDU connector.
Measure the resistance according to the value(s) in the table below.
- Standard resistance (No. 1):
-
Tester Connection Condition Specified Condition C54-1 (GND) - Body ground Always Below 1 Ω
- Standard resistance (No. 2):
-
Tester Connection Condition Specified Condition C52-1 (GND) - Body ground Always Below 1 Ω
- Result:
-
Proceed to OK NG
OK
NG