BRAKE CONTROL / DYNAMIC CONTROL SYSTEMS ANTI-LOCK BRAKE SYSTEM C1283 L4 Position Switch
DESCRIPTION
DTC C1283 is output only in Test Mode.
| DTC No. | Detection Item | DTC Detection Condition | Trouble Area |
|---|---|---|---|
| C1283 | L4 Position Switch | No signal is input to the EXI2 terminal of the skid control ECU. |
·
No. 1 transfer indicator switch (L4 position switch)
·
EXI2 terminal circuit
·
Brake actuator assembly (Skid control ECU) |
WIRING DIAGRAM
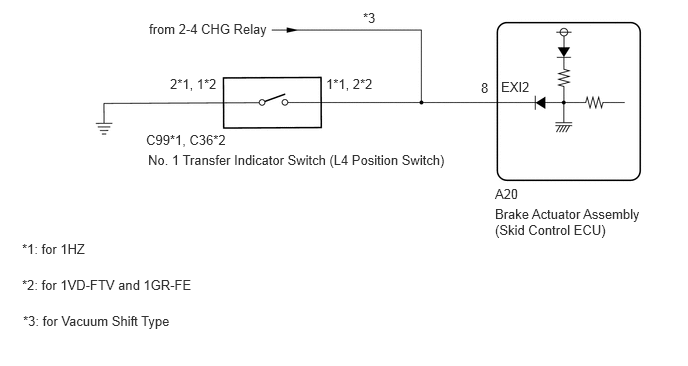
CAUTION / NOTICE / HINT
- NOTICE:
-
·
Before disconnecting the connector, make sure that there are no problems with the connection.
·After disconnecting the connector, make sure that the connector case and terminals are not deformed or corroded.
PROCEDURE
Set the vehicle to the L4 state.
Disconnect the A20 brake actuator assembly (skid control ECU) connector.
Measure the resistance according to the value(s) in the table below.
- Standard Resistance:
-
Tester Connection Condition Specified Condition A20-8 (EXI2) - Body ground Transfer position L4 Below 1 Ω
Connect the brake actuator assembly (skid control ECU) connector.
Set the vehicle to the 2WD state.
Disconnect the A20 brake actuator assembly (skid control ECU) connector.
Measure the resistance according to the value(s) in the table below.
- Standard Resistance:
-
Tester Connection Condition Specified Condition A20-8 (EXI2) - Body ground Transfer position 2WD 10 kΩ or higher
- Result:
-
Proceed to OK NG
OK
NG
Connect the brake actuator assembly (skid control ECU) connector.
Switch the vehicle to Test Mode, perform the 2WD to L4 shift operation check, and then check that DTC C1283 is not stored.
- Chassis > ABS/VSC/TRC > Utility
-
Tester Display Signal Check - 50005 105 3
- Result:
-
Proceed to DTC is stored DTC is not stored
DTC is stored
DTC is not stored
Click hereGeneral>INTRODUCTION>HOW TO TROUBLESHOOT ECU CONTROLLED SYSTEMS>HOW TO PROCEED WITH TROUBLESHOOTING
Turn the ignition switch off.
for 1VD-FTV and 1GR-FE:
Disconnect the C36 No. 1 transfer indicator switch (L4 position switch) connector.
for 1HZ:
Disconnect the C99 No. 1 transfer indicator switch (L4 position switch) connector.
Measure the resistance according to the value(s) in the table below.
- Standard Resistance:
-
for 1VD-FTV and 1GR-FE Tester Connection Condition Specified Condition A20-8 (EXI2) - C36-2 Always Below 1 Ω A20-8 (EXI2) - Body ground Always 10 kΩ or higher C36-2 - Body ground Always 10 kΩ or higher C36-1 - Body ground Always Below 1 Ω
-
for 1HZ Tester Connection Condition Specified Condition A20-8 (EXI2) - C99-1 Always Below 1 Ω A20-8 (EXI2) - Body ground Always 10 kΩ or higher C99-1 - Body ground Always 10 kΩ or higher C99-2 - Body ground Always Below 1 Ω
- Result:
-
Proceed to OK NG
OK
NG
Remove the No. 1 transfer indicator switch (L4 position switch).
for HF1A:
Click hereDrivetrain>HF1A (TRANSFER / 4WD / AWD)>TRANSFER INDICATOR SWITCH>REMOVAL
for BF1B:
Click hereDrivetrain>BF1B (TRANSFER / 4WD / AWD)>TRANSFER INDICATOR SWITCH>REMOVAL
Inspect the No. 1 transfer indicator switch (L4 position switch).
for HF1A:
Click hereDrivetrain>HF1A (TRANSFER / 4WD / AWD)>TRANSFER INDICATOR SWITCH>INSPECTION
for BF1B:
Click hereDrivetrain>BF1B (TRANSFER / 4WD / AWD)>TRANSFER INDICATOR SWITCH>INSPECTION
- Result:
-
Proceed to OK NG
OK
Click hereGeneral>INTRODUCTION>HOW TO TROUBLESHOOT ECU CONTROLLED SYSTEMS>HOW TO PROCEED WITH TROUBLESHOOTING
NG
for HF1A:
Click hereDrivetrain>HF1A (TRANSFER / 4WD / AWD)>TRANSFER INDICATOR SWITCH>REMOVAL
for BF1B:
Click hereDrivetrain>BF1B (TRANSFER / 4WD / AWD)>TRANSFER INDICATOR SWITCH>REMOVAL