HF1A TRANSFER / 4WD / AWD TRANSFER INDICATOR SWITCH INSTALLATION
PROCEDURE

 84222 1.INSTALL NO. 1 TRANSFER INDICATOR SWITCH (4WD POSITION AND L4 POSITION)
Install the No. 1 transfer indicator switch (4WD position).
Using a 27 mm socket wrench, install the No. 1 transfer indicator switch (4WD position).
- Torque:
- 37.24 N*m (380 kgf*cm, 27 ft.*lbf)
Connect the connector.
w/ ABS:
Install the No. 1 transfer indicator switch (L4 position).
Using SST, install the No. 1 transfer indicator switch (L4 position).
- SST
-
09817-16011
- Torque:
- 37.24 N*m (380 kgf*cm, 27 ft.*lbf)
Connect the connector and attach the clamp.
for H152F:
Install the manual transmission assembly.
Click hereDrivetrain>H152F (MANUAL TRANSMISSION / TRANSAXLE)>MANUAL TRANSMISSION ASSEMBLY>INSTALLATION
for H150F:
Install the manual transmission assembly.
36336 2.INSTALL TRANSFER HEAT INSULATOR (w/ ABS)
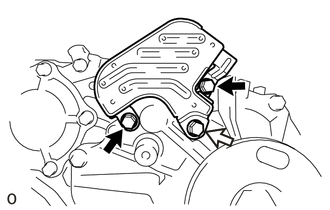

|
Bolt A |

|
Bolt B |
Clean the threads of the bolts labeled A and the rear transfer extension housing sub-assembly with non-residue solvent.
Apply adhesive to the bolts labeled A.
- Adhesive:
-
Toyota Genuine Adhesive 1344, Three Bond 1344 or equivalent
- NOTICE:
-
Install the bolts labeled A within 3 minutes of application.
Install the transfer heat insulator with the 3 bolts.
- Torque:
- Bolt A : 37.24 N*m (380 kgf*cm, 27 ft.*lbf)
- Bolt B : 11.76 N*m (120 kgf*cm, 9 ft.*lbf)