LIGHTING (EXT) HEADLIGHT ASSEMBLY REMOVAL
CAUTION / NOTICE / HINT
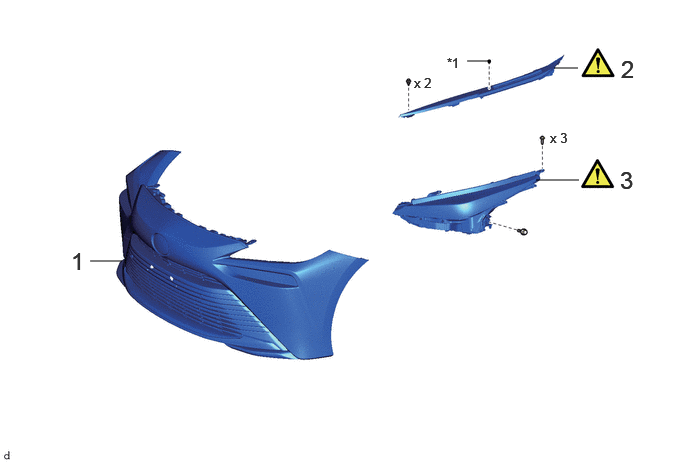
| Procedure | Part Name Code | 
|

|

|
|
|---|---|---|---|---|---|
| 1 | FRONT BUMPER ASSEMBLY | - | - | - | - |
| 2 | FRONT FENDER UPPER PROTECTOR LH | 53826A | ( ) |
- | - |
| 3 | HEADLIGHT ASSEMBLY LH | - | ()
|
- | - |
| *1 | CENTER HOOD CUSHION | - | - |
CAUTION / NOTICE / HINT
The necessary procedures (adjustment, calibration, initialization, or registration) that must be performed after parts are removed and installed, or replaced during headlight assembly LH removal/installation are shown below.
| Replaced Part or Performed Procedures | Necessary Procedures | Effect/Inoperative Function when Necessary Procedures are not Performed | Link |
|---|---|---|---|
| Disconnect cable from negative (-) auxiliary battery terminal | Memorize steering angle neutral point | Parking assist monitor system | ()
|
| Panoramic view monitor system | ()
|
||
| Front bumper assembly (Including removal and installation) | ·
Measurement of ultrasonic sensor detection angle ·
Ultrasonic sensor detection angle registration |
·
TOYOTA Parking assist- sensor system ·
Parking support brake system ·
Advanced park |
w/ Advanced Park:
( )
w/o Advanced Park: ( )
|
| Front television camera view adjustment | Panoramic view monitor system | ()
|
|
| Front television camera assembly, front bumper assembly or radiator grille | ·
Television camera view adjustment
|
Panoramic view monitor system | ()
|
| Headlight ECU sub-assembly LH | ·
Synchronize the vehicle information ·
Perform headlight ECU sub-assembly LH initialization |
·
Automatic headlight beam level control system ·
Adaptive high beam system |
()
|
- HINT:
- ·
When the cable is disconnected/reconnected to the auxiliary battery terminal, systems temporarily stop operating. However, each system has a function that completes learning the first time the system is used.
-Learning completes when vehicle is driven
Effect/Inoperative Function When Necessary Procedures are not Performed Necessary Procedures Link Lane tracing assist system Drive the vehicle straight ahead at 35 km/h (22 mph) or more for 5 seconds or more. ( )
Pre-collision system Adaptive high beam system
-Learning completes when vehicle is operated normally
Effect/Inoperative Function When Necessary Procedures are not Performed Necessary Procedures Link Air conditioning system After the ignition switch is turned to ON, the servo motor and expansion valve standard position is recognized. -
PROCEDURE

 1.REMOVE FRONT BUMPER ASSEMBLY
53826A
2.REMOVE FRONT FENDER UPPER PROTECTOR LH
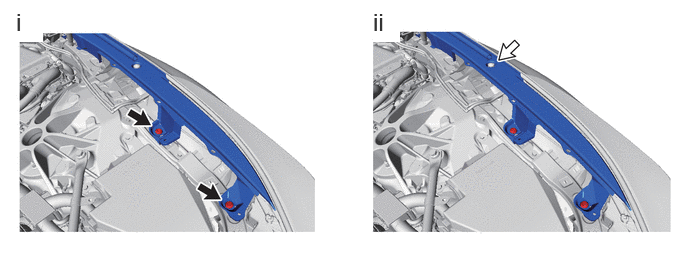

|
Clip | 
|
Center Hood Cushion |
Remove the 2 clips.
Remove the center hood cushion.
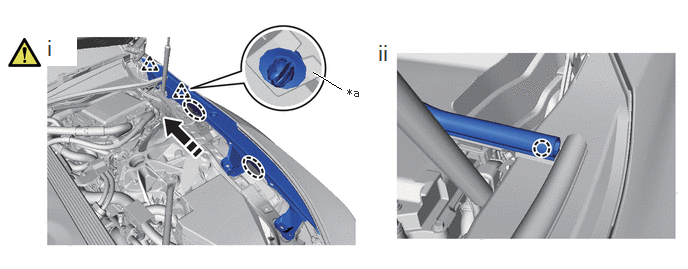
| *a | Seat | - | - |

|
Place Hand Here | 
|
Move in this Direction |
Hold the areas shown in the illustration and pull toward the rear of the vehicle to disconnect the seat from the clip.
Detach the claw of the hood to cowl top seal and remove the front upper fender protector LH.
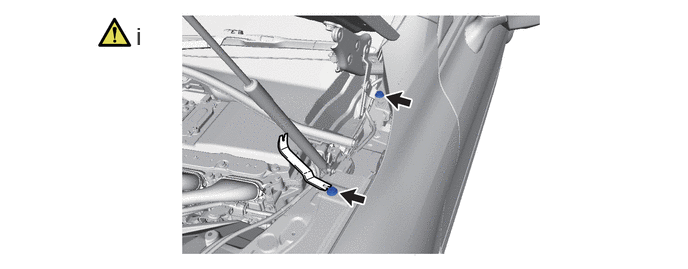
Using a clip remover, detach the remaining 2 clips on the vehicle and remove them to the front upper fender protector LH.
3.REMOVE HEADLIGHT ASSEMBLY LH
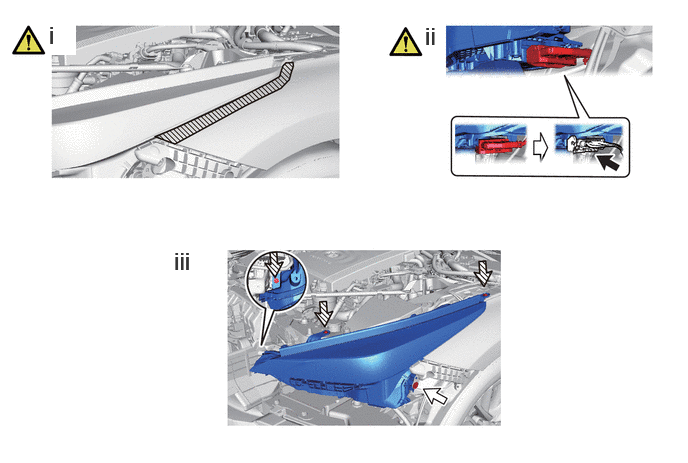
|
|
Connector |
|
Bolt |

|
Screw | - | - |
Apply protective tape around the headlight assembly LH.
Release the connector lock lever and disconnect the connector as shown in the illustration.
Remove the bolt and 3 screws.
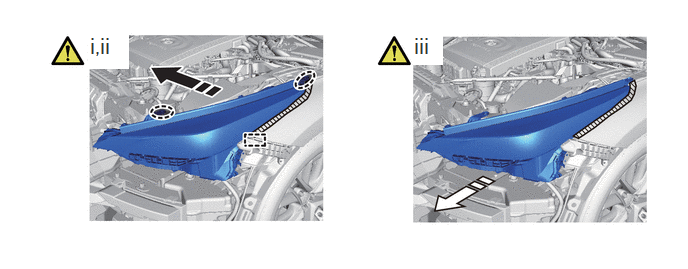
|
|
Place Hand Here |
|
Remove in this Direction (1) |

|
Remove in this Direction (2) | - | - |
Place your hands at the positions shown in the illustration and remove the bracket from the screw seat.
- NOTICE:
-
Do not break the bracket.
Slide the headlight assembly LH in the removal direction (1) and detach the guide.
Remove the headlight assembly LH in the removal direction (2) as shown in the illustration.