TELEMATICS TELEMATICS SYSTEM(for eCall) B15CB11 Telephone Main Antenna Circuit Short to Ground B15CB13 Telephone Main Antenna Circuit Open
DESCRIPTION
This DTC is stored when the telematics transceiver detects an open or a short in the telephone antenna (main) circuit.
| DTC No. | Detection Item | DTC Detection Condition | Trouble Area | DTC Output from | Priority |
|---|---|---|---|---|---|
| B15CB11 | Telephone Main Antenna Circuit Short to Ground | Telephone antenna (main) impedance (Ω) is lower than the malfunction threshold for 10 seconds or more when the ignition switch is ON. (Short circuit) | ·
Telephone antenna assembly ·
Antenna cord sub-assembly ·
No. 2 antenna cord sub-assembly ·
Telematics transceiver |
Telematics | A |
| B15CB13 | Telephone Main Antenna Circuit Open | Telephone antenna (Main) impedance (Ω) is higher than the malfunction threshold for 10 seconds or more when the ignition switch is ON. (Open circuit) | ·
Telephone antenna assembly ·
Antenna cord sub-assembly ·
No. 2 antenna cord sub-assembly ·
Telematics transceiver |
Telematics | A |
WIRING DIAGRAM
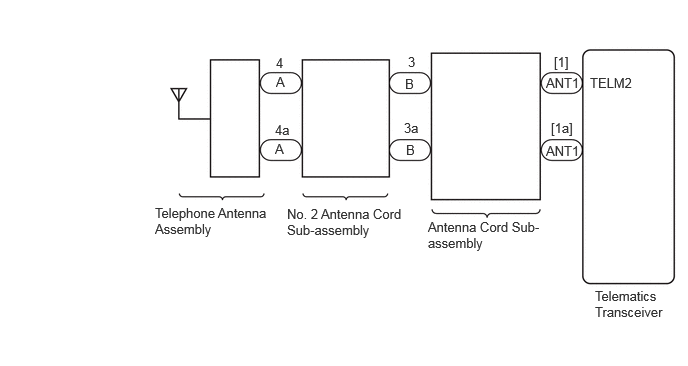
CAUTION / NOTICE / HINT
- NOTICE:
- ·
Depending on the parts that are replaced during vehicle inspection or maintenance, performing initialization, registration or calibration may be needed. Refer to Precaution for Telematics System.
Click hereAudio / Visual / Telematics>TELEMATICS>TELEMATICS SYSTEM (for eCall)>PRECAUTION
·When replacing the telematics transceiver, make sure to replace it with a new one.
PROCEDURE
Pre-procedure1
Turn the ignition switch to ON and wait for 10 seconds.
Procedure1
Check for DTCs and check that no DTCs are output.
- Body Electrical > Telematics > Trouble Codes
- 50001 459
- Result:
Result Proceed to DTCs are not output A DTCs are output B
Post-procedure1
None
A
Click hereGeneral>INTRODUCTION>HOW TO TROUBLESHOOT ECU CONTROLLED SYSTEMS>HOW TO PROCEED WITH TROUBLESHOOTING
B
Pre-procedure1
Remove the telephone antenna assembly.
- HINT:
-
Click hereAudio / Visual / Telematics>TELEMATICS>TELEPHONE ANTENNA>REMOVAL
Procedure1
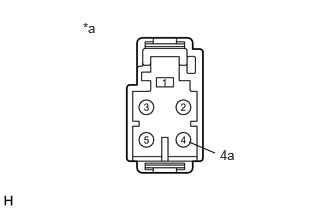
| *a | Component without harness connected
(Telephone Antenna Assembly) |
Measure the resistance according to the value(s) in the table below.
- Standard Resistance:
Tester Connection Condition Specified Condition 4 - 4a Always 9 to 11 kΩ
- Result:
Proceed to OK NG
Post-procedure1
None
OK
NG
Pre-procedure1
Disconnect the antenna connector from the telephone antenna assembly.
Disconnect the antenna connector from the antenna cord sub-assembly.
Procedure1
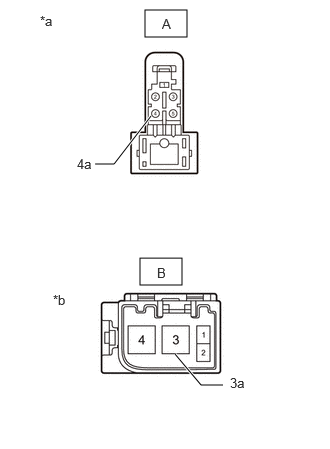
| *a | Front view of wire harness connector
(to Telephone Antenna Assembly) |
| *b | Front view of wire harness connector
(to Antenna Cord Sub-assembly) |
Measure the resistance according to the value(s) in the table below.
- Standard Resistance:
Tester Connection Condition Specified Condition A-4 - B-3 Always Below 1 Ω A-4a - B-3a Always Below 1 Ω A-4 - Body ground Always 10 kΩ or higher
- Result:
Proceed to OK NG
Post-procedure1
None
OK
NG
Pre-procedure1
Disconnect the antenna connector from the No. 2 antenna cord sub-assembly.
Disconnect the antenna connector from the telematics transceiver.
Procedure1
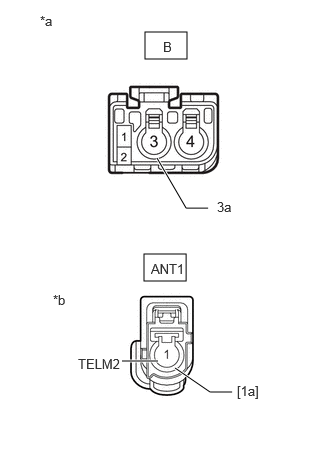
| *a | Front view of wire harness connector
(to No. 2 Antenna Cord Sub-assembly) |
| *b | Front view of wire harness connector
(to Telematics Transceiver) |
Measure the resistance according to the value(s) in the table below.
- Standard Resistance:
Tester Connection Condition Specified Condition B-3 - ANT1-[1](TELM2) Always Below 1 Ω B-3a - ANT1-[1a] Always Below 1 Ω B-3 - Body ground Always 10 kΩ or higher
- Result:
Proceed to OK NG
Post-procedure1
None
OK
NG
Click hereAudio / Visual / Telematics>AUDIO / VIDEO>RADIO ANTENNA CORD (for Instrument Panel)>REMOVAL
Replace the telematics transceiver with a new one.
- Result:
Proceed to NEXT
NEXT