COOLING ION EXCHANGER INSTALLATION
CAUTION / NOTICE / HINT
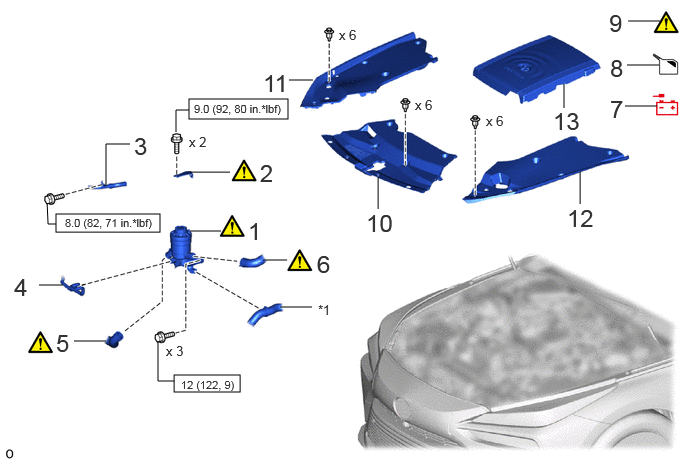
| Procedure | Part Name Code | 
|

|

|
|
|---|---|---|---|---|---|
| 1 | FC COOLING WATER ION EXCHANGER ASSEMBLY | 16A40 | ( ) |
- | - |
| 2 | FC COOLING WATER ION EXCHANGER BRACKET | 16A45 | ()
|
- | - |
| 3 | NO. 4 FC INVERTER COOLING PIPE | G91D4 | - | - | - |
| 4 | RADIATOR TO RESERVE TANK HOSE | 16567D | - | - | - |
| 5 | NO. 13 FC RADIATOR HOSE | 1657D | ()
|
- | - |
| 6 | NO. 9 FC RADIATOR HOSE | 16579A | ()
|
- | - |
| 7 | CABLE FROM NEGATIVE AUXILIARY BATTERY TERMINAL | - | - | - | - |
| 8 | ADD COOLANT (TOYOTA GENUINE FC STACK COOLANT (Pre-mixed)) | - | - | ()
|
- |
| 9 | INSPECT FOR COOLANT (TOYOTA GENUINE FC STACK COOLANT (Pre-mixed)) LEAK | - | ()
|
- | - |
| 10 | LOWER RADIATOR AIR DEFLECTOR | 53295 | - | - | - |
| 11 | RADIATOR COVER PLATE | 53291B | - | - | - |
| 12 | UPPER RADIATOR SUPPORT SEAL | 53292A | - | - | - |
| 13 | FC STACK COVER SUB-ASSEMBLY | 1A906 | - | - | - |
| *1 | NO. 7 FC RADIATOR HOSE | - | - |

|
N*m (kgf*cm, ft.*lbf): Specified torque | - | - |
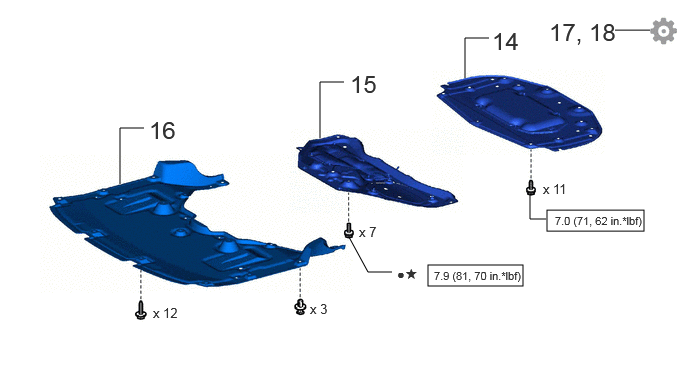
| Procedure | Part Name Code |
|
|
|
|
|---|---|---|---|---|---|
| 14 | FRONT COMPARTMENT UNDER COVER ASSEMBLY | 51420A | - | - | - |
| 15 | FRONT LOWER SUSPENSION MEMBER PROTECTOR | 51219 | - | - | - |
| 16 | FRONT COMPARTMENT UNDER COVER | 51441N | - | - | - |
| 17 | INITIALIZATION | - | - | - | ()
|
| 18 | INITIALIZATION AFTER RECONNECTING AUXILIARY BATTERY TERMINAL | - | - | - | ()
|
|
|
N*m (kgf*cm, ft.*lbf): Specified torque | ● | Non-reusable part |
| ★ | Precoated part | - | - |
PROCEDURE

 16A40
1.INSTALL FC COOLING WATER ION EXCHANGER ASSEMBLY
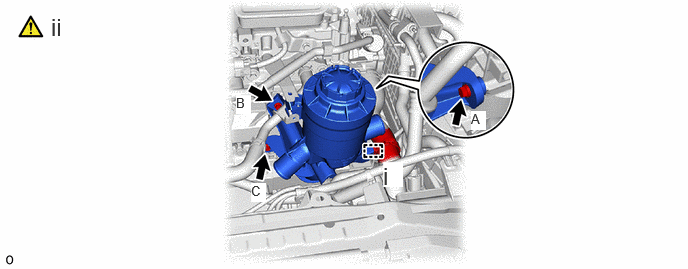
Attach the clamp.
Install the FC cooling water ion exchanger assembly to the FC stack assembly with the 3 bolts.
- Torque:
- 12 N*m (122 kgf*cm, 9 ft.*lbf)
- NOTICE:
-
Tightening order: Temporarily install bolt A → Temporarily install bolt B → Tighten bolt C → Tighten bolt A → Tighten bolt B
16A45
2.INSTALL FC COOLING WATER ION EXCHANGER BRACKET
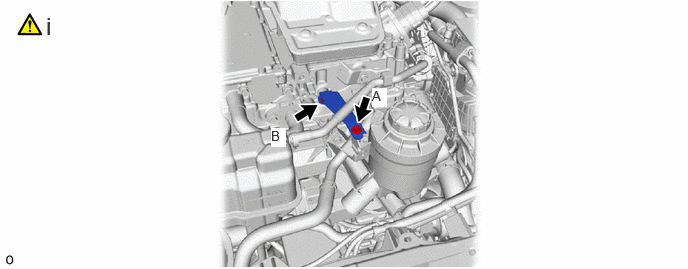
Install the FC cooling water ion exchanger bracket to the FC stack assembly and FC cooling water ion exchanger assembly with the 2 bolts
- Torque:
- 9.0 N*m (92 kgf*cm, 80 in.*lbf)
- NOTICE:
-
Tightening order: Temporarily install bolt A → Tighten bolt B → Tighten bolt A
G91D4
3.CONNECT NO. 4 FC INVERTER COOLING PIPE
- Torque:
- 8.0 N*m (82 kgf*cm, 71 in.*lbf)
16567D
4.CONNECT RADIATOR TO RESERVE TANK HOSE
1657D
5.CONNECT NO. 13 FC RADIATOR HOSE
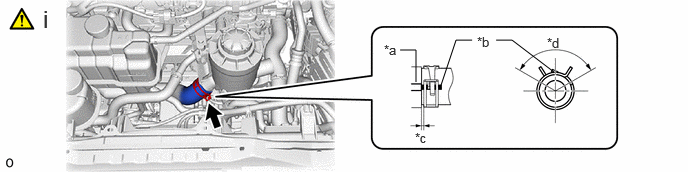
| *a | FC Cooling Water Ion Exchanger Assembly Rib | *b | Hose Paint Mark |
| *c | 2 to 7 mm (0.0787 to 0.2756 in.) | *d | 120° |
Connect the No. 13 FC radiator hose to the FC cooling water ion exchanger assembly and slide the hose clip to secure it.
- NOTICE:
- ·
Align the hose and the hose clip at the locations shown in the illustration and install them.
·Make sure the No. 13 FC radiator hose is securely inserted to the stopper.
When connecting, if it is difficult to insert the hose, coat it with new coolant (Toyota genuine FC stack coolant (Pre-mixed)).
16579A
6.CONNECT NO. 9 FC RADIATOR HOSE
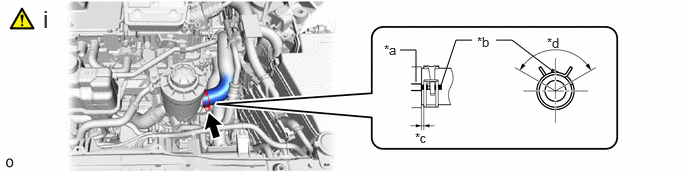
| *a | FC Cooling Water Ion Exchanger Assembly Rib | *b | Hose Paint Mark |
| *c | 2 to 7 mm (0.0787 to 0.2756 in.) | *d | 120° |
Connect the No. 9 FC radiator hose to the FC cooling water ion exchanger assembly and slide the hose clip to secure it.
- NOTICE:
- ·
Align the hose and the hose clip at the locations shown in the illustration and install them.
·Make sure the No. 9 FC radiator hose is securely inserted to the stopper.
When connecting, if it is difficult to insert the hose, coat it with new coolant (Toyota genuine FC stack coolant (Pre-mixed)).
7.CONNECT CABLE FROM NEGATIVE AUXILIARY BATTERY TERMINAL
8.ADD COOLANT (TOYOTA GENUINE FC STACK COOLANT (Pre-mixed))
9.INSPECT FOR COOLANT (TOYOTA GENUINE FC STACK COOLANT (Pre-mixed)) LEAK
53295
10.INSTALL LOWER RADIATOR AIR DEFLECTOR
53291B
11.INSTALL RADIATOR COVER PLATE
53292A
12.INSTALL UPPER RADIATOR SUPPORT SEAL
1A906
13.INSTALL FC STACK COVER SUB-ASSEMBLY
51420A
14.INSTALL FRONT COMPARTMENT UNDER COVER ASSEMBLY
51219
15.INSTALL FRONT LOWER SUSPENSION MEMBER PROTECTOR
51441N
16.INSTALL FRONT COMPARTMENT UNDER COVER
17. INITIALIZATION
|
|
Click here()
|
18. INITIALIZATION AFTER RECONNECTING AUXILIARY BATTERY TERMINAL
Click hereGeneral>SETUP>WHEN DISCONNECTING OR RECONNECTING BATTERY TERMINAL>WORK PROCEDURE
- HINT:
-
When disconnecting and reconnecting the auxiliary battery, there is an automatic learning function that completes learning when the respective system is used.
-
Click hereGeneral>SETUP>WHEN DISCONNECTING OR RECONNECTING BATTERY TERMINAL>AUTOMATIC LEARNING CHART