COOLING ROTARY VALVE INSTALLATION
CAUTION / NOTICE / HINT
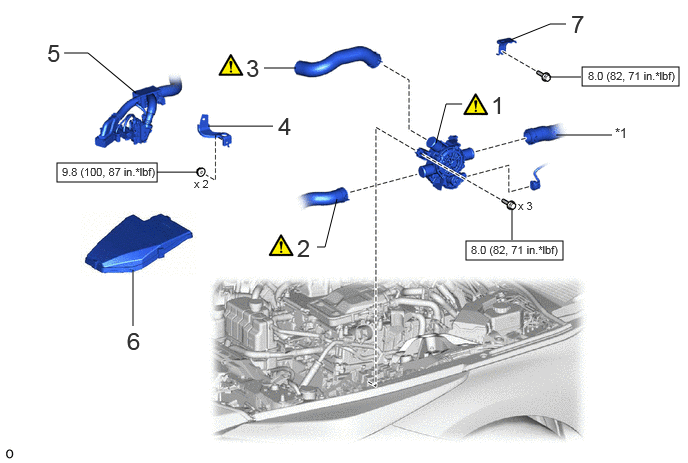
| Procedure | Part Name Code | 
|

|

|
|
|---|---|---|---|---|---|
| 1 | FC COOLING WATER TEMPERATURE CONTROL VALVE | 16A31 | ( ) |
- | - |
| 2 | NO. 7 FC RADIATOR HOSE | 16577D | ()
|
- | - |
| 3 | NO. 9 FC RADIATOR HOSE | 16579A | ()
|
- | - |
| 4 | NO. 2 COOLER BRACKET | 88689F | - | - | - |
| 5 | STACK WIRE | 82121F | - | - | - |
| 6 | NO. 2 RELAY BLOCK COVER | 82662B | - | - | - |
| 7 | FC CONVERTER POWER OUTLET BRACKET | G9A25 | - | - | - |
| *1 | NO. 6 FC RADIATOR HOSE | - | - |

|
N*m (kgf*cm, ft.*lbf): Specified torque | - | - |
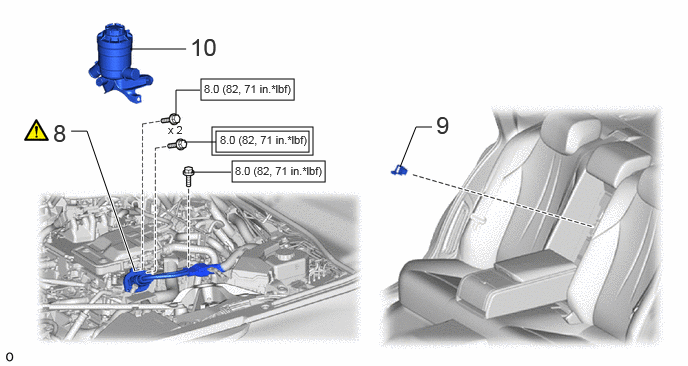
| Procedure | Part Name Code |
|
|
|
|
|---|---|---|---|---|---|
| 8 | FC CONVERTER POWER OUTLET CABLE (INVERTER WITH CONVERTER ASSEMBLY) | G9200A | ()
|
- | - |
| 9 | SERVICE PLUG GRIP | G3834 | - | - | - |
| 10 | FC COOLING WATER ION EXCHANGER ASSEMBLY | 16A40 | - | - | - |

|
Tightening torque for "Major areas involving basic vehicle performance such as moving/turning/stopping": N*m (kgf*cm, ft.*lbf) |
|
N*m (kgf*cm, ft.*lbf): Specified torque |
PROCEDURE

 16A31
1.INSTALL FC COOLING WATER TEMPERATURE CONTROL VALVE
|
|
|
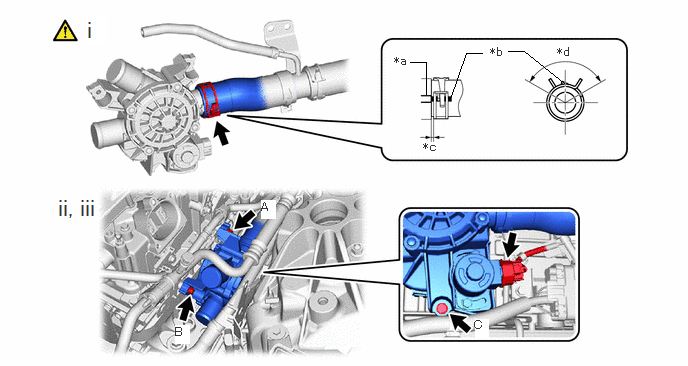
| *a | Stopper | *b | Hose Paint Mark |
| *c | 2 to 7 mm (0.0787 to 0.276 in.) | *d | 120° |
Install the No. 6 FC radiator hose to the FC cooling water temperature control valve, and slide the clip to secure the hose as shown in the illustration.
- NOTICE:
- ·
Align the hose and the hose clip at the locations shown in the illustration and install them.
·Make sure the No. 6 FC radiator hose is securely inserted to the stopper.
When connecting, if it is difficult to insert the hose, coat it with new coolant (Toyota genuine FC stack coolant).
Connect the connector and temporarily install the FC cooling water temperature control valve with the bolt A and bolt B.
Tighten the 3 bolts.
- Torque:
- 8.0 N*m (82 kgf*cm, 71 in.*lbf)
16577D
2.CONNECT NO. 7 FC RADIATOR HOSE
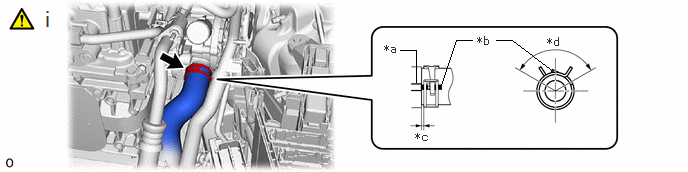
| *a | Stopper | *b | Hose Paint Mark |
| *c | 2 to 7 mm (0.0787 to 0.276 in.) | *d | 120° |
Connect the No. 7 FC radiator hose to the FC cooling water temperature control valve, and slide the clip to secure the hose as shown in the illustration.
- NOTICE:
- ·
Align the hose and the hose clip at the locations shown in the illustration and install them.
·Make sure the No. 7 FC radiator hose is securely inserted to the stopper.
When connecting, if it is difficult to insert the No. 7 FC radiator hose, coat it with new coolant (Toyota genuine FC stack coolant).
16579A
3.INSTALL NO. 9 FC RADIATOR HOSE
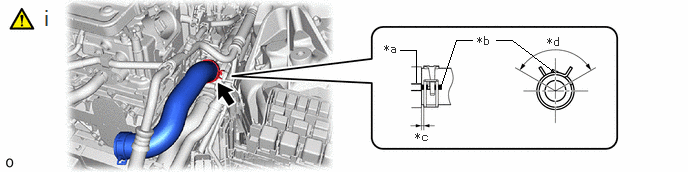
| *a | Stopper | *b | Hose Paint Mark |
| *c | 2 to 7 mm (0.0787 to 0.276 in.) | *d | 120° |
Install the No. 9 FC radiator hose to the FC cooling water temperature control valve, and slide the clip to secure the hose as shown in the illustration.
- NOTICE:
- ·
Align the hose and the hose clip at the locations shown in the illustration and install them.
·Make sure the No. 9 FC radiator hose is securely inserted to the stopper.
When connecting, if it is difficult to insert the No. 9 FC radiator hose, coat it with new coolant (Toyota genuine FC stack coolant).
88689F
4.INSTALL NO. 2 COOLER BRACKET
- Torque:
- 9.8 N*m (100 kgf*cm, 87 in.*lbf)
82121F
5.CONNECT STACK WIRE
82662B
6.INSTALL NO. 2 RELAY BLOCK COVER
G9A25
7.INSTALL FC CONVERTER POWER OUTLET BRACKET
- Torque:
- 8.0 N*m (82 kgf*cm, 71 in.*lbf)
G9200A
8.CONNECT FC CONVERTER POWER OUTLET CABLE (INVERTER WITH CONVERTER ASSEMBLY)
|
|
|
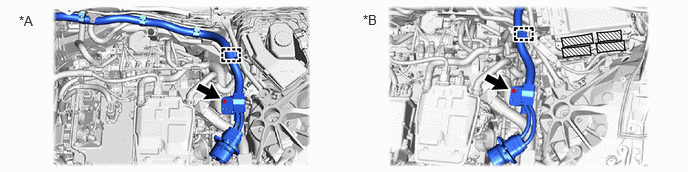
| *A | for LHD | *B | for RHD |
- Torque:
- 8.0 N*m (82 kgf*cm, 71 in.*lbf)
G3834
9.INSTALL SERVICE PLUG GRIP
16A40
10.INSTALL FC COOLING WATER ION EXCHANGER ASSEMBLY