MAINTENANCE FRONT DISC BRAKE PAD INSTALLATION
CAUTION / NOTICE / HINT
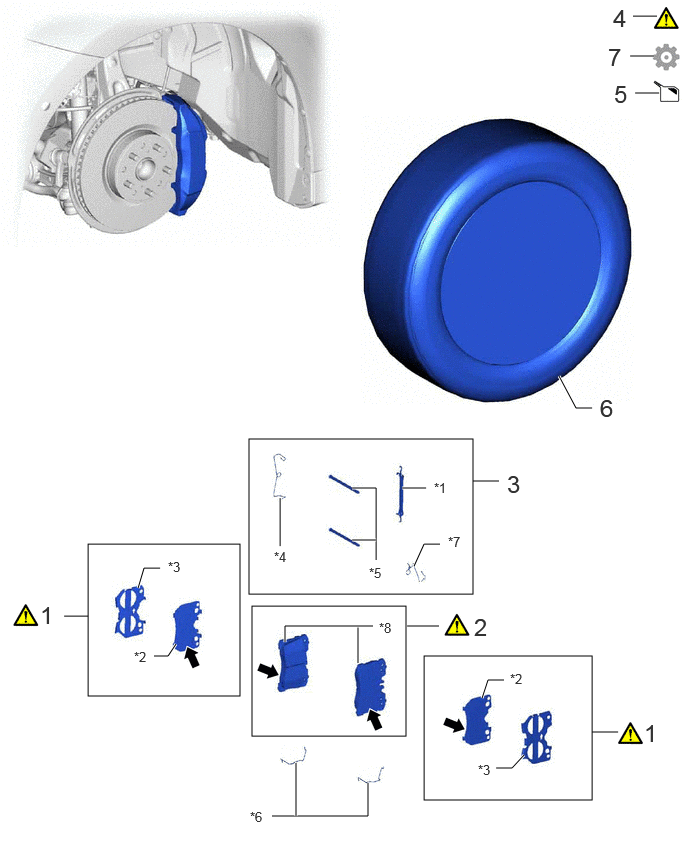
| Procedure | Part Name Code | 
|

|

|
|
|---|---|---|---|---|---|
| 1 | FRONT ANTI SQUEAL SHIM KIT | 04945 | ( ) |
- | - |
| 2 | FRONT DISC BRAKE PAD KIT | 04465 | ()
|
- | - |
| 3 | FRONT DISC BRAKE FITTING KIT | 04947 | - | - | - |
| 4 | CABLE TO NEGATIVE AUXILIARY BATTERY TERMINAL | - | ()
|
- | - |
| 5 | BRAKE FLUID LEVEL IN RESERVOIR | - | - | ()
|
- |
| 6 | FRONT WHEEL | - | - | - | - |
| 7 | INITIALIZATION AFTER RECONNECTING BATTERY TERMINAL | - | - | - | ()
|
| *1 | NO. 1 ANTI-RATTLE SPRING | *2 | NO. 1 ANTI-SQUEAL SHIM |
| *3 | NO. 2 ANTI-SQUEAL SHIM | *4 | PIN HOLD CLIP |
| *5 | ANTI-SQUEAL SPRING | *6 | INNER ANTI-RATTLE SPRING |
| *7 | ANTI-SQUEAL SPRING | *8 | FRONT DISC BRAKE PAD |

|
Disc brake grease | - | - |
CAUTION / NOTICE / HINT
- NOTICE:
- ·
Immediately after installing the front disc brake pads, the braking performance may be reduced. Always perform a road test in a safe place while paying attention to the surroundings.
·After replacing the front disc brake pads, the brake pedal may feel soft due to clearance between the front disc brake pads and front disc. Depress the brake pedal several times until the brake pedal feels firm.
·After replacing the front disc brake pads, always perform a road test to check the braking performance and check for vibrations.
·When removing or installing the front disc brake cylinder assembly, pushing back the disc brake piston may cause a large clearance between the brake pads and brake disc. When the brake pedal is depressed with a large clearance between the brake pads and the brake disc, DTC C13DB00, C13DC00, C13DD00, C13DE00, C140000 and/or C140A00 related to abnormal brake fluid pressure may be stored. Make sure to clear any DTCs after performing this procedure.
·While the auxiliary battery is connected, even if the power switch is off, the brake control system activates when the brake pedal is depressed or the door courtesy switch is turned on. Therefore, even if only brake pads are to be removed and installed, be sure to remove the brake booster pump connectors before beginning work.
- HINT:
- ·
Use the same procedure for the RH and LH sides, except where indicated.
·The following procedure is for the LH side.
PROCEDURE

 04945
1.INSTALL FRONT ANTI SQUEAL SHIM KIT
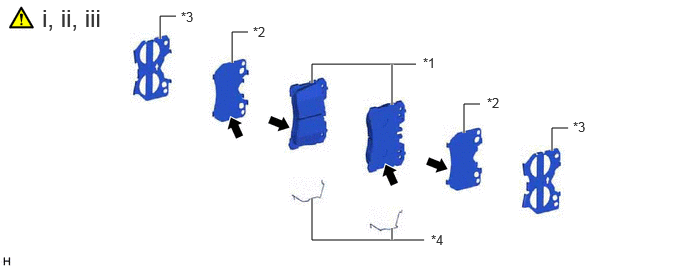
| *1 | Front Disc Brake Pad | *2 | No. 1 Anti-Squeal Shim |
| *3 | No. 2 Anti-Squeal Shim | *4 | Inner Anti-Rattle Spring |
|
|
Disc Brake Grease | - | - |
Apply disc brake grease to the front disc brake pads and No. 1 anti-squeal shims at the positions shown in the illustration.
- NOTICE:
- ·
Use the grease supplied with the anti-squeal shim kit or disc brake grease as the disc brake grease.
·Keep the lining surface of the front disc brake pad free from grease.
·Do not apply grease between the No. 1 and No. 2 anti-squeal shims.
Install the inner anti-rattle springs to each of the front disc brake pads.
Install the No. 1 and No. 2 anti-squeal shims to each of the front disc brake pads.
04465
2.INSTALL FRONT DISC BRAKE PAD KIT
|
|
|
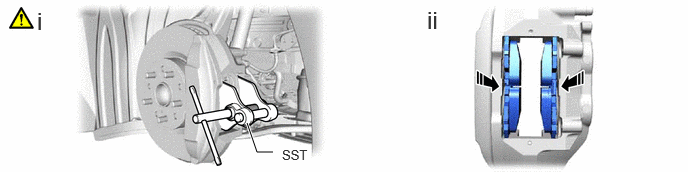
Using SST, push back the front disc brake pistons.
- SST
- 09719-77020
- NOTICE:
- ·
Make sure the brake fluid does not overflow from the reservoir.
·Do not forcibly push in the front disc brake pistons.
Install the 2 front disc brake pads to the disc brake cylinder assembly LH.
04947
3.INSTALL FRONT DISC BRAKE FITTING KIT
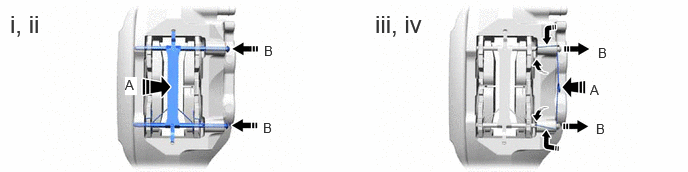
Install the anti-squeal spring between the 2 front disc brake pads.
Install the No. 1 anti-rattle spring to the disc brake cylinder LH.
While pressing the area (A), install the 2 hole pins (B).
While pressing the area (A), slightly pull out the hole pin (B) from the disc brake cylinder assembly LH, and install the pin hold clip.
4.CONNECT CABLE TO NEGATIVE AUXILIARY BATTERY TERMINAL
|
|
Click here()
|
5.INSPECT BRAKE FLUID LEVEL IN RESERVOIR
6.INSTALL FRONT WHEEL
7. INITIALIZATION AFTER RECONNECTING BATTERY TERMINAL
Click hereGeneral>SETUP>WHEN DISCONNECTING OR RECONNECTING BATTERY TERMINAL>WORK PROCEDURE
- HINT:
-
When disconnecting and reconnecting the battery, there is an automatic learning function that completes learning when the respective system is used.
-
Click hereGeneral>SETUP>WHEN DISCONNECTING OR RECONNECTING BATTERY TERMINAL>AUTOMATIC LEARNING CHART