REAR SUSPENSION REAR SHOCK ABSORBER INSTALLATION
CAUTION / NOTICE / HINT
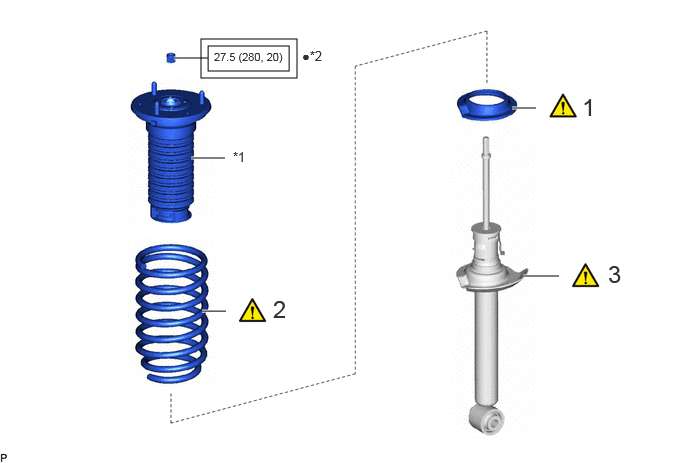
| Procedure | Part Name Code | 
|

|

|
|
|---|---|---|---|---|---|
| 1 | REAR LOWER COIL SPRING INSULATOR LH | 48258C | ( ) |
- | - |
| 2 | REAR COIL SPRING LH | 48231B | ()
|
- | - |
| 3 | REAR SHOCK ABSORBER ASSEMBLY LH | 48540 | ()
|
- | - |
| *1 | REAR SUSPENSION SUPPORT ASSEMBLY LH | *2 | LOCK NUT |

|
Tightening torque for "Major areas involving basic vehicle performance such as moving/turning/stopping": N*m (kgf*cm, ft.*lbf) | ● | Non-reusable part |
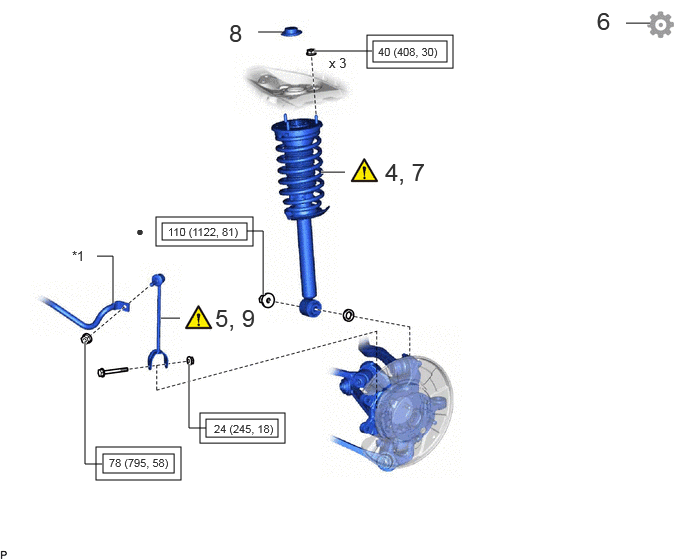
| Procedure | Part Name Code |
|
|
|
|
|---|---|---|---|---|---|
| 4 | TEMPORARILY TIGHTEN REAR SHOCK ABSORBER WITH COIL SPRING | - | ()
|
- | - |
| 5 | TEMPORARILY TIGHTEN REAR STABILIZER LINK ASSEMBLY LH | 48840A | ()
|
- | - |
| 6 | STABILIZE SUSPENSION | - | - | - | ()
|
| 7 | FULLY TIGHTEN REAR SHOCK ABSORBER WITH COIL SPRING | - | ()
|
- | - |
| 8 | REAR SHOCK ABSORBER CAP LH | 48554A | - | -
- |
- |
| 9 | FULLY TIGHTEN REAR STABILIZER LINK ASSEMBLY LH | 48840A | ()
|
- | - |
| *1 | REAR STABILIZER BAR | - | - |
|
|
Tightening torque for "Major areas involving basic vehicle performance such as moving/turning/stopping": N*m (kgf*cm, ft.*lbf) | ● | Non-reusable part |
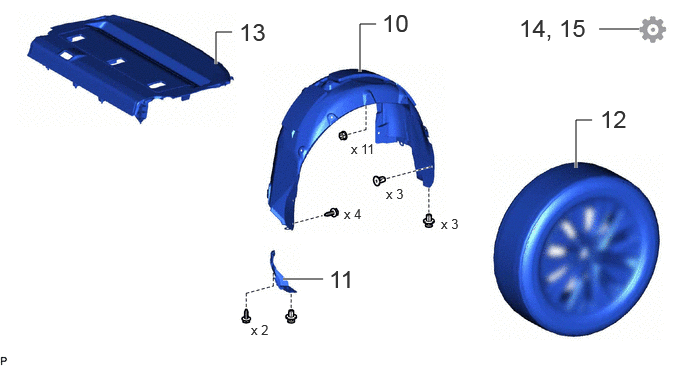
| Procedure | Part Name Code |
|
|
|
|
|---|---|---|---|---|---|
| 10 | REAR WHEEL HOUSE LINER LH | 65638 | - | - | - |
| 11 | ROCKER PANEL MOULDING PROTECTOR LH | 75866E | - | - | - |
| 12 | REAR TIRE LH | - | - | - | - |
| 13 | PACKAGE TRAY TRIM PANEL ASSEMBLY | 64330 | - | - | - |
| 14 | INSPECT AND ADJUST REAR WHEEL ALIGNMENT | - | - | - | ()
|
| 15 | PERFORM INITIALIZATION | - | - | - | ()
|
CAUTION / NOTICE / HINT
- HINT:
- ·
Use the same procedure for the RH and LH side.
·The following procedure is for the LH side.
PROCEDURE

 48258C
1.INSTALL REAR LOWER COIL SPRING INSULATOR LH

| *a | Depression | - | - |
Install the rear lower coil spring insulator LH to the rear shock absorber assembly LH.
48231B
2.INSTALL REAR COIL SPRING LH

Secure SST in a vise.
- SST
- 09727-30022
Attach the hooks of each SST arm across the diameter of the coil spring.
- CAUTION:
- ·
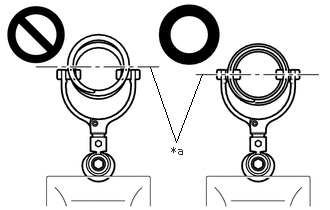 1.563,0.698 1.833,1.479 1.833,1.479 2.104,0.771 false 1.781,1.5 2.094,1.698 0.313,0.198 10 false *a
*a Rear Coil Spring Diameter
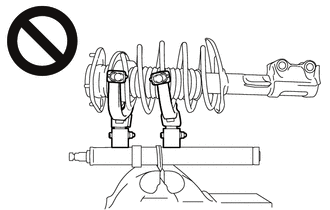
Do not perform the work without checking to make sure that the claws of the hooks are securely engaged.
·It could cause the hook to slip off and the spring to fly out, which could result in an injury.
·
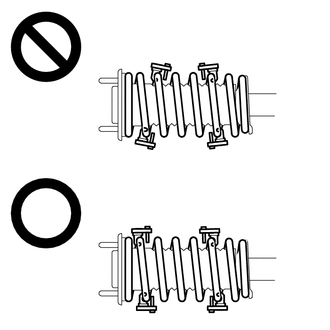
Do not install SST to the rear coil spring unless its top and bottom hook distance is set to the widest condition.
·It could cause the hook to slip off and the spring to fly out, which could result in an injury.
·
Do not install SST when the distances between the SST arms or the number of coils of the coil spring between the hooks are not the same.
·It could cause the hook to slip off and the spring to fly out, which could result in an injury.
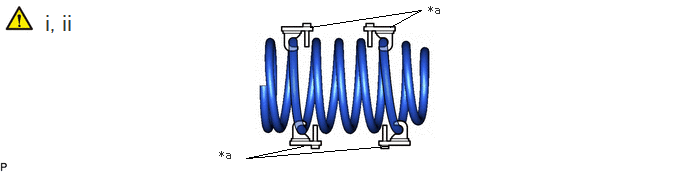
| *a | Stopper Pins | - | - |
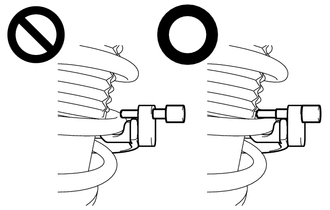
Install the stopper pins to the hooks of SST.
- CAUTION:
-
- ·
Do not perform the work if the stopper pin is not securely installed.
·It could cause the hook to slip off and the spring to fly out, which could result in an injury.
Using SST, compress the coil spring.
- CAUTION:
- ·
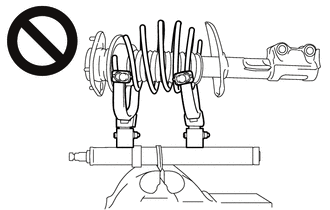
While compressing the spring, if the front coil spring starts to bend into a bow shape, do not continue the work.
·It could cause the hook to slip off and the spring to fly out, which could result in an injury.
·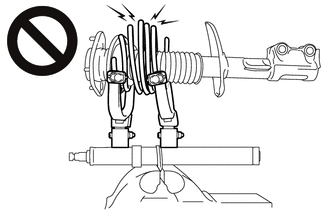
Do not compress the springs so far that the coils of the springs touch each other.
·It could cause the hook to slip off and the spring to fly out, which could result in an injury.
·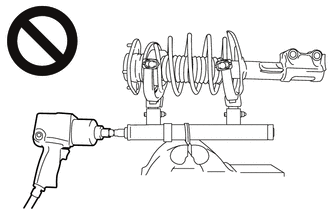
Do not use an impact wrench.
·The threads may be stripped, or the sudden compression may result in slack that causes the hooks to slip off, causing the spring to fly out and possibly resulting in injury.
·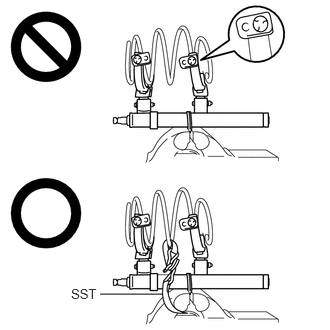 1.042,3.063 1.698,3.063 false 0.74,2.979 1.052,3.135 0.313,0.156 10 false SST
If a stopper pin touches the coil spring while using SST, remove the stopper pin and continue with the procedure.
If a stopper pin is removed, install SST as shown in the illustration.
·If a hook disengages from the coil spring, the coil spring may fly out, resulting in injury.
48540
3.INSTALL REAR SHOCK ABSORBER ASSEMBLY LH
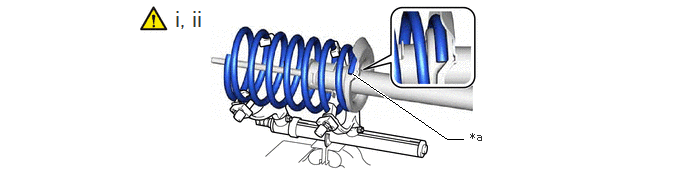
| *a | Depression | - | - |
Install the rear coil spring LH to the rear shock absorber assembly LH.
- NOTICE:
-
Make sure that the end of the rear coil spring is positioned in the depression of the rear lower coil spring insulator LH.
Install the rear No. 1 spring bumper LH to the rear support assembly suspension LH.
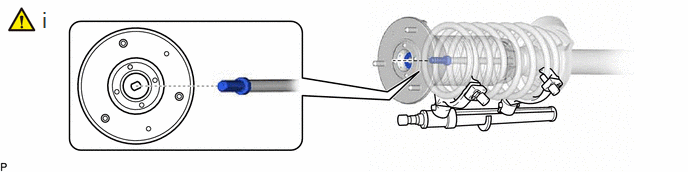
Install the rear support assembly suspension LH to the rear shock absorber assembly LH.
- NOTICE:
-
Match the shape of the rear shock absorber assembly support ring end to the shape of the rear support assembly suspension LH.

| *a | Rear Shock Absorber Assembly LH Claw | *b | End of Rear Upper Coil Spring Insulator LH |
Turn the rear support assembly suspension LH 120° or more to engage the end of the rear upper coil spring insulator LH to the rear shock absorber assembly LH claws.
- NOTICE:
- ·
Make sure that the end of the rear upper coil spring insulator LH is engaged securely to the 3 rear shock absorber assembly LH claws.
·Be careful not to deform the bellows of the rear upper coil spring insulator LH.
·Keep the rear upper coil spring insulator LH free of oil and grease.
Temporarily tighten a new lock nut.

| *a | for LH Side | *b | for RH Side |
| *c | Rear Shock Absorber Assembly LH Bushing Large-diameter Side | *d | Rear Shock Absorber Assembly LH Bushing Small-diameter Side |
| *e | Front Suspension Support Assembly LH Stud Bolt | *f | 0°+/-2° |

|
Front of the Vehicle | 
|
Outside of the Vehicle |
Adjust the rear support assembly suspension LH so that the bolts come to the positions as shown in the illustration, and remove SST from the rear coil spring.
- NOTICE:
- ·
Do not use an impact wrench. It will damage SST.
·Make sure that the width across flat on the rear shock absorber piston rod end is located parallel to the rear shock absorber bushing.
·Make sure of the direction of the rear suspension support assembly when removing SST.
4.TEMPORARILY TIGHTEN REAR SHOCK ABSORBER WITH COIL SPRING
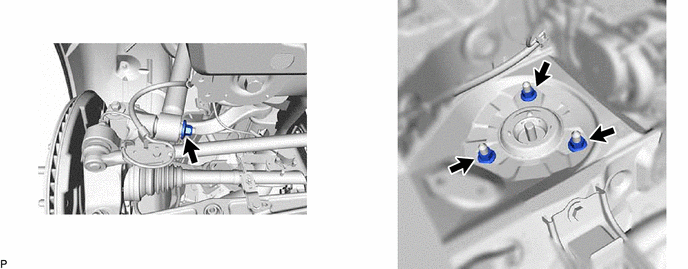
48840A
5.TEMPORARILY TIGHTEN REAR STABILIZER LINK ASSEMBLY LH
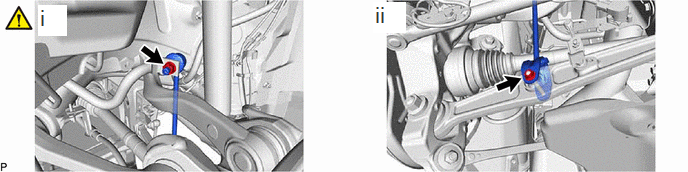
Temporarily tighten the rear stabilizer link assembly LH to the rear stabilizer bar with the nut.
- HINT:
-
If the ball joint turns together with the nut, use a 6 mm hexagon wrench to hold the stud bolt.
Temporarily tighten the rear stabilizer link assembly LH to the rear No. 2 suspension arm assembly LH with the bolt and nut.
6. STABILIZE SUSPENSION
Install the rear wheel.
Lower the vehicle and bounce it up and down several times to stabilize the rear suspension.
Remove the rear wheel.
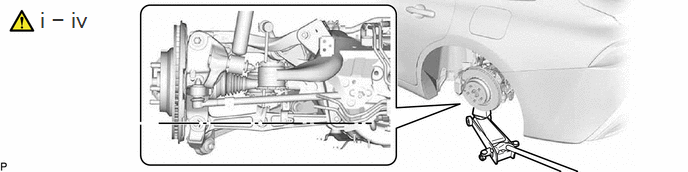
Jack up the axle carrier with a wooden block between the jack and axle carrier. Apply a load to the rear suspension so that the rear No. 2 suspension arm assembly LH becomes level.
- CAUTION:
-
- ·
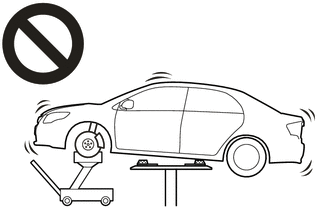
Do not raise the jack up too high.
·The vehicle could fall, resulting in a serious accident.
- NOTICE:
- ·
When jacking up the rear No. 2 suspension arm assembly LH, be sure to jack it up slowly.
·Make sure to perform this operation with the vehicle kept as low as possible.
7.FULLY TIGHTEN REAR SHOCK ABSORBER WITH COIL SPRING
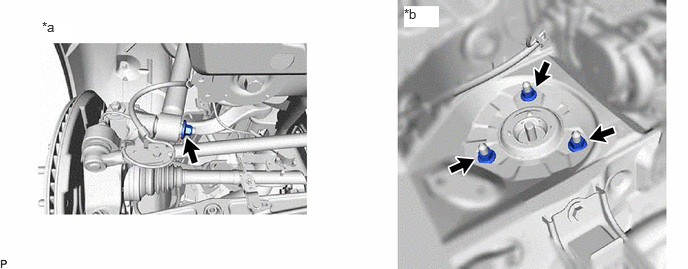
| *a | Lower Side | *b | Upper Side |
- Torque:
- Lower Side : 110 N*m (1122 kgf*cm, 81 ft.*lbf)
- Upper Side : 40 N*m (408 kgf*cm, 30 ft.*lbf)

Fully tighten the lock nut.
- Torque:
- 27.5 N*m (280 kgf*cm, 20 ft.*lbf)
- NOTICE:
-
Perform this step only when the rear shock absorber with coil spring has been disassembled.
48554A
8.INSTALL REAR SHOCK ABSORBER CAP LH

48840A
9.FULLY TIGHTEN REAR STABILIZER LINK ASSEMBLY LH
Fully tighten the nut.
- HINT:
-
If the ball joint turns together with the nut, use a 6 mm hexagon wrench to hold the stud bolt.
- Torque:
- 78 N*m (795 kgf*cm, 58 ft.*lbf)
Fully tighten the nut.
- Torque:
- 24 N*m (245 kgf*cm, 18 ft.*lbf)
65638
10.INSTALL REAR WHEEL HOUSE LINER LH
75866E
11.INSTALL ROCKER PANEL MOULDING PROTECTOR LH
12.INSTALL REAR TIRE LH
64330
13.INSTALL PACKAGE TRAY TRIM PANEL ASSEMBLY
14.INSPECT AND ADJUST REAR WHEEL ALIGNMENT
15.PERFORM INITIALIZATION