HYBRID / BATTERY CONTROL WATER PUMP WITH MOTOR INSTALLATION
CAUTION / NOTICE / HINT
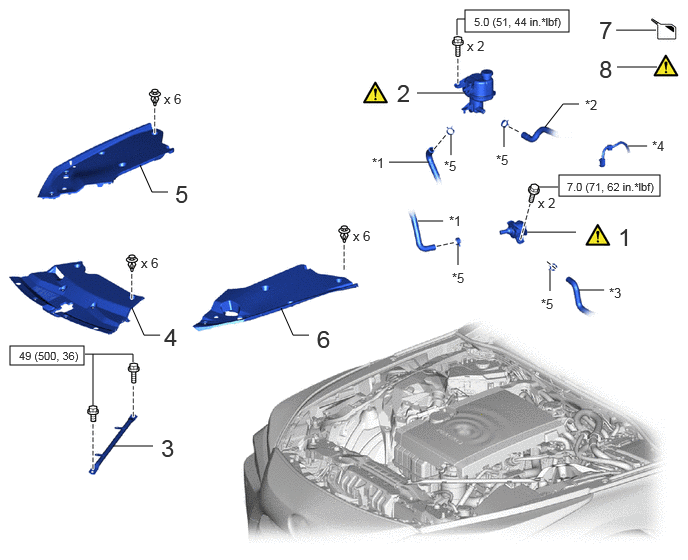
| Procedure | Part Name Code | 
|

|

|
|
|---|---|---|---|---|---|
| 1 | WATER WITH MOTOR PUMP ASSEMBLY | G9040E | ( ) |
- | - |
| 2 | EV RESERVE TANK ASSEMBLY | G91H0D | ()
|
- | - |
| 3 | RADIATOR SUPPORT TO CROSSMEMBER BRACE SUB-ASSEMBLY RH | 53209F | - | - | - |
| 4 | LOWER RADIATOR AIR DEFLECTOR | 53295 | - | - | - |
| 5 | RADIATOR COVER PLATE | 53291B | - | - | - |
| 6 | UPPER RADIATOR SUPPORT SEAL | 53292A | - | - | - |
| 7 | ADD COOLANT (for Inverter) | - | - | ()
|
- |
| 8 | INSPECT FOR COOLANT LEAK (for Inverter) | - | ()
|
- | - |
| *1 | NO. 6 FC INVERTER COOLING HOSE | *2 | NO. 7 FC INVERTER COOLING HOSE |
| *3 | NO. 15 FC INVERTER COOLING HOSE | *4 | CONNECTOR |
| *5 | HOSE CLIP | - | - |

|
N*m (kgf*cm, ft.*lbf): Specified torque | - | - |
PROCEDURE

 G9040E
1.INSTALL WATER WITH MOTOR PUMP ASSEMBLY
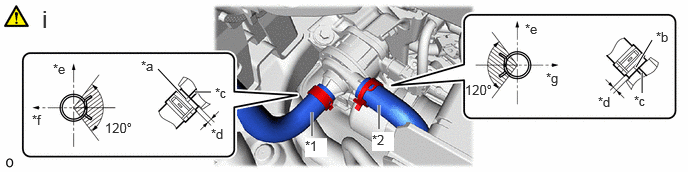
| *1 | No. 6 FC Inverter Cooling Hose | *2 | No. 15 FC Inverter Cooling Hose |
| *a | Alignment Mark (Yellow) | *b | Alignment Mark (White) |
| *c | Rib | *d | 2.0 to 7.0 mm (0.079 to 0.276 in.) |
| *e | Upper Side | *f | RH Side |
| *g | Rear Side | - |
Connect the No. 6 FC inverter cooling hose and No. 15 FC inverter cooling hose to the water with motor pump assembly and slide the 2 hose clips to secure them.
- NOTICE:
- ·
To prevent foreign matter from entering the water with motor pump assembly and inverter cooling system, do not remove the pieces of cloth from the pipes and disconnected hoses until installation.
·Do not apply excessive force to the No. 6 FC inverter cooling hose and No. 15 FC inverter cooling hose.
- HINT:
- ·
Make sure to align the alignment marks of the hoses with the ribs of the water with motor pump assembly.
·Make sure that the hose clips are positioned as shown in the illustration.
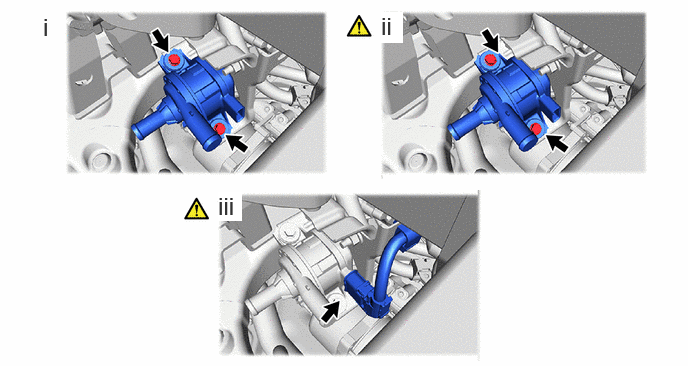
Temporarily install the water with motor pump assembly with the 2 bolts.
Tighten the 2 bolts.
- Torque:
- 7.0 N*m (71 kgf*cm, 62 in.*lbf)
- NOTICE:
-
The water with motor pump assembly may be damaged by overtightening the bolt. Therefore, be sure to use a torque wrench for tightening.
Connect the connector.
- NOTICE:
- ·
If the connector of the water with motor pump assembly is equipped with a dust prevention cap, remove the cap just before connecting the connector.
·Make sure that the connector is connected securely.
G91H0D
2.INSTALL EV RESERVE TANK ASSEMBLY
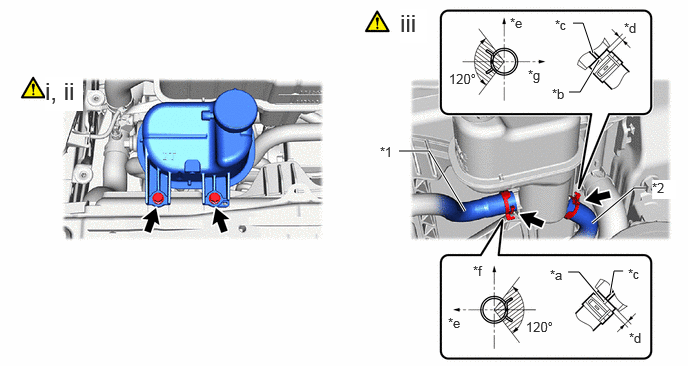
| *1 | No. 6 FC Inverter Cooling Hose | *2 | No. 7 FC Inverter Cooling Hose |
| *a | Alignment Mark (Yellow) | *b | Alignment Mark (White) |
| *c | Rib | *d | 2.0 to 7.0 mm (0.079 to 0.276 in.) |
| *e | Front of the Vehicle | *f | Upper Side |
| *g | Lower Side | - | - |
Connect the grommet and install the EV reserve tank assembly.
Install the 2 bolts.
- Torque:
- 5.0 N*m (51 kgf*cm, 44 in.*lbf)
- NOTICE:
-
The fan shroud may be damaged by overtightening the bolt. Therefore, be sure to use a torque wrench for tightening.
Connect the No. 6 FC inverter cooling hose and No. 7 FC inverter cooling hose to the EV reserve tank assembly and slide the 2 hose clips to secure them.
- NOTICE:
- ·
To prevent foreign matter from entering the inverter reserve tank assembly and inverter cooling system, do not remove the pieces of cloth from the pipes and disconnected hoses until installation.
·Do not apply excessive force to the No. 6 FC inverter cooling hose and No. 7 FC inverter cooling hose.
- HINT:
- ·
Make sure to align the alignment marks of the hoses with the ribs of the inverter reserve tank assembly.
·Make sure that the hose clips are positioned as shown in the illustration.
53209F
3.INSTALL RADIATOR SUPPORT TO CROSSMEMBER BRACE SUB-ASSEMBLY RH
53295
4.INSTALL LOWER RADIATOR AIR DEFLECTOR
53291B
5.INSTALL RADIATOR COVER PLATE
53292A
6.INSTALL UPPER RADIATOR SUPPORT SEAL
7.ADD COOLANT (for Inverter)
8.INSPECT FOR COOLANT LEAK (for Inverter)