FUEL HYDROGEN TANK ASSEMBLY(for No. 3) INSTALLATION
CAUTION / NOTICE / HINT
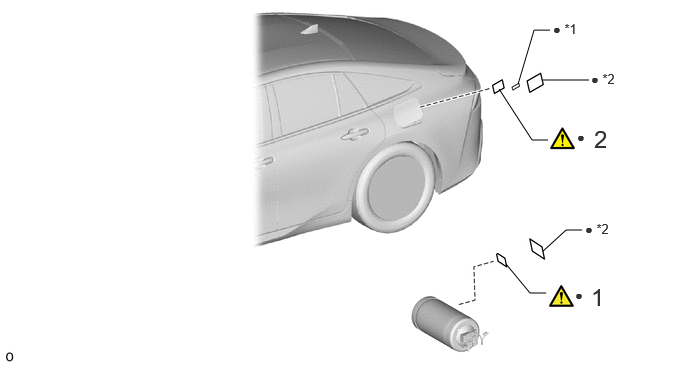
| Procedure | Part Name Code | 
|

|

|
|
|---|---|---|---|---|---|
| 1 | NO. 2 HYDROGEN TANK INFORMATION LABEL | 77A38 | ( ) |
- | - |
| 2 | HYDROGEN TANK PRESSURE INFORMATION LABEL | 77A61 | ()
|
- | - |
| *1 | TAPE | *2 | LABEL COVER FILM |
| ● | Non-reusable part | - | - |
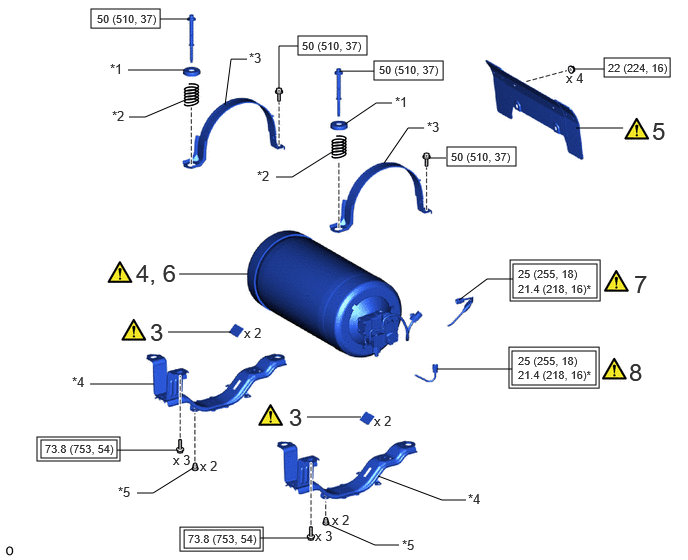
| Procedure | Part Name Code |
|
|
|
|
|---|---|---|---|---|---|
| 3 | NO. 2 HYDROGEN TANK FRAME SEAT | 77B61C | ()
|
- | - |
| 4 | NO. 3 HYDROGEN TANK ASSEMBLY | 77A30 | ()
|
- | - |
| 5 | HYDROGEN TANK PROTECTOR PLATE | 77BBA | ()
|
- | - |
| 6 | NO. 3 HYDROGEN TANK ASSEMBLY | 77A30 | ()
|
- | - |
| 7 | NO. 7 HYDROGEN TANK TUBE | 77BA7 | ()
|
- | - |
| 8 | NO. 4 HYDROGEN TANK TUBE | 77BA4 | ()
|
- | - |
| *1 | NO. 3 HYDROGEN TANK SPRING BOLT CAP | *2 | COMPRESSION SPRING |
| *3 | NO. 3 HYDROGEN TANK BAND SUB-ASSEMBLY | *4 | NO. 3 HYDROGEN TANK FRAME SUB-ASSEMBLY |
| *5 | GROMMET | - | - |

|
Tightening torque for "Major areas involving basic vehicle performance such as moving/turning/stopping" : N*m (kgf*cm, ft.*lbf) | 
|
N*m (kgf*cm, ft.*lbf): Specified torque |
| * | For use with union nut wrench | - | - |
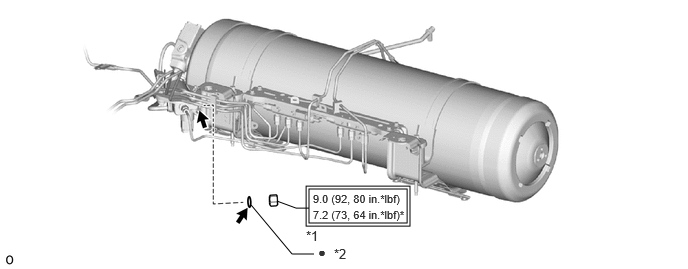
| *1 | NO. 1 HYDROGEN SUPPLY REGULATOR PLUG | *2 | O-RING |
|
|
Tightening torque for "Major areas involving basic vehicle performance such as moving/turning/stopping" : N*m (kgf*cm, ft.*lbf) | * | For use with SST |
| ● | Non-reusable part | 
|
TOYOTA Genuine FC Grease |
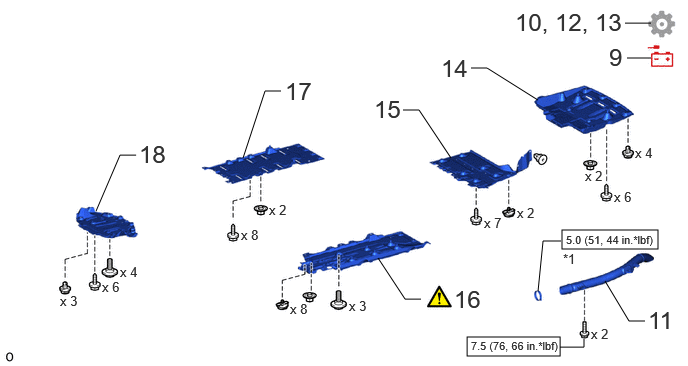
| Procedure | Part Name Code |
|
|
|
|
|---|---|---|---|---|---|
| 9 | CABLE TO NEGATIVE AUXILIARY BATTERY TERMINAL | - | - | - | - |
| 10 | FIRST LEAK CHECK | - | - | - | ()
|
| 11 | NO. 3 FC EXHAUST PIPE | 17DB3 | - | - | - |
| 12 | INITIALIZATION AFTER RECONNECTING BATTERY TERMINAL | - | - | - | ()
|
| 13 | SECOND LEAK CHECK | - | - | - | ()
|
| 14 | NO. 1 FLOOR UNDER COVER | 58398F | - | - | - |
| 15 | REAR FLOOR SIDE MEMBER COVER LH | 57628E | - | - | - |
| 16 | NO. 2 FLOOR BOARD SUB-ASSEMBLY | 58402K | ()
|
- | - |
| 17 | REAR NO. 3 FLOOR BOARD SUB-ASSEMBLY | 58403L | - | - | - |
| 18 | REAR NO. 4 FLOOR BOARD SUB-ASSEMBLY | 58404B | - | - | - |
| *1 | HOSE CLAMP | - | - |
|
|
N*m (kgf*cm, ft.*lbf): Specified torque | - | - |
PROCEDURE

 77A38
1.INSTALL NO. 2 HYDROGEN TANK INFORMATION LABEL
|
|
|
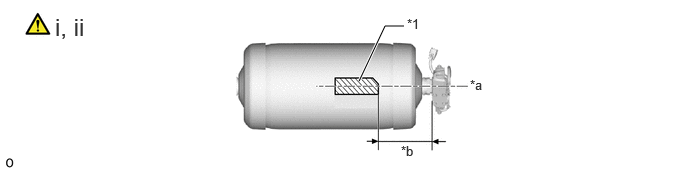
| *1 | No. 2 Hydrogen Tank Information Label | - | - |
| *a | Center of the No. 3 Hydrogen Tank Assembly | *b | 280 to 310 mm (11.0 to 12.2 in.) |
Apply the No. 2 hydrogen tank information label to the No. 3 hydrogen tank assembly as shown in the illustration.
- NOTICE:
-
Avoid the air bubbles as much as possible.
Apply new label cover film over the No. 2 hydrogen tank information label.
- NOTICE:
- ·
Do not protrude from the frame of the label.
·Avoid the air bubbles as much as possible.
77A61
2.REPLACE HYDROGEN TANK PRESSURE INFORMATION LABEL
|
|
|
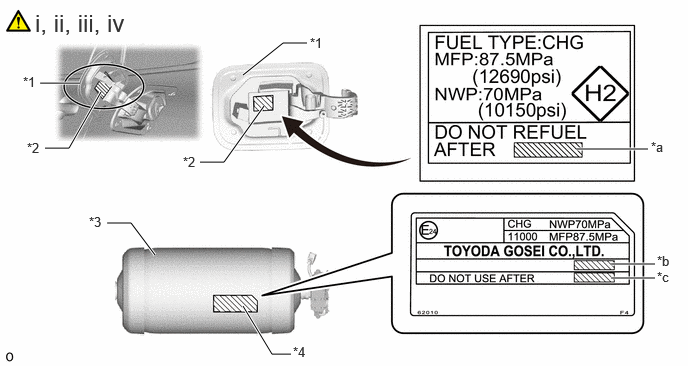
| *1 | Fuel Filler Opening Lid Assembly | *2 | Hydrogen Tank Pressure Information Label |
| *3 | No. 3 Hydrogen Tank Assembly | *4 | Hydrogen Tank Information Label |
| *a | Tape with DO NOT USE AFTER date recorded | *b | Location to record Tank Inspection Passed date |
| *c | Location to record DO NOT USE AFTER date | - | - |
Peel off the label cover film applied over the hydrogen tank pressure information label.
- NOTICE:
-
When peeling off the label cover film, if the hydrogen tank pressure information label is also peeled off, replace it with a new hydrogen tank pressure information label.
Record the item onto new tape.
| Recorded Item | Recorded Contents |
|---|---|
| DO NOT USE AFTER date | Check the DO NOT USE AFTER dates on the hydrogen tank information labels of the 3 hydrogen tank assemblies in the vehicle and record the oldest date (year/month).
|
- NOTICE:
- ·
Do not protrude from the frame of the label.
·When writing the text by hand, be sure to write the letters and numbers clearly and distinctly so that there can be no confusion.
- HINT:
-
When recording the items with the label printer, use black lettering on transparent tape.
Font Size Gothic 3.0 mm (0.118 in.)
Apply the tape with item recorded to the hydrogen tank pressure information label.
Apply new label cover film over the hydrogen tank pressure information label.
- NOTICE:
-
When applying the tape, avoid air bubbles as much as possible.
77B61C
3.INSTALL NO. 2 HYDROGEN TANK FRAME SEAT
|
|
|
77A30
4.INSTALL NO. 3 HYDROGEN TANK ASSEMBLY
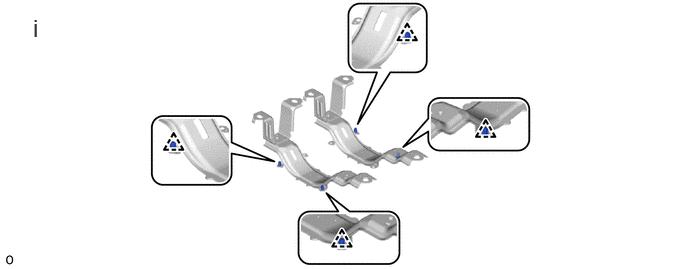
Install the 4 grommets.
- HINT:
-
This procedure is only performed when the grommet is being replaced with a new one.
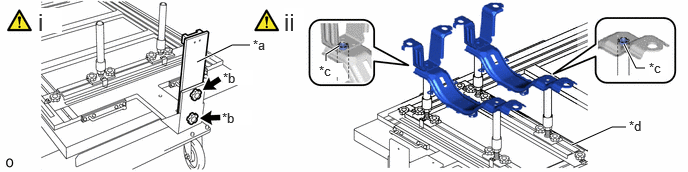
| *a | SST (Support No. 1) | *b | SST (Set bolt A) |
| *c | Protrusion | *d | SST (Hydrogen Tank Stand No. 2) |
Install SST (support No. 1) with 2 SST (set bolt A).
- SST
- 09403-62030 (09403-06200, 09403-06210)
Install the 2 No. 3 hydrogen tank frame sub-assemblies to SST (hydrogen tank stand No. 2)
- NOTICE:
-
Align the protrusions of each No. 3 hydrogen tank frame sub-assembly with the holes of SST (support No. 3).
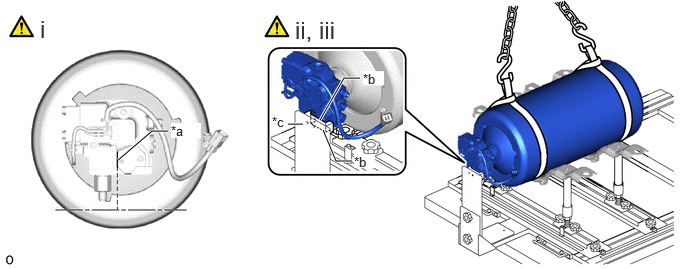
| *a | Valve Edge | *b | Make sure there is no gap |
| *c | SST (Support No. 1) | - | - |
Adjust the position of the No. 3 hydrogen tank assembly so that its valve edge is in the vertical direction as shown in the illustration.
Using the engine sling device and belt, hoist up the No. 3 hydrogen tank assembly.
- NOTICE:
-
Do not allow the No. 3 hydrogen tank assembly to fall.
Slowly press the valve edge of the No. 3 hydrogen tank assembly against SST (support No. 1), and set the No. 3 hydrogen tank assembly to the No. 3 hydrogen tank frame sub-assembly as shown in the illustration.
- NOTICE:
- ·
To prevent the No. 2 hydrogen tank frame seat from being moved out of position, perform positioning with the No. 3 hydrogen tank assembly lifted up.
·Make sure that there is no gap between the valve edge of the No. 3 hydrogen tank assembly and SST (support No. 1).
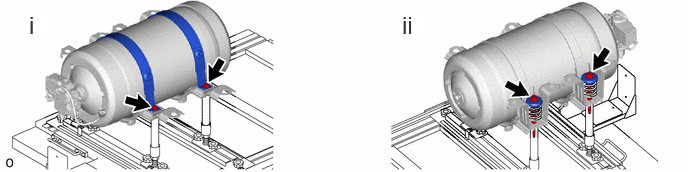
Install the 2 No. 3 hydrogen tank band sub-assemblies to the 2 No. 3 hydrogen tank frame sub-assemblies with the 2 bolts.
- Torque:
- 50 N*m (510 kgf*cm, 37 ft.*lbf)
Install the 2 No. 3 hydrogen tank spring cups and 2 compression springs with the 2 bolts.
- Torque:
- 50 N*m (510 kgf*cm, 37 ft.*lbf)
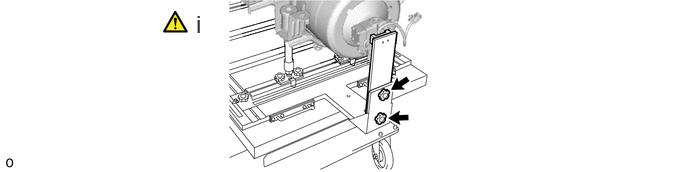
Remove the 2 SST (set bolt A) and SST (support No. 1)
- SST
- 09403-62030 (09403-06200, 09403-06210)
77BBA
5.INSTALL HYDROGEN TANK PROTECTOR PLATE
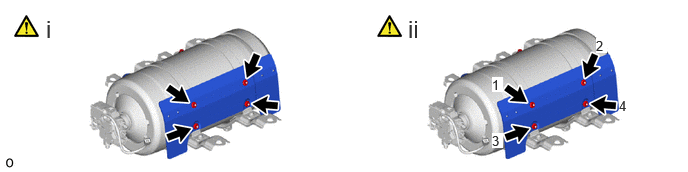
Temporarily install the hydrogen tank plate with the 4 nuts.
Tighten the 4 nuts in the order shown in the illustration.
- Torque:
- 22 N・m (224 kgf・cm, )
77A30
6.INSTALL NO. 3 HYDROGEN TANK ASSEMBLY
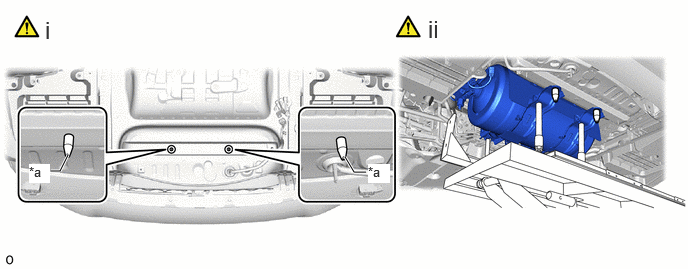
| *a | SST (Guide Pin A) | - | - |
Install 2 SST (guide pin A) as shown in the illustration.
- SST
- 09403-62030 (09403-06270)
Operate the engine lifter and slowly install the No. 3 hydrogen tank assembly to the vehicle.
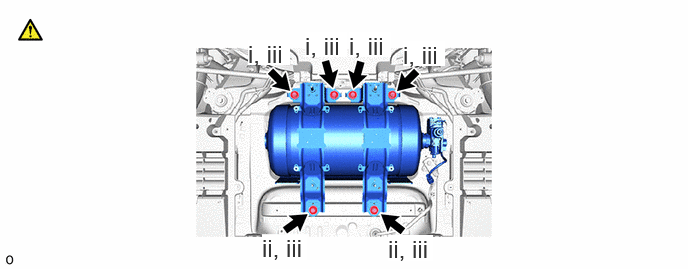
Temporarily install the No. 3 hydrogen tank assembly with the 4 bolts.
Remove 2 SST (guide pin A) and install the 2 bolts.
- SST
- 09403-62030 (09403-06270)
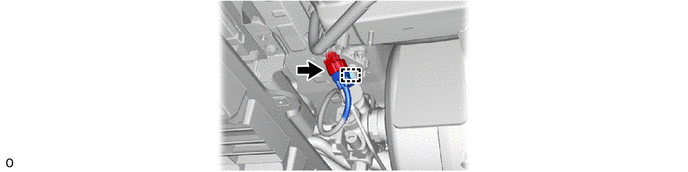
Tighten the 6 bolts.
- Torque:
- 73.8 N*m (753 kgf*cm, 54 ft.*lbf)
77BA7
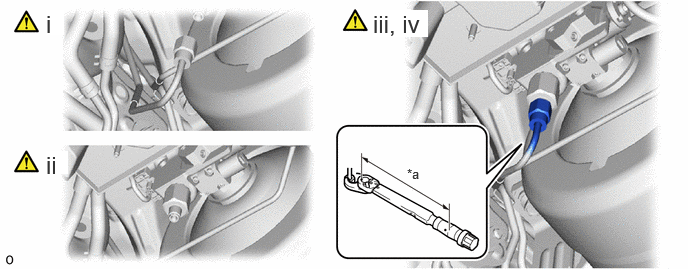
7.CONNECT NO. 7 HYDROGEN TANK TUBE
|
|
|
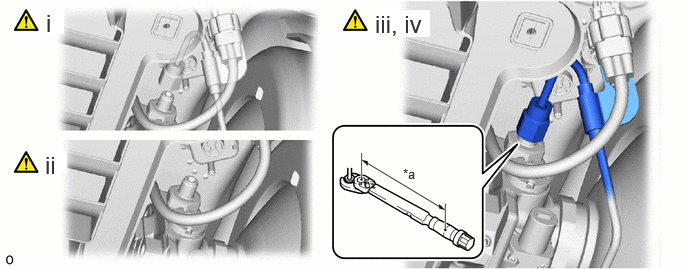
| *a | Torque Wrench Fulcrum Length | - | - |
To prevent contamination by foreign matter, remove the plastic bags from the openings of the No. 7 hydrogen tank tube immediately before performing the procedure.
- NOTICE:
-
When frost has formed on the hydrogen tank assembly or piping, water droplets may be formed when the frost begins to melt. If water droplets enter the tank or piping, it could result in blockage of the hydrogen piping, so do not allow water droplets to enter the tank or piping.
To prevent contamination by foreign matter, remove the protective tape from the openings of the No. 3 hydrogen tank assembly immediately before performing the procedure.
Temporarily install the No. 7 hydrogen tank tube to the No. 3 hydrogen tank assembly with the union nut.
Using a 19 mm union nut wrench, tighten the union nut while holding a tube part by hand.
- Torque:
- Specified tightening torque:
25 N*m (255 kgf*cm, 18 ft.*lbf)
- HINT:
- ·
Calculate the torque wrench reading when changing the fulcrum length of the torque wrench.
Click hereGeneral>INTRODUCTION>REPAIR INSTRUCTION>PRECAUTION
·When using a union nut wrench (fulcrum length of 30 mm (1.18 in.)) + torque wrench (fulcrum length of 180 mm (7.09 in.)): 21.4 N*m (218 kgf*cm, 16 ft.*lbf)
77BA4
8.CONNECT NO. 4 HYDROGEN TANK TUBE
|
|
|
| *a | Torque Wrench Fulcrum Length | - | - |
To prevent contamination by foreign matter, remove the plastic bags from the openings of the No. 4 hydrogen tank tube immediately before performing the procedure.
- NOTICE:
-
When frost has formed on the hydrogen tank assembly or piping, water droplets may be formed when the frost begins to melt. If water droplets enter the tank or piping, it could result in blockage of the hydrogen piping, so do not allow water droplets to enter the tank or piping.
To prevent contamination by foreign matter, remove the protective tape from the openings of the No. 3 hydrogen tank assembly immediately before performing the procedure.
Temporarily install the No. 4 hydrogen tank tube to the No. 3 hydrogen tank assembly with the union nut.
Using a 19 mm union nut wrench, tighten the union nut while holding a tube part by hand.
- Torque:
- Specified tightening torque:
25 N*m (255 kgf*cm, 18 ft.*lbf)
- HINT:
- ·
Calculate the torque wrench reading when changing the fulcrum length of the torque wrench.
Click hereGeneral>INTRODUCTION>REPAIR INSTRUCTION>PRECAUTION
·When using a union nut wrench (fulcrum length of 30 mm (1.18 in.)) + torque wrench (fulcrum length of 180 mm (7.09 in.)): 21.4 N*m (218 kgf*cm, 16 ft.*lbf)
9.CONNECT CABLE TO NEGATIVE AUXILIARY BATTERY TERMINAL
10. FIRST LEAK CHECK
17DB3
11.INSTALL NO. 3 FC EXHAUST PIPE
12. INITIALIZATION AFTER RECONNECTING BATTERY TERMINAL
Click hereGeneral>SETUP>WHEN DISCONNECTING OR RECONNECTING BATTERY TERMINAL>WORK PROCEDURE
- HINT:
-
When disconnecting and reconnecting the battery, there is an automatic learning function that completes learning when the respective system is used.
-
Click hereGeneral>SETUP>WHEN DISCONNECTING OR RECONNECTING BATTERY TERMINAL>AUTOMATIC LEARNING CHART
13. SECOND LEAK CHECK
58398F
14.INSTALL NO. 1 FLOOR UNDER COVER
57628E
15.INSTALL REAR FLOOR SIDE MEMBER COVER LH
58402K
16.INSTALL NO. 2 FLOOR BOARD SUB-ASSEMBLY
|
|
Click here()
|
58403L
17.INSTALL REAR NO. 3 FLOOR BOARD SUB-ASSEMBLY
58404B
18.INSTALL REAR NO. 4 FLOOR BOARD SUB-ASSEMBLY