FC CONTROL FC CONTROL SYSTEM PRECAUTION
PRECAUTIONS FOR INSPECTING FC CONTROL SYSTEM
- NOTICE:
-
This vehicle performs FC system shutdown process after turning the ignition switch off from ON (READY). Therefore, after the ignition switch is turned off from ON (READY), do not perform any work on the electrical system for at least 10 minutes including removing connectors or disconnecting the negative (-) auxiliary battery terminal.
Before the following operations are conducted, take precautions to prevent electric shock by turning the ignition switch off, wearing insulated gloves, and removing the EV supply battery assembly service plug grip and FC converter power outlet cable (inverter with converter assembly) on FC converter side.
Make sure to remove the EV supply battery assembly service plug grip first.
Inspecting the high-voltage system
Disconnecting the low voltage connector of the inverter with converter assembly
Disconnecting the low voltage connector of the EV supply battery assembly
Disconnecting the low voltage connector of the FC converter assembly
After removing the EV supply battery assembly service plug grip and FC converter power outlet cable (inverter with converter assembly) on FC converter side, store them according to the following guidelines to prevent other technicians from accidentally reconnecting them while work is being performed on the high voltage systems.
The technician performing the work should put the EV supply battery assembly service plug grip in their pocket and carry it with them.
Remove the FC converter power outlet cable (inverter with converter assembly) on FC converter side with a "HIGH-VOLTAGE, DO NOT TOUCH" caution tag attached to it for other technicians.
- NOTICE:
-
After removing the EV supply battery assembly service plug grip and FC converter power outlet cable (inverter with converter assembly) on FC converter side, turning the ignition switch to ON (READY) may cause a malfunction. Do not turn the ignition switch to ON (READY) unless instructed by the repair manual.
- HINT:
-
No removal order is specified for the EV supply battery assembly service plug grip and FC converter power outlet cable (inverter with converter assembly) on FC converter side.
Remove the FC converter power outlet cable (inverter with converter assembly) on FC converter side.
Click hereEngine / Hybrid System>HYBRID / BATTERY CONTROL>INVERTER WITH CONVERTER>REMOVAL
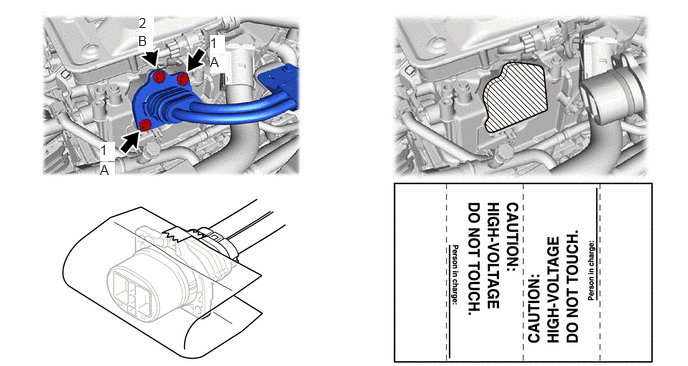
Remove the 2 bolts A and bolt B in the order shown in the illustration.
- NOTICE:
-
Removing the bolts in an incorrect order may damage the FC converter and FC converter power outlet cable (inverter with converter assembly).
Disconnect the FC converter power outlet cable.
Protect the openings of the FC converter assembly with protective tape (non-residue type) to prevent the entry of foreign matter or water.
Use the "CAUTION: HIGH VOLTAGE DO NOT TOUCH" sign to notify other technicians that the high-voltage system is being inspected and/or repaired.
- NOTICE:
-
Be careful not to touch the terminal before or during attaching the display label.
Remove the EV supply battery assembly service plug grip.
Click hereEngine / Hybrid System>HYBRID / BATTERY CONTROL>SERVICE PLUG GRIP>REMOVAL
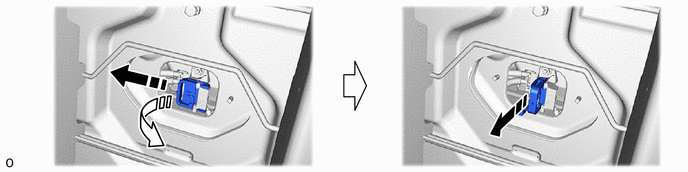
After removing the EV supply battery assembly service plug grip and FC converter power outlet cable (inverter with converter assembly) on FC converter side, wait for at least 10 minutes before touching any of the high-voltage connectors or terminals.
- HINT:
-
Waiting for at least 10 minutes is required to discharge the high-voltage capacitor inside the inverter with converter assembly and FC converter assembly.
Check the voltage at the terminals in the inspection point in the inverter with converter assembly.
- CAUTION:
-
Be sure to wear insulated gloves.
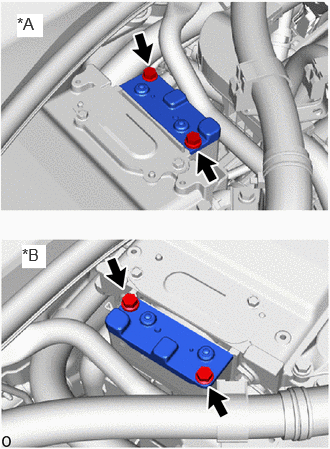
| *A | for LHD |
| *B | for RHD |
Remove the inverter cover from the inverter with converter assembly.
Click hereEngine / Hybrid System>HYBRID / BATTERY CONTROL>INVERTER WITH CONVERTER>REMOVAL
- NOTICE:
- ·
Do not touch the connector cover assembly waterproof seal.
·Make sure that no foreign matter or water has entered the inverter with converter assembly.
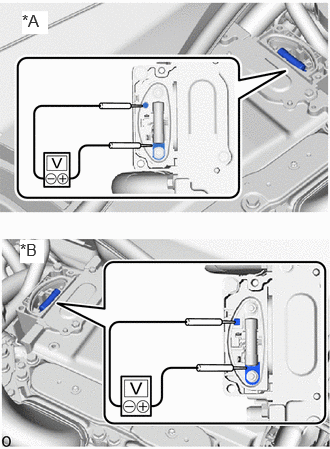
| *A | for LHD |
| *B | for RHD |
Measure the voltage according to the value(s) in the table below.
- Standard Voltage:
Tester Connection Condition Specified Condition Inspection point At least 10 minutes after removing the service plug grip 0 V
- HINT:
-
Set the tester to DC750 V or more to measure the voltage.
When turning the ignition switch to ON during an inspection, do not press the power switch with the brake pedal depressed.
- CAUTION:
-
Pressing the power switch with the brake pedal depressed causes the system to enter the READY-on state. This is very dangerous because high voltage may be applied to the inspection area.
Turn the ignition switch off, wear insulated gloves, and disconnect the cable from the negative (-) terminal of the auxiliary battery before touching any of the orange-colored wires of the high-voltage system.
Turn the ignition switch off before performing any resistance checks.
Turn the ignition switch off before disconnecting or reconnecting any connectors.
When performing work involving high-voltage wires, use either a tool wrapped with vinyl insulation tape or an insulated tool.
When high-voltage connectors are removed, wrap the connectors with insulation tape to prevent them from contacting foreign matter.
Connect the FC converter power outlet cable to the FC converter.

Tighten the 2 bolts (A) and bolt (B) in the order shown in the illustration.
- Torque:
- 8.0 N*m (82 kgf*cm, 71 in.*lbf)
- NOTICE:
-
Installing the bolts in an incorrect order may damage the FC converter and FC converter power outlet cable (inverter with converter assembly).
Reinstall the EV supply battery assembly service plug grip.
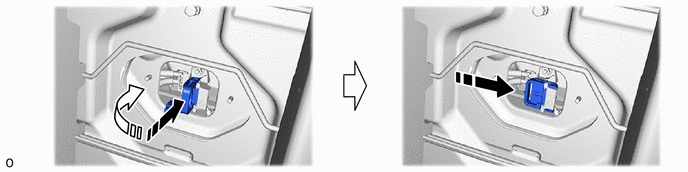
- NOTICE:
- ·
Before connecting the EV supply battery assembly service plug grip, check that no components or tools have been left behind, and check that high voltage terminals are tightened and connectors are connected.
·After lowering the EV supply battery assembly service plug grip 90°, securely slide it until a "click" sound is heard.
NOTICE FOR ANTIFREEZE CONTROL
When the EV control ECU determines that the temperature of FC system components is below 0°C (32°F) when the vehicle is parked with the ignition switch off, it operates the FC air compressor, hydrogen pump and FC cooling water pump for a maximum of 180 seconds to drain the FC stack assembly. When performing inspection or repairs with the ignition switch off (not ON or ON (READY)), disconnect the cable from the negative (-) auxiliary battery terminal before performing work. (If the auxiliary battery voltage is needed to conduct inspection, perform the inspection in an environment with an ambient temperature of 10°C (50°F) or higher.)
PRECAUTIONS FOR DISCONNECTING AMD TERMINAL
- HINT:
-
The AMD terminal is connected to the positive terminal of the auxiliary battery. To prevent damage when the AMD terminal is being disconnected, use the following procedure.
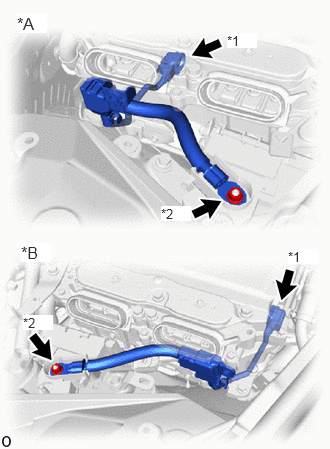
| *A | for LHD |
| *B | for RHD |
| *1 | AMD Terminal (Inverter with Converter Assembly Side) |
| *2 | AMD Terminal (Fusible Link Block Assembly Side) |
Be sure to disconnect the cable from the negative (-) terminal of the auxiliary battery before disconnecting the AMD terminal from the fusible link assembly.
- NOTICE:
- ·
After turning the ignition switch off, there may be a waiting time before disconnecting the negative (-) auxiliary battery terminal.
Click hereGeneral>SETUP>WHEN DISCONNECTING OR RECONNECTING BATTERY TERMINAL>BEFORE DISCONNECTING BATTERY
·When disconnecting and reconnecting the auxiliary battery.
Click hereGeneral>SETUP>WHEN DISCONNECTING OR RECONNECTING BATTERY TERMINAL>WORK PROCEDURE
- HINT:
-
When disconnecting and reconnecting the auxiliary battery, there is an automatic learning function that completes learning when the respective system is used.
-
Click hereGeneral>SETUP>WHEN DISCONNECTING OR RECONNECTING BATTERY TERMINAL>AUTOMATIC LEARNING CHART
After disconnecting the AMD terminal, wrap the terminal with insulation tape.
Be sure to reconnect the AMD terminal to the fusible link assembly before reconnecting the cable to the negative (-) terminal of the auxiliary battery.
- NOTICE:
-
A short circuit to ground may occur if the AMD terminal is disconnected before the cable is disconnected from the negative (-) terminal of the auxiliary battery. If a short circuit to ground occurs, it can result in an open circuit in a fusible link or fuse.
PRECAUTIONS FOR REPLACING EV CONTROL ECU AND FC BOOST CONTROL ECU (FC CONVERTER ASSEMBLY)
- NOTICE:
-
When the EV control ECU or FC boost control ECU (FC converter assembly) is replaced, update the ECU security key.
-
Click hereGeneral>SETUP>WHEN REPLACING OR REMOVING/INSTALLING PARTS>UPDATE ECU SECURITY KEY
PRECAUTION WHEN REPLACING BATTERY ECU ASSEMBLY AND EV CONTROL ECU
EV supply battery assembly learning values are stored in the battery ECU assembly and EV control ECU to display "Maintenance Required for Traction Battery at Your Dealer" on the multi-information display. When either of these ECUs is replaced, the new ECU receives the EV supply battery assembly learning value data from the other ECU and updates the information.
- NOTICE:
- ·
Do not replace the battery ECU assembly and EV control ECU at the same time as it clears the EV supply battery assembly learning values. However, if it is necessary to replace both ECUs at the same time, replace them by following the procedure below.
·Do not replace the battery ECU assembly or EV control ECU with used ones from other vehicles.
Procedure when replacing both battery ECU assembly and EV control ECU:
Disconnect the cable from the negative (-) auxiliary battery terminal.
Replace either of the ECUs.
Connect the cable to the negative (-) auxiliary battery terminal.
Turn the ignition switch to ON (READY) and wait for 5 minutes or more.
Turn the ignition switch off and disconnect the cable from the negative (-) auxiliary battery terminal.
Replace the other ECU.
Connect the cable to the negative (-) auxiliary battery terminal.
Check that the ignition switch can be turned to ON (READY).
- HINT:
-
If the battery ECU assembly and EV control ECU are replaced at the same time without following the above procedure, replace either of the ECUs with its original one and then replace it again by following the above procedure. If the correct procedure is not followed, perform the procedure again from the beginning.
PRECAUTIONS FOR WORKING IN FRONT COMPARTMENT
- CAUTION:
-
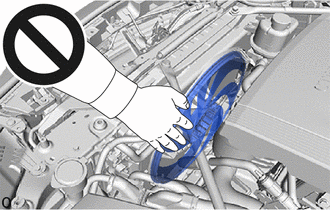
-
The electric fans may be activated unintentionally. Thus, keep your hands and tools away from the fans.