EXTERIOR PANELS / TRIM FRONT BUMPER REASSEMBLY
CAUTION / NOTICE / HINT
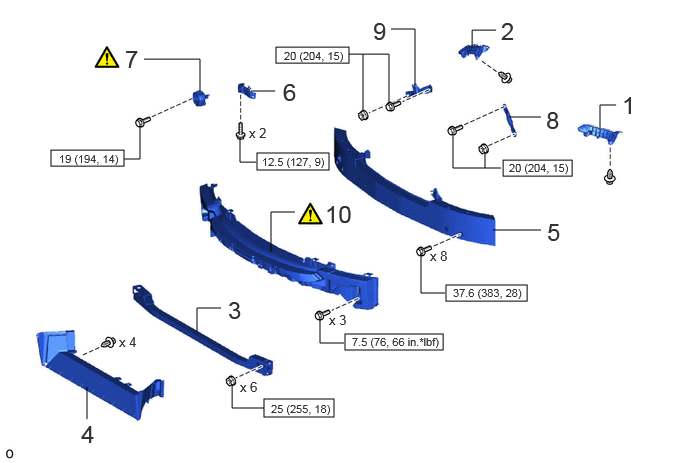
| Procedure | Part Name Code | 
|

|

|
|
|---|---|---|---|---|---|
| 1 | FRONT BUMPER SIDE SUPPORT LH | 52116A | - | - | - |
| 2 | FRONT BUMPER SIDE SUPPORT RH | 52115A | - | - | - |
| 3 | FRONT BUMPER NO. 2 REINFORCEMENT SUB-ASSEMBLY | 52029B | - | - | - |
| 4 | LOWER RADIATOR AIR GUIDE PLATE | 16683A | - | - | - |
| 5 | FRONT BUMPER REINFORCEMENT SUB-ASSEMBLY | 52021 | - | - | - |
| 6 | HORN BRACKET | 86591 | - | - | - |
| 7 | VEHICLE APPROACHING SPEAKER ASSEMBLY | 86570 | ( ) |
- | - |
| 8 | UPPER RADIATOR SUPPORT BRACE LH | 51466 | - | - | - |
| 9 | UPPER RADIATOR SUPPORT BRACE RH | 51465 | - | - | - |
| 10 | FRONT BUMPER ENERGY ABSORBER SUB-ASSEMBLY | - | ()
|
- | - |

|
N*m (kgf*cm, ft.*lbf): Specified torque | - | - |
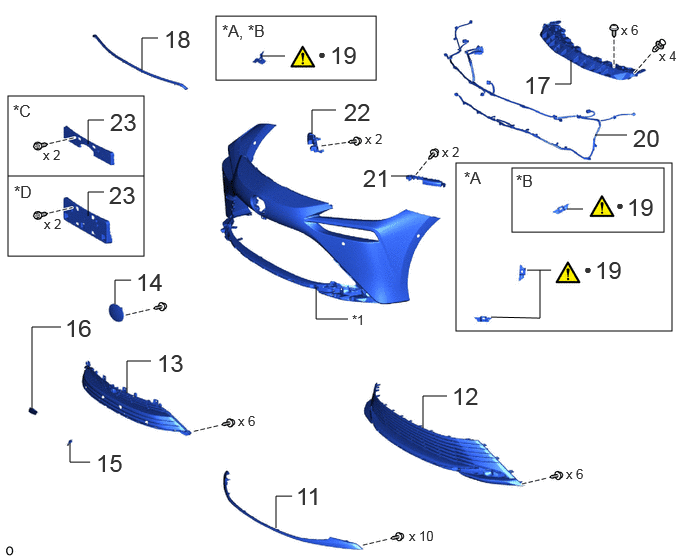
| Procedure | Part Name Code |
|
|
|
|
|---|---|---|---|---|---|
| 11 | LOWER RADIATOR GRILLE MOULDING | 53123D | - | - | - |
| 12 | LOWER RADIATOR GRILLE SUB-ASSEMBLY | 53102A | - | - | - |
| 13 | RADIATOR GRILLE SUB-ASSEMBLY | 53101 | - | - | - |
| 14 | RADIATOR GRILLE EMBLEM | 75311 | - | - | - |
| 15 | LOWER RADIATOR GRILLE RH | 53127A | - | - | - |
| 16 | FRONT BUMPER HOLE COVER | 52127C | - | - | - |
| 17 | RADIATOR GRILLE BRACKET | 53115H | - | - | - |
| 18 | HOOD TO FRONT END PANEL SEAL | 53395E | - | - | - |
| 19 | FRONT ULTRASONIC SENSOR CLIP | 89348X | ()
|
- | - |
| 20 | FRONT NO. 4 COMPARTMENT WIRE | 82114C | - | - | - |
| 21 | FRONT BUMPER EXTENSION LH | 52113D | - | - | - |
| 22 | FRONT BUMPER EXTENSION RH | 52112D | - | - | - |
| 23 | FRONT BUMPER EXTENSION MOUNTING BRACKET | 52114B | - | - | - |
| *A | w/ TOYOTA Parking Assist-sensor System | *B | w/ Advanced Park |
| *C | for Type A | *D | for Type B |
| *1 | FRONT BUMPER COVER | - | - |
| ● | Non-reusable part | - | - |
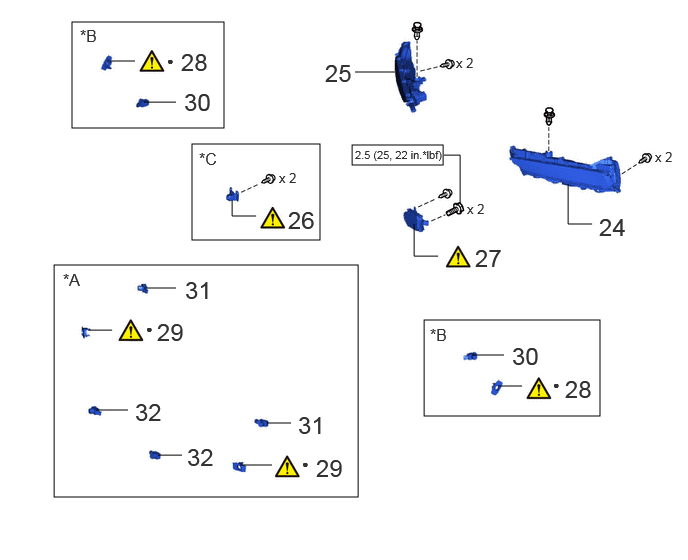
| Procedure | Part Name Code |
|
|
|
|
|---|---|---|---|---|---|
| 24 | FRONT TURN SIGNAL LIGHT ASSEMBLY LH | 81520 | - | - | - |
| 25 | FRONT TURN SIGNAL LIGHT ASSEMBLY RH | 81510 | - | - | - |
| 26 | FRONT TELEVISION CAMERA ASSEMBLY | 86790B | ()
|
- | - |
| 27 | MILLIMETER WAVE RADAR SENSOR ASSEMBLY | 88211B | ()
|
- | - |
| 28 | FRONT SIDE ULTRASONIC SENSOR RETAINER | 89C48F | ()
|
- | - |
| 29 | FRONT CORNER ULTRASONIC SENSOR RETAINER | 89C48D | ()
|
- | - |
| 30 | FRONT SIDE ULTRASONIC SENSOR | 89341M | - | - | - |
| 31 | FRONT CORNER ULTRASONIC SENSOR | 89341K | - | - | - |
| 32 | FRONT CENTER ULTRASONIC SENSOR | 89341L | - | - | - |
| *A | w/ TOYOTA Parking Assist-sensor System | *B | w/ Advanced Park |
| *C | w/ Panoramic View Monitor System | - | - |
|
|
N*m (kgf*cm, ft.*lbf): Specified torque | ● | Non-reusable part |
PROCEDURE

 52116A
1.INSTALL FRONT BUMPER SIDE SUPPORT LH
52115A
2.INSTALL FRONT BUMPER SIDE SUPPORT RH
52029B
3.INSTALL FRONT BUMPER NO. 2 REINFORCEMENT SUB-ASSEMBLY
- Torque:
- 25 N*m (255 kgf*cm, 18 ft.*lbf)
16683A
4.INSTALL LOWER RADIATOR AIR GUIDE PLATE
52021
5.INSTALL FRONT BUMPER REINFORCEMENT SUB-ASSEMBLY
- Torque:
- 37.6 N*m (383 kgf*cm, 28 ft.*lbf)
86591
6.INSTALL HORN BRACKET
86570
7.INSTALL VEHICLE APPROACHING SPEAKER ASSEMBLY
|
|
Click here()
|
51466
8.INSTALL UPPER RADIATOR SUPPORT BRACE LH
- Torque:
- Bolt : 20 N*m (204 kgf*cm, 15 ft.*lbf)
- Nut : 20 N*m (204 kgf*cm, 15 ft.*lbf)
51465
9.INSTALL UPPER RADIATOR SUPPORT BRACE RH
- Torque:
- Bolt : 20 N*m (204 kgf*cm, 15 ft.*lbf)
- Nut : 20 N*m (204 kgf*cm, 15 ft.*lbf)
10.INSTALL FRONT BUMPER ENERGY ABSORBER SUB-ASSEMBLY
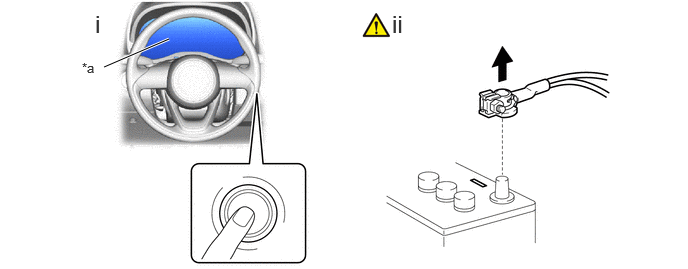
| *a | Goes off | - | - |
Check that the ignition switch is off.
Check that the cable is disconnected from the negative (-) auxiliary battery terminal.
- CAUTION:
- ·
Wait at least 60 seconds after disconnecting the cable from the negative (-) auxiliary battery terminal to disable the SRS system.
·If the airbag deploys for any reason, it may cause a serious accident.
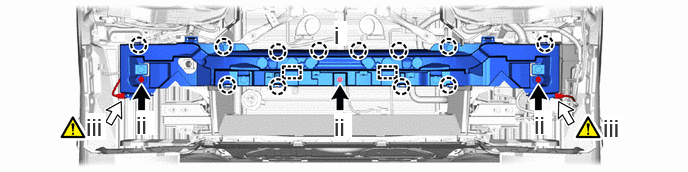

|
Bolt | 
|
Airbag Connector |
Attach the guide and claw and install the front bumper energy absorber sub-assembly.
Install the 3 bolts.
- Torque:
- 7.5 N*m (76 kgf*cm, 66 in.*lbf)
Connect the 2 airbag connectors.
- NOTICE:
- ·
When connecting any airbag connector, take care not to damage the airbag wire harness.
·Make sure the lock button is securely locked.
- HINT:
-
Refer to How to Connect or Disconnect Airbag Connector: Click hereVehicle Interior>SUPPLEMENTAL RESTRAINT SYSTEMS>AIRBAG SYSTEM>HOW TO CONNECT OR DISCONNECT AIRBAG CONNECTOR
53123D
11.INSTALL LOWER RADIATOR GRILLE MOULDING
53102A
12.INSTALL LOWER RADIATOR GRILLE SUB-ASSEMBLY
53101
13.INSTALL RADIATOR GRILLE SUB-ASSEMBLY
75311
14.INSTALL RADIATOR GRILLE EMBLEM
53127A
15.INSTALL LOWER RADIATOR GRILLE RH
52127C
16.INSTALL FRONT BUMPER HOLE COVER
53115H
17.INSTALL RADIATOR GRILLE BRACKET
53395E
18.INSTALL HOOD TO FRONT END PANEL SEAL
89348X
19.INSTALL FRONT ULTRASONIC SENSOR CLIP (w/ TOYOTA Parking Assist-sensor System)
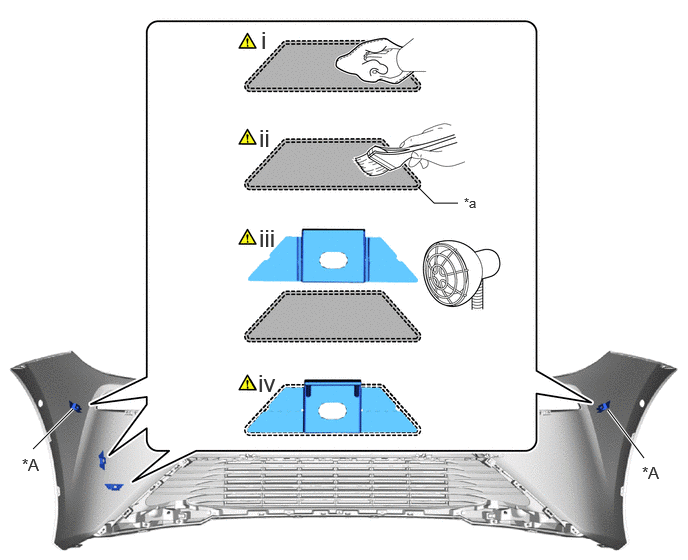
| *A | w/ Advanced Park | - | - |
| *a | Mark-off Line | - | - |

|
Installation area | - | - |
Clean the front bumper cover surface:
1. When reusing the front bumper cover, remove remaining double-sided tape from the front bumper cover.
2. Using a heat light, heat the front bumper cover surface.
- Standard Value:
Part Temperature Front Bumper Cover 20 to 30°C (68 to 86°F) Front Ultrasonic Sensor Clip 20 to 30°C (68 to 86°F)
- CAUTION:
-
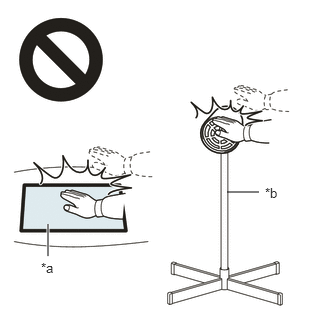 2.365,2 2.698,2 false 0.5,2.333 0.5,2.667 true 0.427,2.708 0.74,2.865 0.313,0.156 10 false *a 2.76,1.927 3.073,2.083 0.313,0.156 10 false *b
*a Heated Part *b Heat Light
- ·
Do not touch the heat light and heated parts.
·Touching the heat light may result in burns.
·Touching heated parts for a long time may result in burns.
- NOTICE:
-
Do not heat the front bumper cover excessively.
3. Remove any remaining double-sided tape from the front bumper cover and wipe off any tape adhesive residue with cleaner.
4. Clean the installation area surface.
- NOTICE:
- ·
Installing the front ultrasonic sensor clip with some double-sided tape remaining may cause poor adhesion. Perform this procedure until the tape is sufficiently removed.
·Make sure to use a cloth when removing. Using a screwdriver, etc., may cause damage and poor adhesion.
·Also, clean a new front bumper cover surface.
Primer application:
1. Apply primer to the front bumper cover on the installation area of the front ultrasonic sensor clip using a brush or felt.
- NOTICE:
- ·
Replace the brush or felt if it is dirty or has become hardened.
·Keep any painted surface free from primer.
·If the primer contacts a painted surface, it may leave light primer marks. Therefore, use protective tape when using liquid primer.
·Do not touch surfaces to which primer has been applied until the front ultrasonic sensor clip has been attached.
2. Let the primer dry sufficiently.
- NOTICE:
-
Do not touch applied surfaces until the primer is dry.
- Recommended drying time:
10 minutes or more (at 23°C (73°F))
Using a heat light, heat the front bumper cover and a new front ultrasonic sensor clip.
- NOTICE:
-
Do not heat the front ultrasonic sensor clip and front bumper cover excessively.
Install each front ultrasonic sensor clip in the position shown in the illustration.
- NOTICE:
-
The application strength of the front ultrasonic sensor clip will weaken if reapplied. If reapplication is necessary, be sure to replace it with a new one.
- HINT:
-
Apply pressure so that it does not lift up from the front bumper cover.
82114C
20.INSTALL FRONT NO. 4 COMPARTMENT WIRE
52113D
21.INSTALL FRONT BUMPER EXTENSION LH
52112D
22.INSTALL FRONT BUMPER EXTENSION RH
52114B
23.INSTALL FRONT BUMPER EXTENSION MOUNTING BRACKET
81520
24.INSTALL FRONT TURN SIGNAL LIGHT ASSEMBLY LH
81510
25.INSTALL FRONT TURN SIGNAL LIGHT ASSEMBLY RH
86790B
26.INSTALL FRONT TELEVISION CAMERA ASSEMBLY (w/ Panoramic View Monitor System)
|
|
Click here()
|
88211B
27.INSTALL MILLIMETER WAVE RADAR SENSOR ASSEMBLY
|
|
Click here()
|
89C48F
28.INSTALL FRONT SIDE ULTRASONIC SENSOR RETAINER (w/ Advanced Park)
|
|
Click here()
|
89C48D
29.INSTALL FRONT CORNER ULTRASONIC SENSOR RETAINER (w/ TOYOTA Parking Assist-sensor System)
|
|
Click here()
|
89341M
30.INSTALL FRONT SIDE ULTRASONIC SENSOR (w/ Advanced Park)
89341K
31.INSTALL FRONT CORNER ULTRASONIC SENSOR (w/ TOYOTA Parking Assist-sensor System)
89341L
32.INSTALL FRONT CENTER ULTRASONIC SENSOR (w/ TOYOTA Parking Assist-sensor System)