INTERIOR PANELS / TRIM FRONT CONSOLE BOX INSTALLATION
CAUTION / NOTICE / HINT
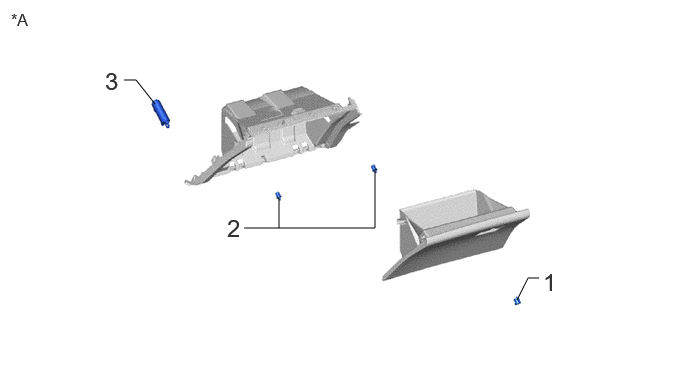
| Procedure | Part Name Code | 
|

|

|
|
|---|---|---|---|---|---|
| 1 | GLOVE COMPARTMENT DOOR LOCK CYLINDER ASSEMBLY | 69550A | - | - | - |
| 2 | GLOVE COMPARTMENT DOOR CHECK CUSHION | 55557A | - | - | - |
| 3 | GLOVE COMPARTMENT DOOR STOPPER SUB-ASSEMBLY | 55054 | - | - | - |
| *A | for RHD | - | - |
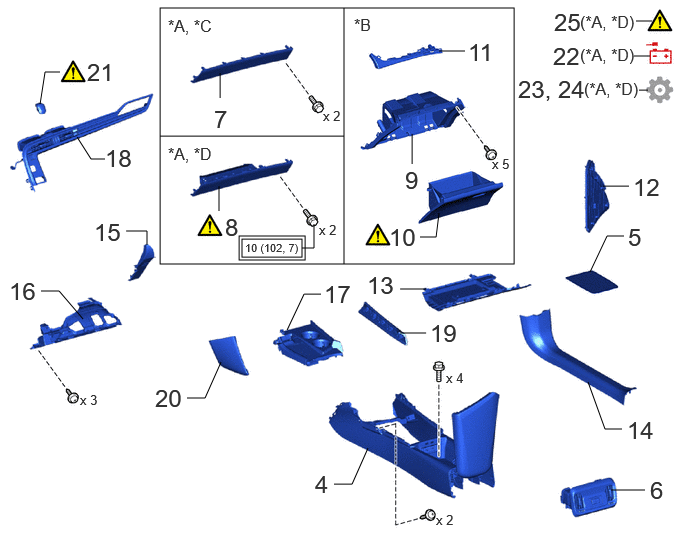
| Procedure | Part Name Code |
|
|
|
|
|---|---|---|---|---|---|
| 4 | CONSOLE BOX ASSEMBLY | 58810J | - | - | - |
| 5 | CONSOLE BOX CARPET | 58815C | - | - | - |
| 6 | CONSOLE REAR END PANEL SUB-ASSEMBLY | 58903A | - | - | - |
| 7 | INSTRUMENT PANEL FINISH PANEL END RH | 55435A | - | - | - |
| 8 | LOWER NO. 2 INSTRUMENT PANEL AIRBAG ASSEMBLY | 73990 | ( ) |
- | - |
| 9 | LOWER NO. 2 INSTRUMENT PANEL FINISH PANEL | 55433B | - | - | - |
| 10 | GLOVE COMPARTMENT DOOR SUB-ASSEMBLY | 55501A | ()
|
- | - |
| 11 | LOWER INSTRUMENT CLUSTER FINISH PANEL GARNISH | 55479D | - | - | - |
| 12 | NO. 2 INSTRUMENT SIDE PANEL | 55318F | - | - | - |
| 13 | NO. 2 INSTRUMENT PANEL UNDER COVER SUB-ASSEMBLY | 55607 | - | - | - |
| 14 | FRONT DOOR SCUFF PLATE RH | 67913 | - | - | - |
| 15 | LOWER INSTRUMENT PANEL FINISH PANEL SUB-ASSEMBLY LH | 55046A | - | - | - |
| 16 | NO. 1 INSTRUMENT PANEL UNDER COVER SUB-ASSEMBLY | 55606 | - | - | - |
| 17 | REAR UPPER CONSOLE PANEL SUB-ASSEMBLY | - | - | - | - |
| 18 | INSTRUMENT CLUSTER FINISH PANEL GARNISH ASSEMBLY | 55470 | - | - | - |
| 19 | UPPER NO. 2 CONSOLE PANEL GARNISH | 58834B | - | - | - |
| 20 | UPPER NO. 1 CONSOLE PANEL GARNISH | 58833B | - | - | - |
| 21 | SHIFT LEVER KNOB SUB-ASSEMBLY | 33504F | ()
|
- | - |
| 22 | CONNECT CABLE TO NEGATIVE AUXILIARY BATTERY TERMINAL | - | ()
|
- | - |
| 23 | INITIALIZATION AFTER RECONNECTING AUXILIARY BATTERY TERMINAL | - | - | - | ()
|
| 24 | PERFORM DIAGNOSTIC SYSTEM CHECK | - | - | - | ()
|
| 25 | CHECK SRS WARNING LIGHT | - | ()
|
- | - |
| *A | for LHD | *B | for RHD |
| *C | w/o Passenger Side Knee Airbag | *D | w/ Passenger Side Knee Airbag |

|
Tightening torque for "Major areas involving basic vehicle performance such as moving/turning/stopping": N*m (kgf*cm, ft.*lbf) | - | - |
- HINT:
- ·
Use the same procedure for RHD and LHD vehicles.
·The procedure listed below is for LHD vehicles.
PROCEDURE

 69550A
1.INSTALL GLOVE COMPARTMENT DOOR LOCK CYLINDER ASSEMBLY
55557A
2.INSTALL GLOVE COMPARTMENT DOOR CHECK CUSHION
55054
3.INSTALL GLOVE COMPARTMENT DOOR STOPPER SUB-ASSEMBLY
58810J
4.INSTALL CONSOLE BOX ASSEMBLY
58815C
5.INSTALL CONSOLE BOX CARPET
58903A
6.INSTALL CONSOLE REAR END PANEL SUB-ASSEMBLY
55435A
7.INSTALL INSTRUMENT PANEL FINISH PANEL END RH (for LHD, w/o Passenger Side Knee Airbag)
73990
8.INSTALL LOWER NO. 2 INSTRUMENT PANEL AIRBAG ASSEMBLY (for LHD, w/ Passenger Side Knee Airbag)
|
|
Click here()
|
55433B
9.INSTALL LOWER NO. 2 INSTRUMENT PANEL FINISH PANEL (for RHD)
55501A
10.INSTALL GLOVE COMPARTMENT DOOR SUB-ASSEMBLY (for RHD)
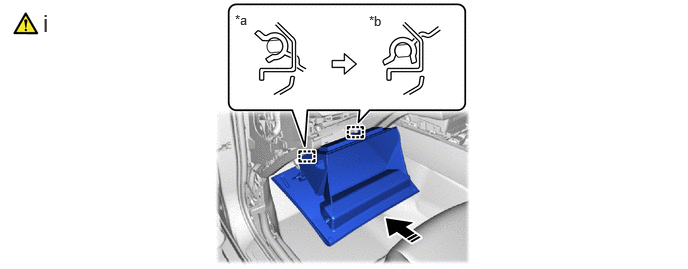
| *a | Horizontal Position | *b | Closed Position |

|
Install in this Direction | - | - |
With the glove compartment door sub-assembly opened position, attach the hinge horizontally.
- NOTICE:
-
Attach the hinge from the top will deform the hinge. Be sure to install the glove compartment door sub-assembly horizontally.
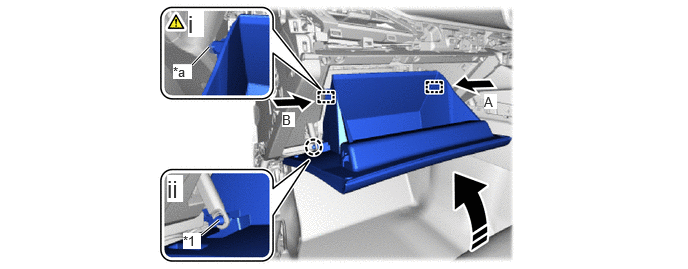
| *1 | Glove Compartment Door Stopper Sub-assembly | - | - |
| *a | Stopper | - | - |
|
|
Install in this Direction | - | - |
Slightly bend the stoppers (A) and (B) in the directions indicated by the arrows in the illustration and attach the stoppers to install the glove compartment door sub-assembly.
Attach the claw to install the glove compartment door stopper sub-assembly.
55479D
11.INSTALL LOWER INSTRUMENT CLUSTER FINISH PANEL GARNISH (for RHD)
55318F
12.INSTALL NO. 2 INSTRUMENT SIDE PANEL
55607
13.INSTALL NO. 2 INSTRUMENT PANEL UNDER COVER SUB-ASSEMBLY
67913
14.INSTALL FRONT DOOR SCUFF PLATE RH
55046A
15.INSTALL LOWER INSTRUMENT PANEL FINISH PANEL SUB-ASSEMBLY LH
55606
16.INSTALL NO. 1 INSTRUMENT PANEL UNDER COVER SUB-ASSEMBLY
17.INSTALL REAR UPPER CONSOLE PANEL SUB-ASSEMBLY
55470
18.INSTALL INSTRUMENT CLUSTER FINISH PANEL GARNISH ASSEMBLY
58834B
19.INSTALL UPPER NO. 2 CONSOLE PANEL GARNISH
58833B
20.INSTALL UPPER NO. 1 CONSOLE PANEL GARNISH
33504F
21.INSTALL SHIFT LEVER KNOB SUB-ASSEMBLY
|
|
Click here()
|
22.CONNECT CABLE TO NEGATIVE AUXILIARY BATTERY TERMINAL (for LHD, w/ Passenger Side Knee Airbag)
23. INITIALIZATION AFTER RECONNECTING AUXILIARY BATTERY TERMINAL (for LHD, w/ Passenger Side Knee Airbag)
Click hereGeneral>SETUP>WHEN DISCONNECTING OR RECONNECTING BATTERY TERMINAL>WORK PROCEDURE
- HINT:
-
When disconnecting and reconnecting the auxiliary battery, there is an automatic learning function that completes learning when the respective system is used.
-
Click hereGeneral>SETUP>WHEN DISCONNECTING OR RECONNECTING BATTERY TERMINAL>AUTOMATIC LEARNING CHART
24. PERFORM DIAGNOSTIC SYSTEM CHECK (for LHD, w/ Passenger Side Knee Airbag)
25.CHECK SRS WARNING LIGHT (for LHD, w/ Passenger Side Knee Airbag)