 |
Install the brake master cylinder push rod clevis to the brake master cylinder, and tighten the lock nut.
- HINT:
- After adjusting the brake pedal height, torque the lock nut.
BRAKE MASTER CYLINDER > INSTALLATION |
| 1. INSTALL BRAKE MASTER CYLINDER SUB-ASSEMBLY |
|
Install the brake master cylinder push rod clevis to the brake master cylinder, and tighten the lock nut.
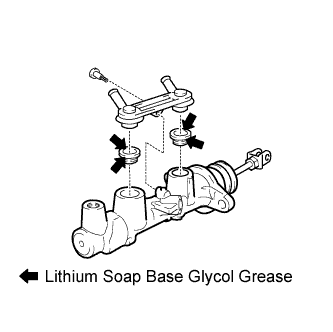
Apply lithium soap base glycol grease to 2 new grommets.
Install the No. 1 brake master cylinder union and 2 grommets to the brake master cylinder with the screw.
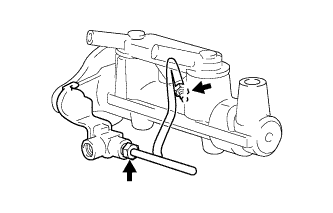 |
Using SST, install the brake tube and 2-way to the brake master cylinder.
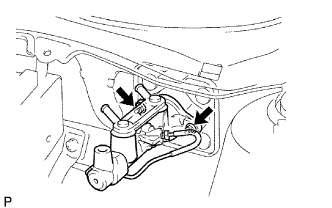 |
Placing the gasket inbetween, install the brake master cylinder to the bracket with the 2 nuts.
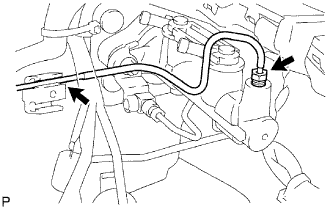 |
Using SST, connect the No. 2 front brake tube to the clamp and brake master cylinder.
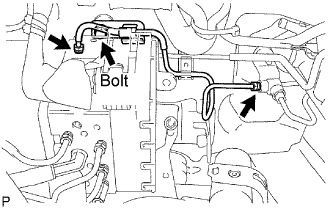 |
Using SST, install the No. 1 front brake tube.
Install the bolt to the actuator bracket.
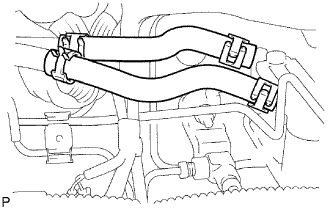 |
Install the 2 reservoir tube hoses and hold them there with the 4 clips.
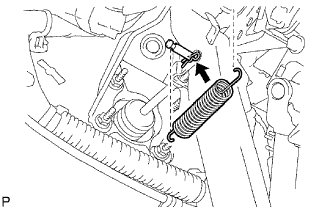 |
Connect the push rod clevis to the brake pedal with the brake master cylinder push rod pin.
Install the clip and brake pedal return spring.
| 2. INSTALL INVERTER WITH CONVERTER |
Install the inverter with converter (Click here).
| 3. INSTALL OUTER FRONT COWL TOP PANEL SUB-ASSEMBLY |
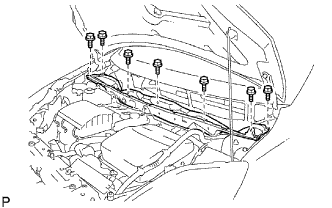 |
Install the outer front cowl top panel with the 7 bolts.
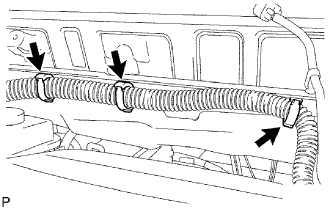 |
Install the 3 clamps to the outer front cowl top panel.
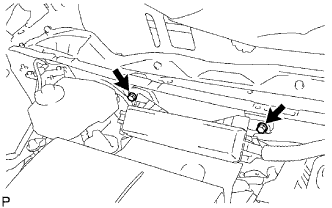 |
Install the engine room No. 2 R/B with the 2 bolts.
| 4. INSTALL WINDSHIELD WIPER MOTOR AND LINK ASSEMBLY |
Install the windshield wiper motor and link (Click here).
| 5. FILL RESERVOIR WITH BRAKE FLUID |
Add brake fluid into the reservoir.
| 6. BLEED AIR FROM MASTER CYLINDER |
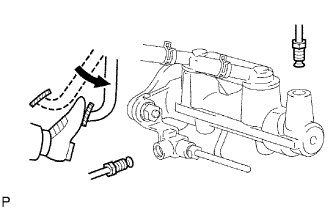 |
Disconnect the brake lines from the master cylinder.
Slowly depress and hold the brake pedal.
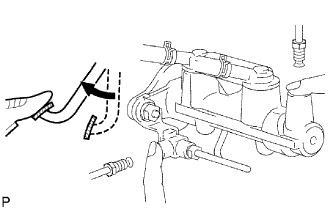 |
Cover the outer holes with your fingers, and release the brake pedal.
Repeat the above steps 3 or 4 times.
Connect the brake lines to the master cylinder.
| 7. BLEED AIR FROM MASTER CYLINDER/STROKE SIMULATOR |
Remove the No. 1 and No. 2 motor relays.
Bleed the air out of the FR/FL wheels in accordance with the display.
Install the No. 1 and No. 2 motor relays.
Bleed the air out of the stroke simulator line.
Depress the brake pedal 20 times in 20 seconds.
Perform the usual air bleeding for the FL wheel.
The air bleeding of the master cylinder/stroke simulator finishes if the display appears.
| 8. INSPECT FOR BRAKE FLUID LEAK |
| 9. CHECK BRAKE FLUID LEVEL IN RESERVOIR |
| 10. CHECK AND ADJUST BRAKE PEDAL HEIGHT |
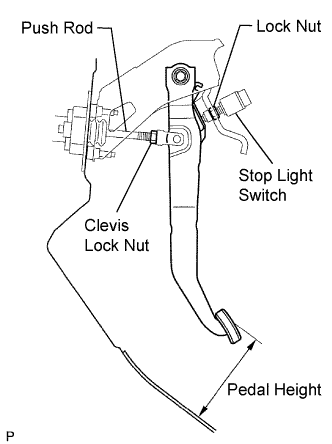 |
Remove the lower instrument panel finish panel .
Inspect brake pedal height.
Adjust brake pedal height.
Disconnect the connector from the stop light switch.
Loosen the stop light switch lock nut. Turn the switch in order to give the pedal some free play.
Loosen the clevis lock nut. Turn the push rod and adjust the pedal height.
Tighten the clevis lock nut.
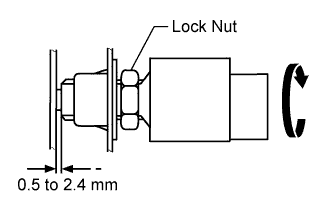 |
Turn the stop light switch so that the clearance between its thread portion tip and the area where the pedal makes contact is between 0.5 to 2.4 mm (0.020 to 0.095 in.). Tighten the lock nut.
Connect the connector to the stop light switch.
Connect the Techstream to the DLC3.
Loosen the stroke sensor set bolts.
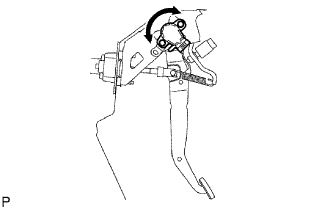 |
Turn the power switch ON (IG). Read the stroke sensor value displayed on the data monitor using the Techstream. Slowly turn the stroke sensor to the right and left to adjust it to the standard value.
Tighten the stroke sensor set bolts.
Carry out system initialization (Click here).
Install lower instrument panel finish panel .
| 11. CHECK BRAKE PEDAL FREE PLAY |
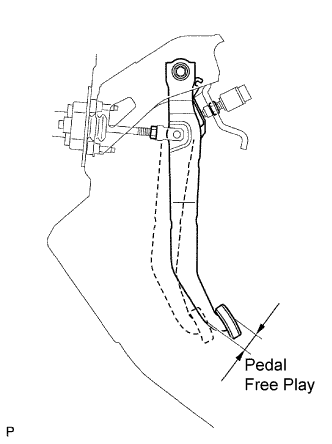 |
Depress the brake pedal several times strongly after the engine stops.
Check the brake pedal free play.
Check the stop light switch clearance.
| 12. CHECK BRAKE PEDAL RESERVE DISTANCE |
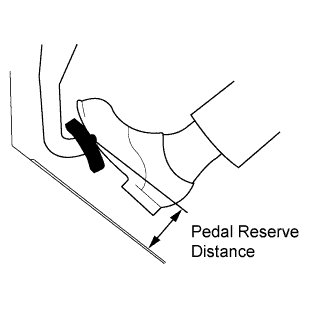 |
Release the parking brake pedal.
With engine running, depress the pedal and measure the pedal reserve distance, as shown in the illustration.
| 13. INSTALL LOWER INSTRUMENT PANEL FINISH PANEL SUB-ASSEMBLY |
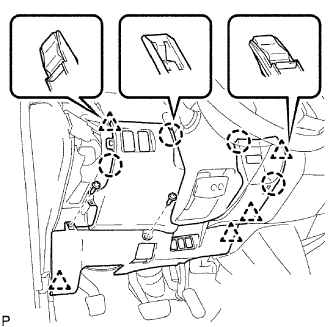 |
Connect the connectors.
Attach the 4 claws and 5 clips to install the instrument panel finish panel.
Connect the hood lock control cable.
Install the 2 screws.
| 14. INSTALL NO. 1 INSTRUMENT PANEL REGISTER ASSEMBLY |
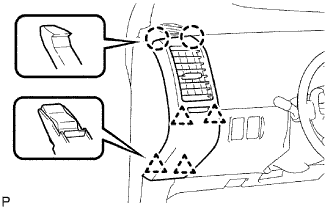 |
Attach the 2 claws and 4 clips to install the instrument panel register.
| 15. PERFORM SYSTEM INITIALIZATION |
Perform the brake system initialization (Click here).
| 16. CHECK AND CLEAR DTC |
Check and clear the DTC (Click here).