HYBRID / BATTERY CONTROL WATER PUMP WITH MOTOR INSTALLATION
PROCEDURE

 G9031A
1.INSTALL HV WATER PUMP BRACKET SUB-ASSEMBLY
Install the HV water pump bracket sub-assembly with the 2 bolts.
- Torque:
- 20 N*m (199 kgf*cm, 14 ft.*lbf)
Connect the clamp.
G9040
2.INSTALL INVERTER WATER PUMP ASSEMBLY
Install the inverter water pump assembly with the 3 bolts.
- Torque:
- 6.1 N*m (62 kgf*cm, 54 in.*lbf)
- NOTICE:
-
Do not hold the inverter water pump assembly by the connector terminals when removing or installing it.
Connect the connector.
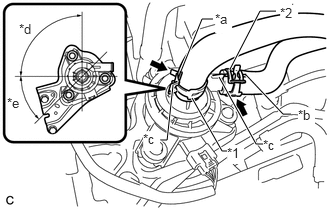
Connect the 2 water hoses.
| *1 | Clamp A |
| *2 | Clamp B |
| *a | Alignment mark (White) |
| *b | Alignment Mark (Yellow) |
| *c | Rib |
| *d | 90° |
| *e | 45° |
- NOTICE:
- ·
Connect the water hoses securely up to the rib of the inverter water pump assembly.
·Make sure to align the alignment marks of the hoses with the ribs of the inverter water pump assembly.
·Do not remove the pieces of cloth from the pipes and disconnected hoses until installation to prevent foreign matter from entering the inverter water pump and cooling system.
·Make sure that the clamp A is positioned as shown in the illustration.
- HINT:
-
Clamp B can be oriented in any angle.
G9110
3.INSTALL INVERTER BRACKET ASSEMBLY
G9200
4.INSTALL INVERTER WITH CONVERTER ASSEMBLY