1NZ-FXE ENGINE MECHANICAL ENGINE ASSEMBLY INSTALLATION
CAUTION / NOTICE / HINT
- CAUTION:
-
The engine assembly with transmission is very heavy. Be sure to follow the procedure described in the repair manual, or the engine lifter may suddenly drop.
- HINT:
-
Perform "Inspection After Repairs" after replacing the engine assembly, cylinder head sub-assembly camshaft, No. 2 camshaft, camshaft timing gear assembly, piston sub-assembly or piston ring (See page Engine / Hybrid System>1NZ-FXE (ENGINE CONTROL)>SFI SYSTEM (w/o Canister Pump Module)>INITIALIZATION).
PROCEDURE

 12281A
1.INSTALL NO. 1 ENGINE HANGER
82121
2.INSTALL ENGINE WIRE
Connect all of the clamps and connectors and install the engine wire from the engine assembly.
3.REMOVE ENGINE STAND
Using a chain block and sling device, secure the engine assembly.
- NOTICE:
- ·
Make sure that the sling angle is correct to prevent the engine assembly and engine hangers from being damaged or deformed.
·Securely support the engine assembly to prevent it from turning upside down until it is secured to an engine stand.
Remove the engine stand from the engine.
12372A
4.INSTALL ENGINE MOUNTING INSULATOR LH
- HINT:
-
Perform this procedure only when replacement of the engine mounting insulator LH is necessary.
Temporarily install the engine mounting insulator LH with the 5 bolts.
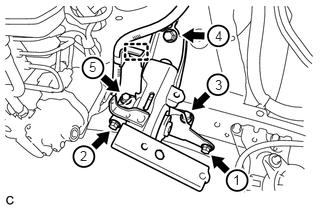
Tighten the 5 bolts in the sequence shown in the illustration.
- Torque:
- 52 N*m (530 kgf*cm, 38 ft.*lbf)
Connect the wire harness clamp.
12305
5.INSTALL ENGINE MOUNTING INSULATOR SUB-ASSEMBLY RH
- HINT:
-
Perform this procedure only when replacement of the engine mounting insulator sub-assembly RH is necessary.
Temporarily install the engine mounting insulator sub-assembly RH with the 3 bolts.
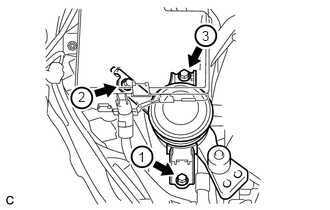
Tighten the 3 bolts in the sequence shown in the illustration.
- Torque:
- 52 N*m (530 kgf*cm, 38 ft.*lbf)
13405
6.INSTALL FLYWHEEL SUB-ASSEMBLY
Gently place the engine assembly onto wood blocks or equivalent.
- NOTICE:
- ·
Set the engine assembly so that it is horizontal.
·To prevent the No. 2 oil pan sub-assembly from deforming, do not place any attachments onto the No. 2 oil pan sub-assembly of the engine assembly.
·This step should be done while hanging the engine assembly using the sling device and chain block.
Install the flywheel sub-assembly (See page Engine / Hybrid System>1NZ-FXE (ENGINE MECHANICAL)>REAR CRANKSHAFT OIL SEAL>INSTALLATION).
31270
7.INSTALL TRANSMISSION INPUT DAMPER ASSEMBLY
Gently place the engine assembly onto wood blocks or equivalent.
- NOTICE:
- ·
Set the engine assembly so that it is horizontal.
·To prevent the No. 2 oil pan sub-assembly from deforming, do not place any attachments onto the No. 2 oil pan sub-assembly of the engine assembly.
·This step should be done while hanging the engine assembly using the sling device and chain block.
Install the transmission input damper assembly (See page Engine / Hybrid System>1NZ-FXE (ENGINE MECHANICAL)>REAR CRANKSHAFT OIL SEAL>INSTALLATION).
8.INSTALL ENGINE ASSEMBLY
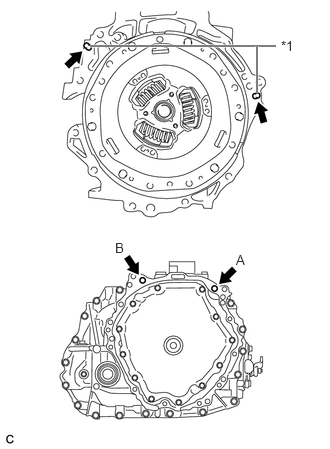
Make sure that the knock pins are installed to the engine.
| *1 | Knock Pin |
Temporarily install the hybrid vehicle transaxle assembly to the engine with the 2 bolts.
- HINT:
-
Temporarily tighten bolt B first.
Fully tighten the 2 bolts in the order of A and B.
- Torque:
- 64 N*m (653 kgf*cm, 47 ft.*lbf)
- NOTICE:
- ·
Make sure that the wire harness or similar items are not pinched between the contact surfaces.
·Do not forcibly pry on the hybrid vehicle transaxle.
·Make sure to align the hybrid vehicle transaxle so that the input shaft of the hybrid vehicle transaxle will be inserted straight into the inner splines of the transmission input damper.
·Do not apply grease either to the spline or to the input shaft.
·When inserting the input shaft of the hybrid vehicle transaxle into the inner splines of the transmission input damper, do not shake the hybrid vehicle transaxle excessively.
·When mounting the hybrid vehicle transaxle to the engine, make sure to securely fit the knock pins into the knock holes.
·When tightening the bolts, be sure that the mating surfaces of the engine and the hybrid vehicle transaxle assembly are in close contact with one another.
- Bolt Length:
45 mm (1.77 in.)
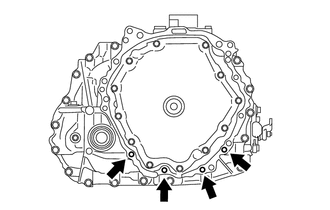
Install the 4 bolts.
- Torque:
- 30 N*m (301 kgf*cm, 22 ft.*lbf)
- Bolt Length:
45 mm (1.77 in.)
Engage the claw and install the flywheel housing side cover to the engine.
Install the starter hole heat insulator to the engine with the 2 bolts.
- Torque:
- 30 N*m (301 kgf*cm, 22 ft.*lbf)
- Bolt Length:
45 mm (1.77 in.)
Install the drive shaft heat insulator bracket to the engine with the 2 bolts.
- Torque:
- 30 N*m (301 kgf*cm, 22 ft.*lbf)
- Bolt Length:
45 mm (1.77 in.)
Connect the clamp to the drive shaft heat insulator bracket.
Install the drive shaft heat insulator sub-assembly to the engine and drive shaft heat insulator bracket with the bolt and nut.
- Torque:
- 18 N*m (179 kgf*cm, 13 ft.*lbf)
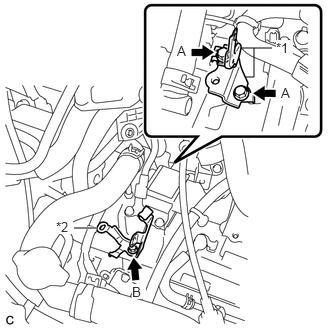
Install the 2 wire harness clamp brackets and transmission control cable clamp to the hybrid vehicle transaxle assembly with the 3 bolts.
| *1 | Wire Harness Clamp Bracket |
| *2 | Transmission Control Cable Clamp |
- Torque:
- Bolt A : 13 N*m (130 kgf*cm, 9 ft.*lbf)
- Bolt B : 12 N*m (122 kgf*cm, 9 ft.*lbf)
Connect the 7 clamps, 4 connectors and install the wire harness to the hybrid vehicle transaxle assembly with the 3 bolts.
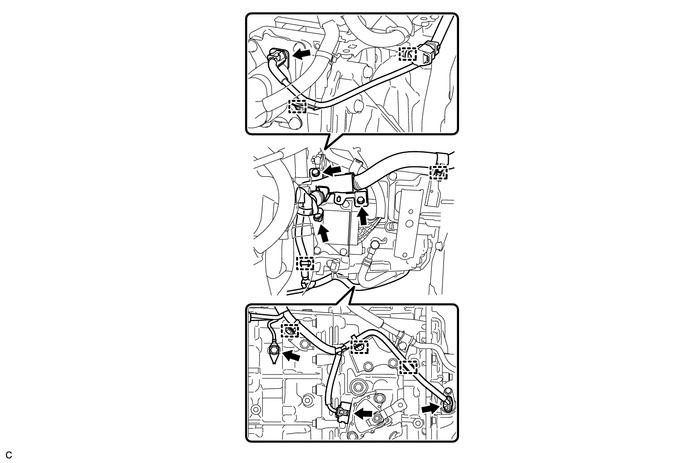
- Torque:
- 13 N*m (130 kgf*cm, 9 ft.*lbf)
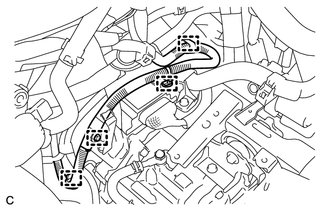
Connect the 4 clamps and No. 2 engine wire.
9.INSTALL ENGINE ASSEMBLY WITH TRANSAXLE
Using a sling device and chain block, set the engine assembly with transaxle on the engine lifter.
- NOTICE:
- ·
Place the height adjustment attachment and plate lift attachment so that the engine assembly with transaxle is level.
·Securely support the engine assembly to prevent it from turning upside down until it is secured to an engine stand.
·To prevent the No. 2 oil pan sub-assembly from deforming, do not place any attachments onto the No. 2 oil pan sub-assembly of the engine assembly.
·Do not place any attachments onto the drain plug and rear cover plug of the hybrid vehicle transaxle assembly.
·Make sure to support the engine assembly with transaxle securely to prevent it from falling.
Remove the 2 bolts and 2 No. 1 engine hangers.
Operate the engine lifter and lift the engine assembly with transaxle and front suspension crossmember to the position where the engine mounting insulator sub-assembly RH and engine mounting insulator LH can be installed.
- CAUTION:
-
Do not raise the engine more than necessary. If the engine is raised excessively, the vehicle may also be lifted up.
- NOTICE:
-
Make sure that the engine is clear of all wiring and hoses.
Operate the engine lifter and lift the engine assembly with transaxle and front suspension crossmember to the position where the front suspension crossmember can be installed.
By inserting SST into the datum holes in the front suspension crossmember RH and LH alternately, temporarily install the front suspension crossmember with the 6 bolts.
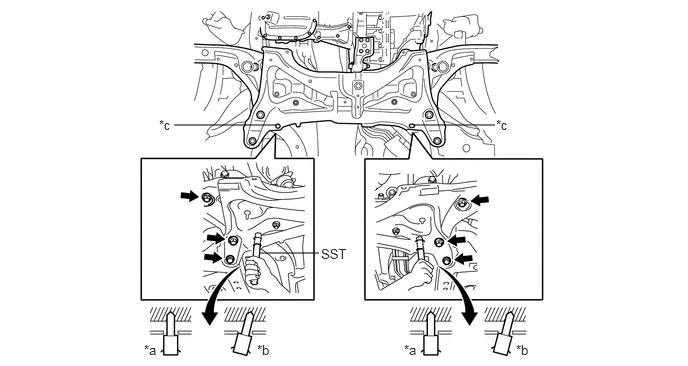
| *a | CORRECT | *b | INCORRECT |
| *c | Datum Hole | - | - |
- SST
- 09670-00010
Connect the engine mounting insulator LH with the bolt and nut to the engine assembly.
- Torque:
- 52 N*m (530 kgf*cm, 38 ft.*lbf)
Connect the engine mounting insulator sub-assembly RH with the bolt and 2 nuts to the engine assembly.
- Torque:
- 52 N*m (530 kgf*cm, 38 ft.*lbf)
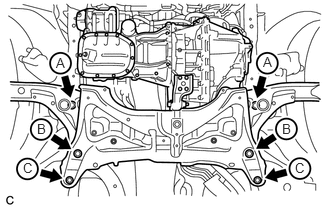
Using several steps, uniformly tighten the 6 bolts.
- Torque:
- Bolt A : 87 N*m (887 kgf*cm, 64 ft.*lbf)
- Bolt B : 151 N*m (1539 kgf*cm, 111 ft.*lbf)
- Bolt C : 98 N*m (999 kgf*cm, 72 ft.*lbf)
11361J
10.INSTALL FLYWHEEL HOUSING UNDER COVER
Install the flywheel housing under cover.
11.INSTALL FRONT DRIVE SHAFT ASSEMBLY
12.INSTALL NO. 2 ENGINE ROOM RELAY BLOCK AND NO. 2 JUNCTION BLOCK ASSEMBLY
17410
13.INSTALL FRONT EXHAUST PIPE ASSEMBLY
88370
14.INSTALL COMPRESSOR WITH MOTOR ASSEMBLY
88704
15.CONNECT SUCTION HOSE SUB-ASSEMBLY
88711
16.CONNECT NO. 1 COOLER REFRIGERANT DISCHARGE HOSE
45025D
17.INSTALL NO. 1 STEERING COLUMN HOLE COVER SUB-ASSEMBLY
45209
18.CONNECT STEERING SLIDING YOKE SUB-ASSEMBLY
45259A
19.INSTALL COLUMN HOLE COVER SILENCER SHEET
33820B
20.CONNECT TRANSMISSION CONTROL CABLE ASSEMBLY
82121
21.CONNECT ENGINE WIRE (for RHD)
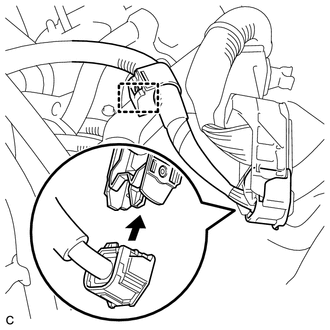
Connect the wire harness clamp.
Connect the engine wire to the engine room main wire.
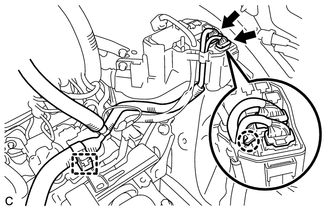
Connect the engine wire to the engine room relay block and junction block assembly and engage the claw.
Connect the wire harness clamp and 2 connectors.
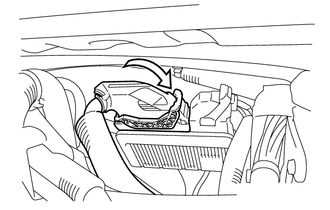
Connect the ECM connector and lower the lever.
- NOTICE:
- ·
When connecting the connector, make sure that dirt, water or other foreign matter does not become stuck between the connector and other part.
·Make sure that the lever is securely locked.
82121
22.CONNECT ENGINE WIRE (for LHD)
Connect the wire harness clamp.
Connect the engine wire to the engine room main wire.
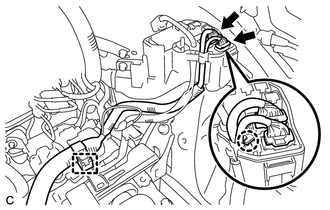
Connect the engine wire to the engine room relay block and junction block assembly and engage the claw.
Connect the wire harness clamp and 2 connectors.
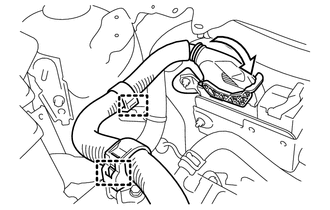
Connect the 2 wire harness clamps.
Connect the ECM connector and lower the lever.
- NOTICE:
- ·
When connecting the connector, make sure that dirt, water or other foreign matter does not become stuck between the connector and other part.
·Make sure that the lever is securely locked.
23901
23.CONNECT FUEL TUBE SUB-ASSEMBLY
23820
24.CONNECT FUEL VAPOR FEED HOSE ASSEMBLY
Connect the fuel vapor feed hose assembly.
25.CONNECT HEATER WATER HOSE
Connect the 2 heater water hoses.
16572D
26.CONNECT NO. 2 RADIATOR HOSE
Connect the No. 2 radiator hose.
16571C
27.CONNECT NO. 1 RADIATOR HOSE
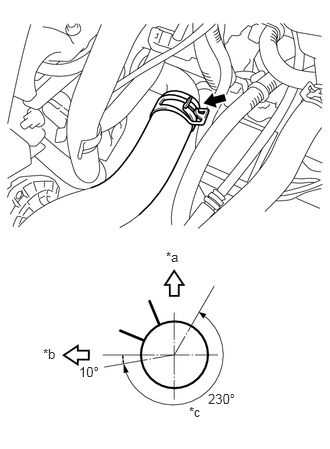
Connect the No. 1 radiator hose.
| *a | Up |
| *b | for LH Side |
| *c | Do Not Position Hose Clamp Claws In This Area |
- HINT:
-
Make sure that the claws on the hose clamp are positioned as shown in the illustration.
G9110
28.INSTALL INVERTER BRACKET ASSEMBLY
- CAUTION:
-
Wear insulated gloves.
Temporarily install the inverter bracket assembly with the 4 bolts.
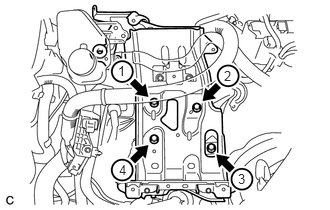
Tighten the 4 bolts in the sequence shown in the illustration.
- Torque:
- 21 N*m (214 kgf*cm, 15 ft.*lbf)
Connect the earth wire with the bolt.
- Torque:
- 8.4 N*m (85 kgf*cm, 74 in.*lbf)
Install the inverter reservoir tank assembly with the 2 bolts.
- Torque:
- 7.0 N*m (71 kgf*cm, 62 in.*lbf)
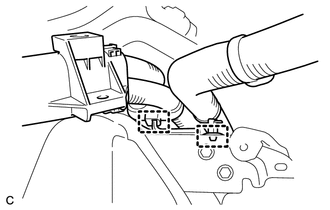
Connect the 2 wire harness clamps.
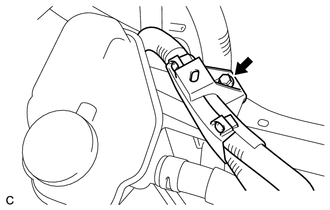
Connect the motor cable protector with the bolt.
- Torque:
- 8.0 N*m (82 kgf*cm, 71 in.*lbf)
29.INSTALL AIR CLEANER CASE SUB-ASSEMBLY
17705
30.INSTALL AIR CLEANER CAP SUB-ASSEMBLY
G9200
31.INSTALL INVERTER WITH CONVERTER ASSEMBLY
55701J
32.INSTALL OUTER COWL TOP PANEL SUB-ASSEMBLY (for LHD)
55701J
33.INSTALL OUTER COWL TOP PANEL SUB-ASSEMBLY (for RHD)
55815E
34.INSTALL FRONT NO. 1 VENTILATOR SEAL (for LHD)
55815E
35.INSTALL FRONT NO. 1 VENTILATOR SEAL (for RHD)
55735B
36.INSTALL FRONT AIR SHUTTER SEAL (for LHD)
55735B
37.INSTALL FRONT AIR SHUTTER SEAL (for RHD)
55722C
38.INSTALL INNER COWL TOP TO COWL BRACE (for LHD)
55722C
39.INSTALL INNER COWL TOP TO COWL BRACE (for RHD)
40.INSTALL WINDSHIELD WIPER MOTOR AND LINK ASSEMBLY
41.ADD COOLANT (for Engine)
42.ADD COOLANT (for Inverter)
43.ADD HYBRID TRANSAXLE FLUID
44.INSPECT HYBRID TRANSAXLE FLUID
46.CONNECT CABLE TO NEGATIVE AUXILIARY BATTERY TERMINAL
G3834
47.INSTALL SERVICE PLUG GRIP
48.CHARGE AIR CONDITIONING SYSTEM WITH REFRIGERANT
49. WARM UP COMPRESSOR
50.INSPECT FOR REFRIGERANT LEAK
51.CHECK ENGINE OIL LEVEL
52.INSPECT FOR FUEL LEAK
53.INSPECT FOR COOLANT LEAK (for Engine)
54.INSPECT FOR COOLANT LEAK (for Inverter)
55.INSPECT FOR HYBRID TRANSAXLE FLUID LEAK
56.INSPECT FOR OIL LEAK
57.INSPECT FOR EXHAUST GAS LEAK
58.INSPECT IGNITION TIMING
59.INSPECT ENGINE IDLE SPEED
61.INSPECT AND ADJUST SHIFT LEVER POSITION
62.INSPECT AND ADJUST FRONT WHEEL ALIGNMENT
63.CHECK ABS SPEED SENSOR SIGNAL
51441C
64.INSTALL ENGINE UNDER COVER RH
51442C
65.INSTALL ENGINE UNDER COVER LH