1NZ-FXE ENGINE MECHANICAL CAMSHAFT INSTALLATION
CAUTION / NOTICE / HINT
- HINT:
-
Perform "Inspection After Repairs" after replacing the camshaft timing gear assembly, camshaft or No. 2 camshaft (See page Engine / Hybrid System>1NZ-FXE (ENGINE CONTROL)>SFI SYSTEM (w/o Canister Pump Module)>INITIALIZATION).
PROCEDURE

 13050
1.INSTALL CAMSHAFT TIMING GEAR ASSEMBLY
- HINT:
-
Perform "Inspection After Repairs" after replacing the camshaft timing gear assembly (See page Engine / Hybrid System>1NZ-FXE (ENGINE CONTROL)>SFI SYSTEM (w/o Canister Pump Module)>INITIALIZATION).
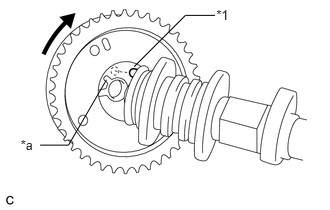
Put the camshaft timing gear assembly and camshaft together with the straight pin and key groove misaligned as shown in the illustration.
| *1 | Straight Pin |
| *a | Key Groove |
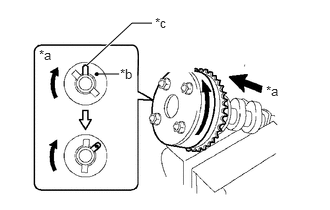
Turn the camshaft timing gear assembly as shown in the illustration while pushing it gently against the camshaft. Push further at the position where the pin fits into the groove.
| *a | View A |
| *b | Straight Pin |
| *c | Key Groove |
- NOTICE:
-
Be sure not to turn the camshaft timing gear assembly to the retard direction (clockwise).
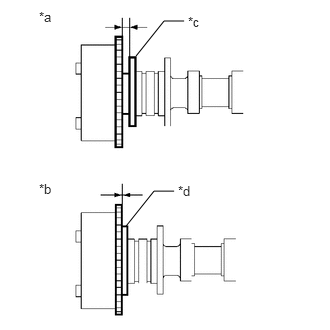
Check that there is no clearance between the camshaft timing gear assembly and camshaft flange.
| *a | INCORRECT |
| *b | CORRECT |
| *c | Flange |
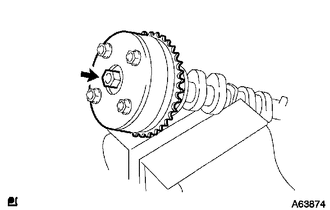
Tighten the bolt with the camshaft timing gear assembly secured in place.
- Torque:
- 64 N*m (652 kgf*cm, 47 ft.*lbf)
- NOTICE:
- ·
Do not lock the camshaft timing gear assembly when tightening the bolt.
·Release the lock pin of the camshaft timing gear assembly first, and tighten the bolt when the lock pin is locked in the most retarded position.
·Tightening the bolts with the lock pin locked could cause breakage of the lock pin.
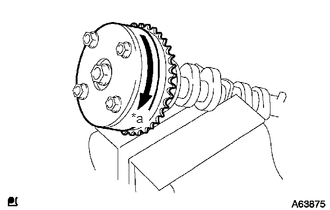
Check that the camshaft timing gear assembly can move to the retard direction (clockwise) and is locked in the most retarded position.
| *a | Lock |
13511
2.INSTALL CAMSHAFT
- HINT:
-
Perform "Inspection After Repairs" after replacing the camshaft (See page Engine / Hybrid System>1NZ-FXE (ENGINE CONTROL)>SFI SYSTEM (w/o Canister Pump Module)>INITIALIZATION).
Apply a light coat of engine oil to the camshaft journals and cylinder head sub-assembly journals.
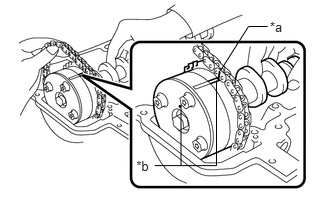
Install the chain sub-assembly onto the camshaft timing gear assembly with the paint mark on the chain sub-assembly aligned with the timing mark on the camshaft timing gear assembly as shown in the illustration.
| *a | Paint Mark |
| *b | Timing Mark |
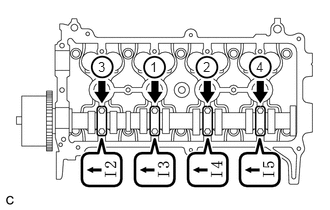
Examine the front marks and numbers, and tighten the 4 No. 2 camshaft bearing caps with the 8 bolts in the sequence shown in the illustration.
- Torque:
- 13 N*m (129 kgf*cm, 9 ft.*lbf)
- NOTICE:
-
Tighten each bolt uniformly, keeping the camshaft level.
13512
3.INSTALL NO. 2 CAMSHAFT
- HINT:
-
Perform "Inspection After Repairs" after replacing the No. 2 camshaft (See page Engine / Hybrid System>1NZ-FXE (ENGINE CONTROL)>SFI SYSTEM (w/o Canister Pump Module)>INITIALIZATION).
Apply a light coat of engine oil to the No. 2 camshaft journals and cylinder head sub-assembly journals.
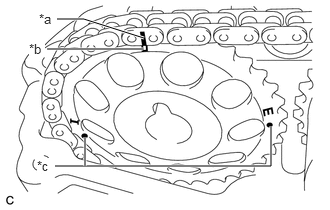
Put the camshaft timing gear or sprocket on the cylinder head sub-assembly with the paint mark on the chain sub-assembly aligned with the timing mark on the camshaft timing gear or sprocket.
| *a | Paint Mark |
| *b | Timing Mark (Rectangle) |
| *c | Mark (Circle) |
- HINT:
-
There are 3 marks on the camshaft timing gear or sprocket. Make sure to align the mark plate with the timing mark (rectangle).
While holding the No. 2 camshaft by hand, temporarily install the No. 2 camshaft to the camshaft timing gear or sprocket using the bolt.
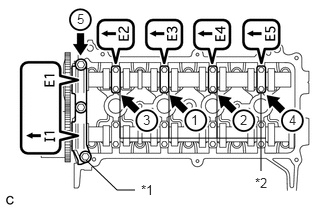
Examine the front marks and numbers, and tighten the No. 1 camshaft bearing cap and No. 2 camshaft bearing caps with the 11 bolts in the sequence shown in the illustration.
| *1 | No. 1 Camshaft Bearing Cap |
| *2 | No. 2 Camshaft Bearing Cap |
- Torque:
- No. 2 camshaft bearing cap : 13 N*m (129 kgf*cm, 9 ft.*lbf)
- No. 1 camshaft bearing cap : 23 N*m (234 kgf*cm, 17 ft.*lbf)
- NOTICE:
-
Tighten each bolt uniformly, keeping the No. 2 camshaft level.
Using a 14 mm union nut wrench, tighten the bolts onto the camshaft timing gear or sprocket while holding the hexagonal portion of the No. 2 camshaft.
- Torque:
- 64 N*m (652 kgf*cm, 47 ft.*lbf)
- NOTICE:
-
Use the torque value compensation formula to calculate the torque value for use when a torque wrench is combined with a tool such as a union nut wrench (See page General>INTRODUCTION>REPAIR INSTRUCTION>PRECAUTION).
Remove the hexagon wrench from the No. 1 chain tensioner assembly.
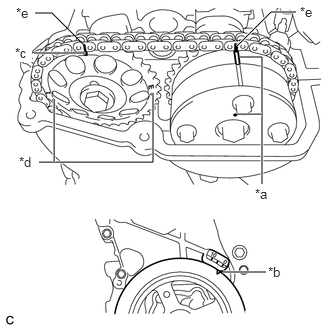
Turn the crankshaft damper until its notch and timing mark "0" of the timing chain cover are aligned.
| *a | Timing Mark |
| *b | Timing Notch |
| *c | Timing Mark (Rectangle) |
| *d | Mark (Circle) |
| *e | Paint Mark |
- HINT:
-
There are 3 marks on the camshaft timing gear or sprocket. Make sure that the timing mark (rectangle) is at the top.
Check that all the pairs of timing marks are aligned.
4.INSTALL SCREW PLUG
11201
5.INSTALL CYLINDER HEAD COVER SUB-ASSEMBLY
Install a new gasket to the cylinder head cover sub-assembly.
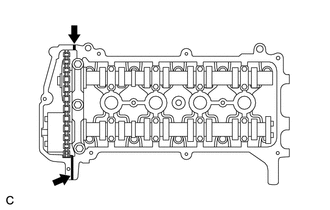
Apply seal packing to the 2 locations shown in the illustration.

|
Apply Seal Packing |
- Seal packing:
Toyota Genuine Seal Packing Black, Three Bond 1207B or equivalent
- NOTICE:
- ·
Remove any oil from the contact surface.
·Install the cylinder head cover within 3 minutes of applying seal packing.
·Do not start the engine for at least 2 hours after installation.
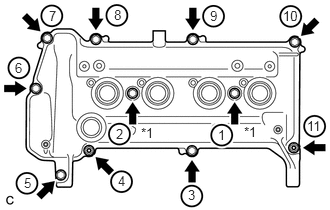
Temporarily install the cylinder head cover sub-assembly with the 9 bolts, 2 nuts and 2 new seal washers.
| *1 | Seal Washer |
Using several steps, uniformly tighten the bolts and nuts in the sequence shown in the illustration.
- Torque:
- 13 N*m (132 kgf*cm, 10 ft.*lbf)
Connect the No. 1 ventilation hose and No. 2 ventilation hose.
82121
6.CONNECT ENGINE WIRE (for LHD)
Install the engine wire with the 3 bolts.
- Torque:
- 8.4 N*m (85 kgf*cm, 74 in.*lbf)
Connect the wire harness clamp.
Connect the 4 injector connectors.
82121
7.CONNECT ENGINE WIRE (for RHD)
Install the engine wire with the 3 bolts.
- Torque:
- 8.4 N*m (85 kgf*cm, 74 in.*lbf)
Connect the 4 injector connectors.
19500D
8.INSTALL IGNITION COIL ASSEMBLY
47220D
9.INSTALL BRAKE MASTER CYLINDER RESERVOIR ASSEMBLY (for RHD)
Install the brake master cylinder reservoir assembly with the bolt and nut.
- Torque:
- 8.0 N*m (82 kgf*cm, 71 in.*lbf)
Connect the connector.
25680
10.INSTALL EGR COOLER ASSEMBLY