FRONT SUSPENSION FRONT SUSPENSION MEMBER INSTALLATION
PROCEDURE

 12363A
1.INSTALL ENGINE MOVING CONTROL ROD
Install the engine moving control rod to the front suspension crossmember sub-assembly with the bolt.
- Torque:
- 110 N*m (1122 kgf*cm, 81 ft.*lbf)
48069
2.TEMPORARILY TIGHTEN FRONT LOWER NO. 1 SUSPENSION ARM SUB-ASSEMBLY LH
Temporarily tighten the front lower No. 1 suspension arm sub-assembly LH to the front suspension crossmember sub-assembly with the bolt.
48068
3.TEMPORARILY TIGHTEN FRONT LOWER NO. 1 SUSPENSION ARM SUB-ASSEMBLY RH
- HINT:
-
Perform the same procedure as the LH side.
48811
4.INSTALL FRONT STABILIZER BAR
48829A
5.INSTALL FRONT NO. 1 STABILIZER BRACKET LH
48824A
6.INSTALL FRONT NO. 1 STABILIZER BRACKET RH
- HINT:
-
Perform the same procedure as the LH side.
7.INSTALL STEERING LINK ASSEMBLY
51201
8.INSTALL FRONT SUSPENSION CROSSMEMBER SUB-ASSEMBLY
Support the front suspension crossmember sub-assembly with an engine lifter using 4 attachments or equivalent tools.
- NOTICE:
- ·
Make sure to secure the front suspension crossmember sub-assembly to prevent it from dropping.
·Use the attachments to keep the front suspension crossmember sub-assembly level.
·The front suspension crossmember sub-assembly is a heavy component. Make sure that it is supported securely.
Temporarily tighten the front suspension crossmember sub-assembly to the body with the 6 bolts.
Tighten the 2 bolts A and 2 bolts C on the left and right sides while alternately inserting SST into the left and right side reference holes in the front suspension crossmember sub-assembly.
- SST
- 09670-00011
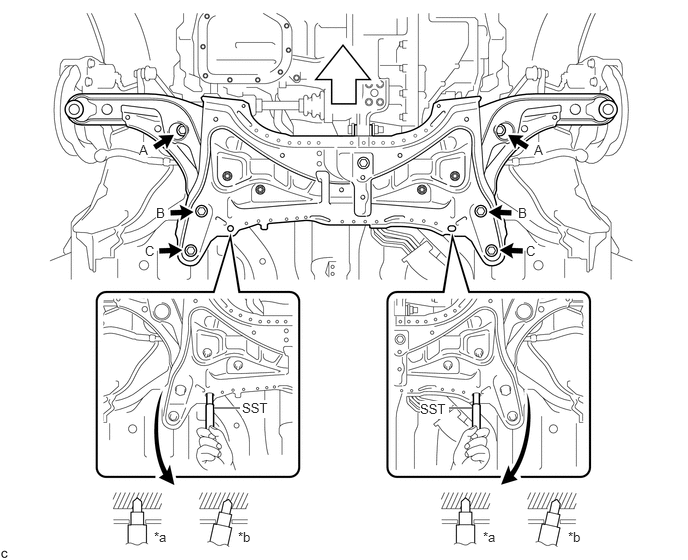
| *a | OK | *b | NG |

|
Front of the Vehicle | - | - |
- Torque:
- Bolt A : 87 N*m (887 kgf*cm, 64 ft.*lbf)
- Bolt C : 98 N*m (999 kgf*cm, 72 ft.*lbf)
- NOTICE:
-
Do not tighten bolt B to the specified torque. Bolt B will be fully tightened after the suspension is stabilized.
Lower the engine lifter.
Install the engine moving control rod with the bolt.
- Torque:
- 120 N*m (1224 kgf*cm, 89 ft.*lbf)
48069
9.CONNECT FRONT LOWER NO. 1 SUSPENSION ARM SUB-ASSEMBLY LH
48068
10.CONNECT FRONT LOWER NO. 1 SUSPENSION ARM SUB-ASSEMBLY RH
- HINT:
-
Perform the same procedure as the LH side.
45047
11.CONNECT TIE ROD END SUB-ASSEMBLY LH
45046
12.CONNECT TIE ROD END SUB-ASSEMBLY RH
- HINT:
-
Perform the same procedure as the LH side.
48810
13.INSTALL FRONT STABILIZER LINK ASSEMBLY LH
Install the front stabilizer link assembly LH to the front stabilizer bar with the nut.
- Torque:
- 74 N*m (755 kgf*cm, 55 ft.*lbf)
- HINT:
-
Use a hexagon socket wrench to hold the stud.
48820B
14.INSTALL FRONT STABILIZER LINK ASSEMBLY RH
- HINT:
-
Perform the same procedure as the LH side.
45025D
15.CONNECT NO. 1 STEERING COLUMN HOLE COVER SUB-ASSEMBLY
45209
16.CONNECT STEERING SLIDING YOKE SUB-ASSEMBLY
45259A
17.INSTALL COLUMN HOLE COVER SILENCER SHEET
18.INSTALL FRONT WHEEL
- Torque:
- 103 N*m (1050 kgf*cm, 76 ft.*lbf)
19.STABILIZE SUSPENSION
Lower the vehicle.
Bounce the vehicle up and down several times to stabilize the suspension.
48069
20.FULLY TIGHTEN FRONT LOWER NO. 1 SUSPENSION ARM SUB-ASSEMBLY LH
48068
21.FULLY TIGHTEN FRONT LOWER NO. 1 SUSPENSION ARM SUB-ASSEMBLY RH
- HINT:
-
Perform the same procedure as the LH side.
22.INSPECT AND ADJUST FRONT WHEEL ALIGNMENT