SEAT BELT FRONT SEAT OUTER BELT ASSEMBLY INSTALLATION
PROCEDURE

 73220
1.INSPECT FRONT SEAT OUTER BELT ASSEMBLY
73220
2.INSTALL FRONT SEAT OUTER BELT ASSEMBLY
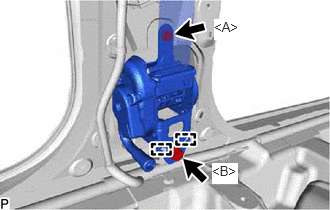
Engage the 2 hooks and temporarily install the front seat outer belt assembly with the 2 bolts.
Tighten bolt A and then bolt B.
- Torque:
- 4.9 N*m (50 kgf*cm, 43 in.*lbf)
for bolt A
- 42 N*m (428 kgf*cm, 31 ft.*lbf)
for bolt B
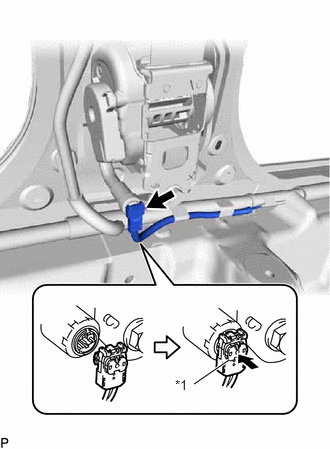
Connect the pretensioner connector.
| *1 | Locking Button |
Lock the locking button.
- NOTICE:
-
Securely lock the locking button.
Connect the shoulder anchor of the front seat outer belt assembly with the bolt.
- Torque:
- 42 N*m (428 kgf*cm, 31 ft.*lbf)
Temporarily install the floor anchor of the front seat outer belt assembly with the bolt.
- Torque:
- 42 N*m (428 kgf*cm, 31 ft.*lbf)
Check that the ELR locks.
- NOTICE:
-
The check should be performed with the front seat outer belt installed.
With the belt installed, check that the belt locks when it is pulled out quickly.
- NOTICE:
-
If the operation is not as specified, replace the front seat outer belt.
62412B
3.INSTALL CENTER PILLAR UPPER GARNISH
62414A
4.INSTALL CENTER PILLAR LOWER GARNISH
73220
5.CONNECT FRONT SEAT OUTER BELT ASSEMBLY
Install the floor anchor of the front seat outer belt assembly with the bolt.
- Torque:
- 42 N*m (428 kgf*cm, 31 ft.*lbf)
73233C
6.INSTALL LAP BELT OUTER ANCHOR COVER
Engage the 3 claws and install the lap belt outer anchor cover.
62332A
7.INSTALL REAR DOOR OPENING TRIM WEATHERSTRIP
for LH Side: (See page Vehicle Interior>INTERIOR PANELS / TRIM>ROOF HEADLINING>INSTALLATION)
for RH Side: (See page Vehicle Interior>INTERIOR PANELS / TRIM>ROOF HEADLINING>INSTALLATION)
62312B
8.INSTALL FRONT DOOR OPENING TRIM WEATHERSTRIP
for LH Side: (See page Vehicle Interior>INTERIOR PANELS / TRIM>ROOF HEADLINING>INSTALLATION)
for RH Side: (See page Vehicle Interior>INTERIOR PANELS / TRIM>ROOF HEADLINING>INSTALLATION)
67918A
9.INSTALL REAR DOOR SCUFF PLATE
58166B
10.INSTALL FRONT FLOOR COVER LH (for LH Side)
67914
11.INSTALL FRONT DOOR SCUFF PLATE
12.CONNECT CABLE TO NEGATIVE AUXILIARY BATTERY TERMINAL
58165F
13.INSTALL FRONT FLOOR COVER RH
14.INSPECT SRS WARNING LIGHT