P510 HYBRID TRANSMISSION / TRANSAXLE SHIFT LEVER POSITION SENSOR INSTALLATION
PROCEDURE

 89451A
1.INSTALL SHIFT LEVER POSITION SENSOR
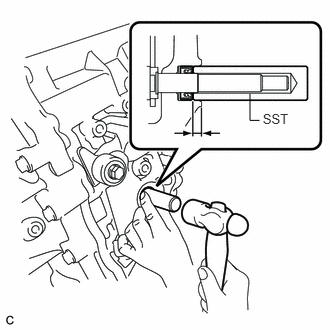
Using SST and a hammer, tap in a new shift lever position sensor seal.
- SST
- 09350-30020 (09350-07110)
- Oil seal installation depth:
5.5 to 6.4 mm (0.217 to 0.252 in.)
- NOTICE:
- ·
It is not always necessary to replace or remove/install the shift lever position sensor seal at the same time when replacing the shift lever position sensor.
·When removing the shift lever position sensor seal, be sure not to damage the case or manual shaft with the screwdriver.
- HINT:
-
Remove/install the shift lever position sensor seal only if oil leaks from the shift lever position sensor seal or other faults are found when the shift lever position sensor is removed.
Install the shift lever position sensor to the manual valve shaft.
- NOTICE:
- ·
Do not reuse the shift lever position sensor if it has been dropped or subjected to a severe impact.
·Do not allow moisture to adhere to the connector terminal.
Temporarily install the 2 bolts.
Install the lock plate and tighten the nut.
- Torque:
- 6.9 N*m (70 kgf*cm, 61 in.*lbf)
Temporarily install the control shaft lever to the manual valve shaft.
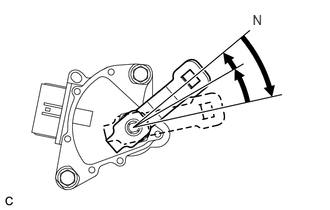
Turn the lever clockwise until it stops, then turn it counterclockwise 2 notches.
Remove the control shaft lever from the manual valve shaft.
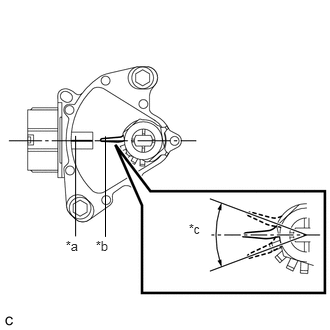
| *a | Neutral Basic Line |
| *b | Protruding |
| *c | Range of Play |
Align the protruding part with the neutral basic line.
- NOTICE:
-
There is play on the nut stopper side (protruding part). Align the center point of the range of the play with the neutral basic line.
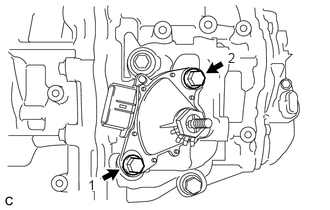
Tighten the 2 bolts in the order shown in the illustration.
- Torque:
- 13 N*m (133 kgf*cm, 10 ft.*lbf)
Using a screwdriver, secure the nut with the lock plate.
Install the control shaft lever, washer, and nut to the manual valve shaft.
- Torque:
- 13 N*m (130 kgf*cm, 9 ft.*lbf)
Connect the connector to the shift lever position sensor.
33820B
2.CONNECT TRANSMISSION CONTROL CABLE ASSEMBLY
Install the transmission control cable assembly to the No. 1 transmission control cable bracket with a new clip.
Install the transmission control cable assembly to the control shaft lever with the nut.
- Torque:
- 12 N*m (122 kgf*cm, 9 ft.*lbf)
3.INSPECT SHIFT LEVER POSITION SENSOR POSITION
4.ADJUST SHIFT LEVER POSITION SENSOR POSITION
5.INSPECT SHIFT LEVER POSITION
6.ADJUST SHIFT LEVER POSITION
51442C
7.INSTALL ENGINE UNDER COVER LH (Separated Cover Type)
8.INSTALL NO. 1 ENGINE UNDER COVER ASSEMBLY (Integrated Cover Type)