AUDIO / VIDEO RADIO ANTENNA CORD INSTALLATION
PROCEDURE

 86101J
1.INSTALL NO. 2 ANTENNA CORD SUB-ASSEMBLY
w/o Coat Hook:
Install the No. 2 antenna cord sub-assembly to the roof headlining assembly from the front of the vehicle.
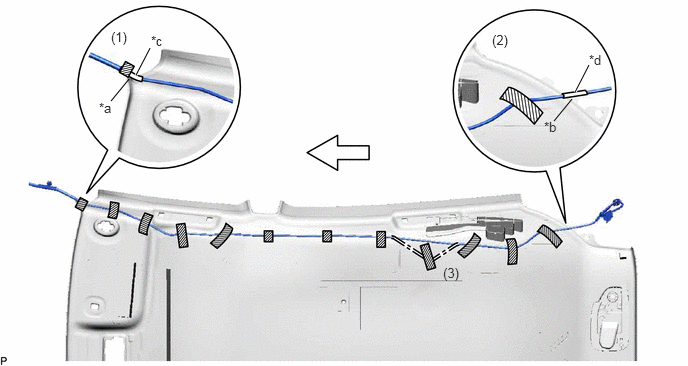
| *a | Protrusion | *b | Edge |
| *c | Marking Tape (A) | *d | Marking Tape (B) |

|
Tape | 
|
Front |
Put the pieces of tape back to the positions shown in the illustration to secure the No. 2 antenna cord sub-assembly to the roof headlining assembly.
- HINT:
- ·
If the tape is no longer sticky, use other tape, such as packing tape, that has enough adhesion to secure the No. 2 antenna cord sub-assembly to the roof headlining assembly.
·Align the marking tape (A) of the No. 2 antenna cord sub-assembly with the protrusion of the roof headlining assembly, and wrap tape around the No. 2 antenna cord sub-assembly and roof headlining assembly once or twice to securely hold them. (1)
·Align the marking tape (B) of the No. 2 antenna cord sub-assembly with the edge of the roof headlining assembly, and secure the No. 2 antenna cord sub-assembly to the roof headlining assembly with tape. (2)
·Secure the extra length of the No. 2 antenna cord sub-assembly in the adjustment area shown in the illustration. (3)
w/ Coat Hook:
Install the No. 2 antenna cord sub-assembly to the roof headlining assembly from the front of the vehicle.
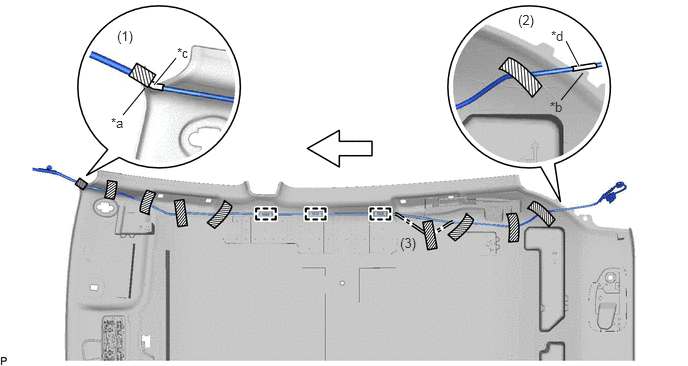
| *a | Protrusion | *b | Edge |
| *c | Marking Tape (A) | *d | Marking Tape (B) |
|
|
Tape |
|
Front |
Engage 3 clamps.
Put the pieces of tape back to the positions shown in the illustration to secure the No. 2 antenna cord sub-assembly to the roof headlining assembly.
- HINT:
- ·
If the tape is no longer sticky, use other tape, such as packing tape, that has enough adhesion to secure the No. 2 antenna cord sub-assembly to the roof headlining assembly.
·Align the marking tape (A) of the No. 2 antenna cord sub-assembly with the protrusion of the roof headlining assembly, and wrap tape around the No. 2 antenna cord sub-assembly and roof headlining assembly once or twice to securely hold them. (1)
·Align the marking tape (B) of the No. 2 antenna cord sub-assembly with the edge of the roof headlining assembly, and secure the No. 2 antenna cord sub-assembly to the roof headlining assembly with tape. (2)
·Secure the extra length of the No. 2 antenna cord sub-assembly in the adjustment area shown in the illustration. (3)
2.INSTALL ROOF HEADLINING ASSEMBLY
86101
3.INSTALL ANTENNA CORD SUB-ASSEMBLY
Engage the 5 clamps.
Install the antenna cord sub-assembly with the 2 bolts.
Connect each connector.
55840C
4.INSTALL NO. 6 HEATER TO REGISTER DUCT ASSEMBLY
5.INSTALL RADIO RECEIVER ASSEMBLY WITH BRACKET (w/ Radio Receiver)
6.INSTALL UPPER INSTRUMENT PANEL ASSEMBLY