1NZ-FXE FUEL FUEL PUMP(w/ Canister Pump Module) REMOVAL
CAUTION / NOTICE / HINT
- HINT:
-
Perform "Inspection After Repair" after replacing the fuel pump with filter assembly.
-
Click hereEngine / Hybrid System>1NZ-FXE (ENGINE CONTROL)>SFI SYSTEM(w/ Canister Pump Module)>INITIALIZATION
PROCEDURE

 1. PRECAUTION
- NOTICE:
-
After turning the power switch off, waiting time may be required before disconnecting the cable from the negative (-) auxiliary battery terminal. Therefore, make sure to read the disconnecting the cable from the negative (-) auxiliary battery terminal notices before proceeding with work.
-
Click hereGeneral>INTRODUCTION>REPAIR INSTRUCTION>PRECAUTION
73705B
2.REMOVE CROSS ANCHOR BRACKET SUB-ASSEMBLY
3. DISCHARGE FUEL SYSTEM PRESSURE
4.DISCONNECT CABLE FROM NEGATIVE AUXILIARY BATTERY TERMINAL
- NOTICE:
-
When disconnecting the cable, some systems need to be initialized after the cable is reconnected.
-
Click hereGeneral>INTRODUCTION>REPAIR INSTRUCTION>INITIALIZATION
58325E
5.REMOVE REAR FLOOR SERVICE HOLE COVER
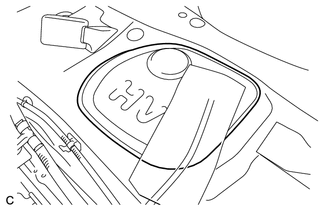
Remove the rear floor service hole cover and butyl tape.
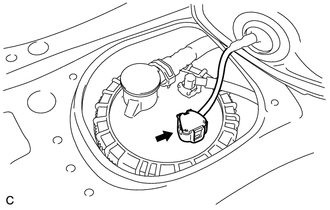
Disconnect the fuel pump connector.
77404
6.DISCONNECT FUEL TANK VENT HOSE SUB-ASSEMBLY
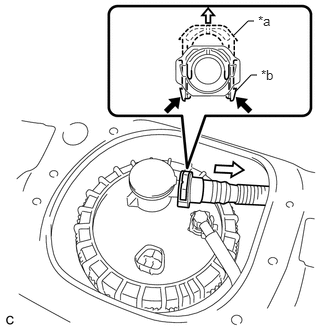
| *a | Retainer |
| *b | Tab |

|
Pinch |

|
Pull |
Pinch the tabs of the retainer to disengage the lock claws and pull out the retainer as shown in the illustration.
- NOTICE:
- ·
Remove any foreign matter on the fuel tank vent hose connector before performing this work.
·Do not scratch or allow any foreign matter to get on the parts when disconnecting them as the fuel tank vent hose connector has an O-ring that seals the pipe (fuel pipe).
·Be sure to disconnect the fuel tank vent hose connector by hand.
·Do not forcibly bend, twist or turn the fuel tank vent hose sub-assembly.
·Cover the disconnected fuel tank vent hose sub-assembly with plastic bags to prevent damage and contamination.
·If the fuel tank vent hose connector and fuel suction tube with pump and gauge assembly are stuck, push and pull to release them.
77209F
7.DISCONNECT FUEL TANK MAIN TUBE SUB-ASSEMBLY
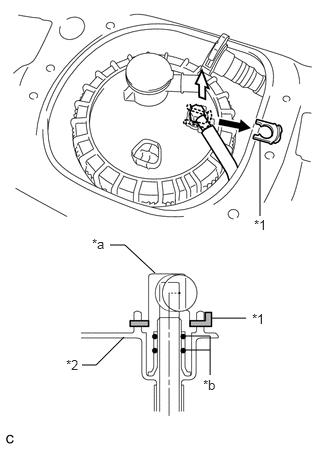
| *1 | Tube Joint Clip |
| *2 | Fuel Suction Plate Sub-assembly |
| *a | Fuel Tube Joint |
| *b | O-ring |
|
|
Pull off |
|
|
Pull off |
Remove the tube joint clip, and pull off the fuel tube joint of the fuel tank main tube sub-assembly.
- NOTICE:
- ·
Remove any foreign matter on the fuel tube joint before performing this work.
·Do not scratch or allow any foreign matter to get on the parts when disconnecting them as the fuel tube connector has O-rings that seal the pipe (fuel pipe).
·Be sure to disconnect the fuel tube joint by hand.
·Do not bend, twist, pinch or kink the nylon tube.
·Cover the disconnected fuel tube joint with a plastic bag to prevent damage and contamination.
·If the fuel tube joint and fuel suction plate sub-assembly are stuck, push and pull to release them.
77169A
8.REMOVE FUEL PUMP GAUGE RETAINER
- NOTICE:
-
Before performing these procedures, first cover the connector and fuel tube joint of the fuel suction tube with pump and gauge assembly with vinyl tape and then clean any dirt and foreign matter in order to prevent contamination of the fuel system.
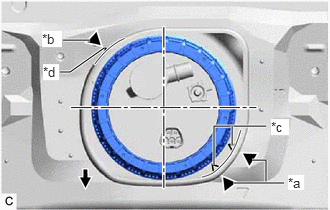
| *a | Copy of Fully Tightened Mark |
| *b | Copy of Start of Threads Mark |
| *c | Fully Tightened Mark on Fuel Tank Assembly |
| *d | Start of Threads Mark on Fuel Tank Assembly |
|
|
Front |
Copy the start of threads mark and fully tightened marks from the fuel tank assembly to the vehicle body in order to record their locations.
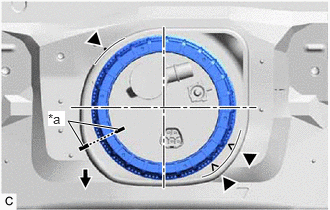
| *a | Paint Mark |
|
|
Front |
Place paint marks on the fuel suction tube with pump and gauge assembly and vehicle body as shown in the illustration.
- NOTICE:
- ·
The fuel suction tube with pump and gauge assembly has a protrusion that engages with a notch on the fuel tank assembly to ensure correct alignment and to prevent the fuel suction tube with pump and gauge assembly from turning during installation and removal of the fuel pump gauge retainer.
·If the fuel pump gauge retainer is turned with the fuel suction tube with pump and gauge assembly misaligned, the fuel suction tube with pump and gauge assembly will turn with the fuel pump gauge retainer and may be damaged.
·The paint marks are used to ensure that the fuel suction tube with pump and gauge assembly does not turn with the fuel pump gauge retainer.
Install SST to the fuel pump gauge retainer.
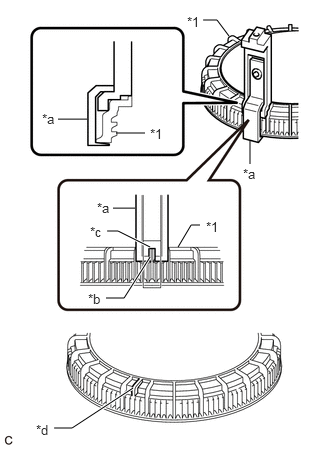
| *1 | Fuel Pump Gauge Retainer |
| *a | SST (Claw Set) |
| *b | Protrusion |
| *c | Notch |
| *d | Do not install SST (Claw Set) |
Set 4 SST (claw set) to the fuel pump gauge retainer.
- SST
- 09808-14031 (09808-01080, 09808-01090, 09808-01100)
- NOTICE:
- ·
Align the notch of SST (claw set) with the protrusion of the fuel pump gauge retainer.
·Do not install SST (claw set) to the start of threads location of the fuel pump gauge retainer.
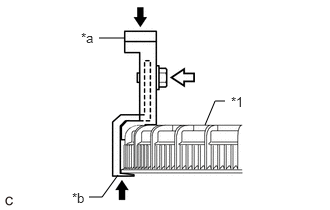
| *1 | Fuel Pump Gauge Retainer |
| *a | SST (Claw Set) |
| *b | Hook |
|
|
Push |
|
|
SST (Bolt) |
Push SST (claw set) against the fuel pump gauge retainer and tighten SST (bolt).
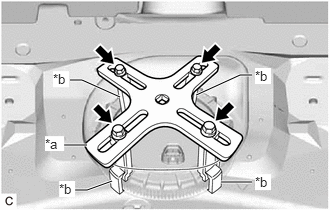
| *a | SST (Plate) |
| *b | SST (Claw Set) |
|
|
SST (Bolt) |
Temporarily install SST (plate) to SST (claw set) with 4 SST (bolt).
- SST
- 09808-14031 (09808-01030, 09808-01090)
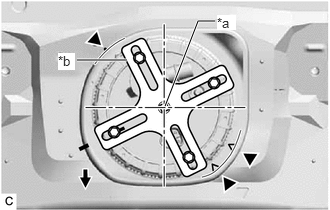
| *a | Center Point of Fuel Pump Gauge Retainer |
| *b | SST (Plate) |
|
|
Front |
Adjust the position of SST (claw set) so that the hole in SST (plate) for installing SST (handle) is in the center of the fuel pump gauge retainer.
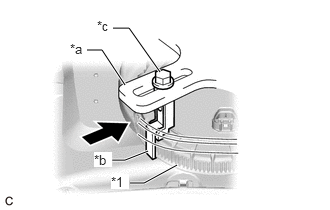
| *1 | Fuel Pump Gauge Retainer |
| *a | SST (Plate) |
| *b | SST (Claw Set) |
| *c | SST (Bolt) |
|
|
Press |
Press SST (claw set) against the rib of the fuel pump gauge retainer and tighten SST (bolt).
Install SST (handle) to SST (plate).
- SST
- 09808-14031 (09808-01010, 09808-01020)
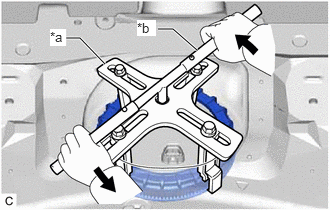
| *a | SST (Plate) |
| *b | SST (Handle) |
|
|
Loosen |
Slowly loosen the fuel pump gauge retainer by approximately 90°.
- NOTICE:
-
Do not spin SST too fast or use an impact wrench as this may result in damage to components.
While one person loosens the fuel pump gauge retainer, have another person press down the rising fuel suction tube with pump and gauge assembly, securely insert the protrusion of the fuel suction tube with pump and gauge assembly into the groove of the fuel tank assembly, and then remove the fuel pump gauge retainer while making sure that the fuel suction tube with pump and gauge assembly is properly aligned.
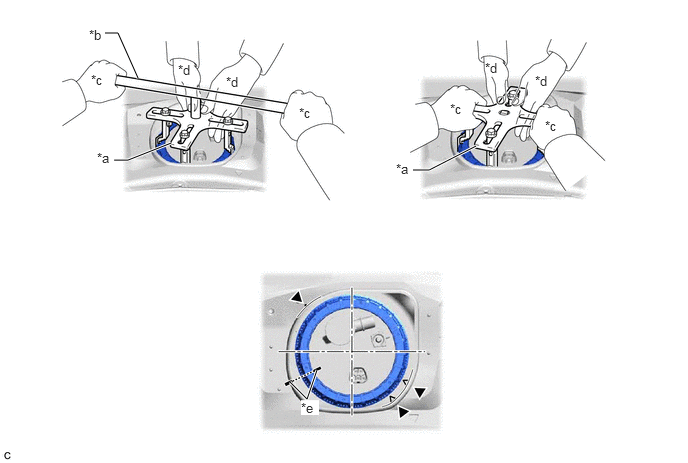
| *a | SST (Plate) | *b | SST (Handle) |
| *c | One Person in Charge of Loosening | *d | One Person in Charge of Pressing Down |
| *e | Paint Mark | - | - |
- NOTICE:
- ·
The fuel suction tube with pump and gauge assembly is pressed against the underside of the fuel tank assembly by a spring, and the constant upward pressure applied by this spring causes the fuel suction tube with pump and gauge assembly to rise up.
·If the fuel pump gauge retainer is turned while the fuel suction tube with pump and gauge assembly and fuel tank assembly are not correctly aligned, the fuel suction tube with pump and gauge assembly will move with the fuel pump gauge retainer, and the fuel suction tube with pump and gauge assembly and fuel tank assembly may both be damaged.
·Do not turn the fuel pump gauge retainer if the paint marks become misaligned.
77020A
9.REMOVE FUEL SUCTION TUBE WITH PUMP AND GAUGE ASSEMBLY
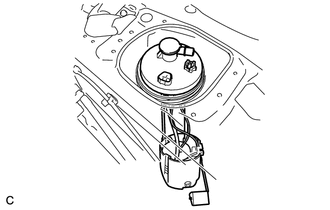
Remove the fuel suction tube with pump and gauge assembly from the fuel tank assembly.
- NOTICE:
-
Be careful not to bend the arm of the fuel sender gauge assembly.
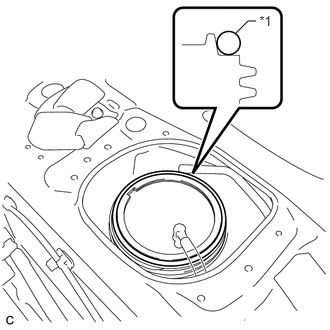
| *1 | Fuel Suction Tube Set Gasket |
Remove the fuel suction tube set gasket from the fuel tank assembly.