SUPPLEMENTAL RESTRAINT SYSTEMS CURTAIN SHIELD AIRBAG ASSEMBLY(w/ Occupant Classification System) INSTALLATION
CAUTION / NOTICE / HINT
- HINT:
- ·
Use the same procedure for the RH side and LH side.
·The following procedure is for the LH side.
PROCEDURE

 62180A
1.INSTALL CURTAIN SHIELD AIRBAG ASSEMBLY
- NOTICE:
-
When installing a curtain shield airbag assembly, have assistants hold it to prevent it from bending.
Check that the power switch is off.
Check that the cable is disconnected from the negative (-) auxiliary battery terminal.
- CAUTION:
-
Wait at least 90 seconds after disconnecting the cable from the negative (-) auxiliary battery terminal to disable the SRS system.
Insert the 2 hooks and then install the curtain shield airbag assembly with 2 new bolts, 3 new spacers, 7 new clips (A) with pins, and engage the 5 clips (B) in the order shown in the illustration.
- Torque:
- 14 N*m (143 kgf*cm, 10 ft.*lbf)
- NOTICE:
-
Do not twist the curtain shield airbag assembly when installing it.
- HINT:
-
Engage the 2 claws to install each new clip (A).
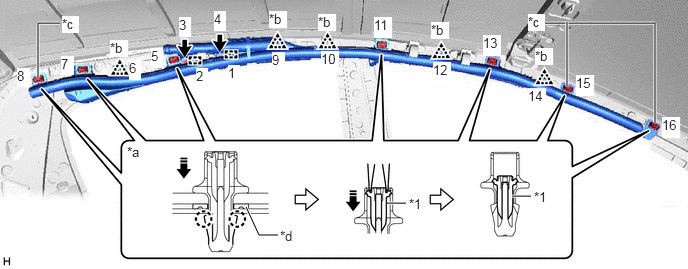
| *1 | Pin | - | - |
| *a | Clip (A) | *b | Clip (B) |
| *c | Spacer Location | *d | Spacer |
Using needle nose pliers, push the 7 pins into the 7 clips (A).
- NOTICE:
- ·
Do not damage the pins.
·Make sure that the pins of the clips (A) are pushed in firmly.
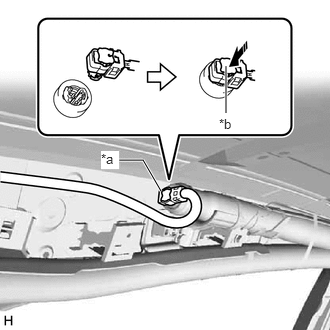
| *a | Airbag Connector |
| *b | Airbag Connector Locking Button |
Connect the airbag connector.
- NOTICE:
-
When connecting any airbag connector, take care not to damage the airbag wire harness.
Push in the airbag connector locking button to install the airbag connector.
2.CONNECT CABLE TO NEGATIVE AUXILIARY BATTERY TERMINAL
- NOTICE:
-
When disconnecting the cable, some systems need to be initialized after the cable is reconnected (See page General>INTRODUCTION>REPAIR INSTRUCTION>INITIALIZATION).
3.INSTALL ROOF HEADLINING ASSEMBLY
4. PERFORM DIAGNOSTIC SYSTEM CHECK
5.INSPECT SRS WARNING LIGHT