HYBRID / BATTERY CONTROL HV BATTERY THERMISTOR REMOVAL
PROCEDURE

 1. PRECAUTION
- CAUTION:
-
After turning the power switch off, waiting time may be required before disconnecting the cable from the negative (-) auxiliary battery terminal. Therefore, make sure to read the disconnecting the cable from the negative (-) auxiliary battery terminal notices before proceeding with work.
-
Click hereGeneral>INTRODUCTION>REPAIR INSTRUCTION>PRECAUTION
2.REMOVE BATTERY SMART UNIT
3.REMOVE NO. 1 HYBRID VEHICLE BATTERY COVER PANEL LH
4.REMOVE NO. 2 HYBRID BATTERY SHIELD SUB-ASSEMBLY
5.REMOVE UPPER HYBRID BATTERY COVER SUB-ASSEMBLY
6.DISCONNECT NO. 1 HYBRID BATTERY PACKING
7.REMOVE HYBRID BATTERY THERMISTOR
- CAUTION:
-
Be sure to wear insulated gloves and protective goggles.
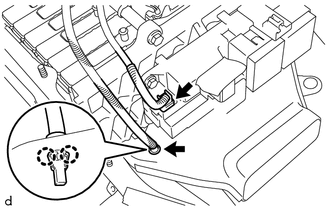
Disconnect the connector.
Disengage the 2 claws and disconnect the hybrid battery thermistor from the No. 1 hybrid battery cover intake duct.
for 2 Clamps Type:
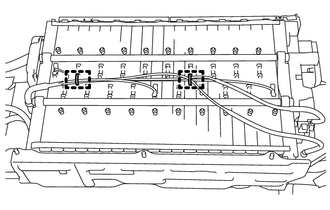
Disengage the 2 clamps.
for 6 Clamps Type:
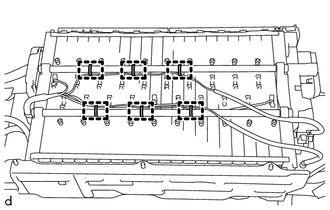
Disengage the 6 clamps.
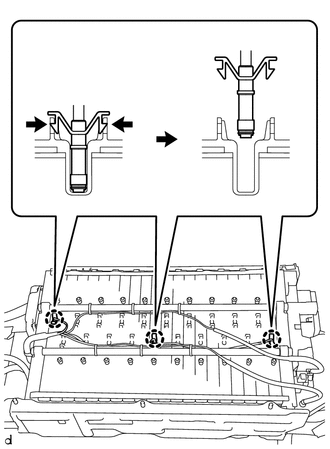
Disengage the 3 claws of the hybrid battery thermistor (sensor portions) and remove the hybrid battery thermistor from the HV battery.