REAR SUSPENSION REAR COIL SPRING INSTALLATION
PROCEDURE

 48259A
1.INSTALL REAR UPPER COIL SPRING INSULATOR LH
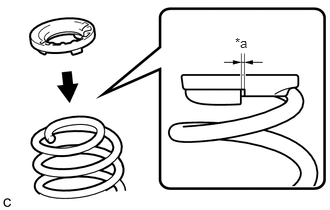
Install the rear upper coil spring insulator LH to the rear coil spring LH.
| *a | 10 mm or less |
- NOTICE:
-
Install the rear upper coil spring insulator so that the dimension between the stopper and the upper end of the rear coil spring is 10 mm (0.394 in.) or less.
48257C
2.INSTALL REAR UPPER COIL SPRING INSULATOR RH
- HINT:
-
Perform the same procedure as the LH side.
48258C
3.INSTALL REAR LOWER COIL SPRING INSULATOR LH
48258B
4.INSTALL REAR LOWER COIL SPRING INSULATOR RH
48231B
5.INSTALL REAR COIL SPRING LH
Support the spring seat of the rear axle beam assembly using 2 jacks and 2 wooden blocks.
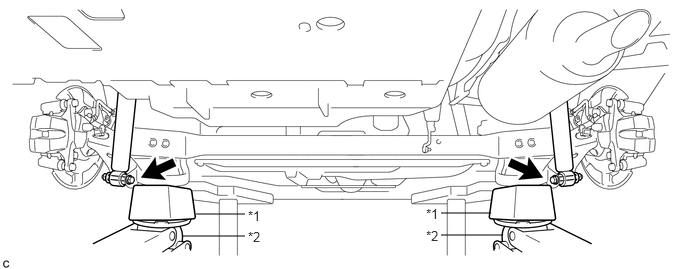
| *1 | Wooden Block | *2 | Jack |
Remove the 2 bolts while holding the 2 nuts and separate the rear axle beam assembly from the rear shock absorber assemblies LH and RH.
- NOTICE:
-
Since the stopper nuts are used, turn the bolts.
Slowly lower the rear axle beam assembly using 2 jacks and 2 wooden blocks.
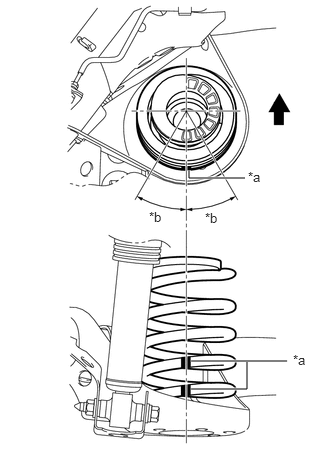
Set the rear coil spring LH to the rear axle beam assembly.
| *a | Identification Mark |
| *b | 30° or less |

|
Front of the Vehicle |
- NOTICE:
-
Set the rear coil spring so that the identification marks are positioned as shown in the illustration.
Slowly jack up the rear axle beam assembly using 2 jacks and 2 wooden blocks, and temporarily install the rear axle beam assembly and rear coil spring LH with the 2 bolts and 2 nuts.
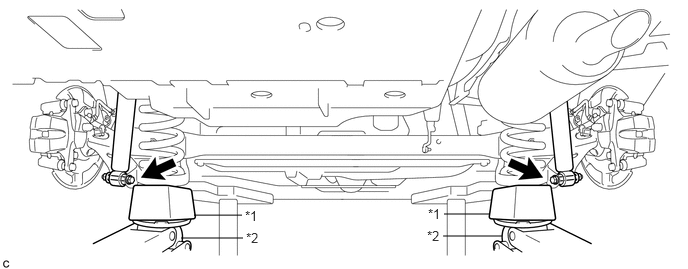
| *1 | Wooden Block | *2 | Jack |
- NOTICE:
-
Since the stopper nuts are used, turn the bolts.
- HINT:
-
Insert the bolt with the threaded end facing the outside of the vehicle.
48231A
6.INSTALL REAR COIL SPRING RH
- HINT:
-
Perform the same procedure as the LH side.
89407A
7.INSTALL REAR HEIGHT CONTROL SENSOR SUB-ASSEMBLY (w/ Height Control Sensor)
Install the rear height control sensor sub-assembly to the rear axle beam assembly with the bolt.
- Torque:
- 8.0 N*m (82 kgf*cm, 71 in.*lbf)
89516D
8.INSTALL SKID CONTROL SENSOR WIRE LH
Install the skid control sensor wire LH to the rear axle beam assembly with the nut and 2 clamps.
- Torque:
- 8.5 N*m (87 kgf*cm, 75 in.*lbf)
- NOTICE:
-
Do not twist the skid control sensor wire when installing it.
89516C
9.INSTALL SKID CONTROL SENSOR WIRE RH
- HINT:
-
Perform the same procedure as the LH side.
89516D
10.CONNECT SKID CONTROL SENSOR WIRE LH
89516C
11.CONNECT SKID CONTROL SENSOR WIRE RH
- HINT:
-
Perform the same procedure as the LH side.
12.INSTALL REAR WHEELS
- Torque:
- 103 N*m (1050 kgf*cm, 76 ft.*lbf)
13. STABILIZE SUSPENSION
42110F
14.FULLY TIGHTEN REAR AXLE BEAM ASSEMBLY
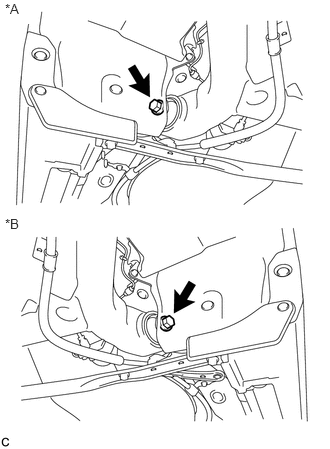
Fully tighten the 2 bolts.
| *A | LH Side |
| *B | RH Side |
- Torque:
- 135 N*m (1377 kgf*cm, 100 ft.*lbf)
- NOTICE:
-
The final torque must be applied under the standard vehicle height conditions.
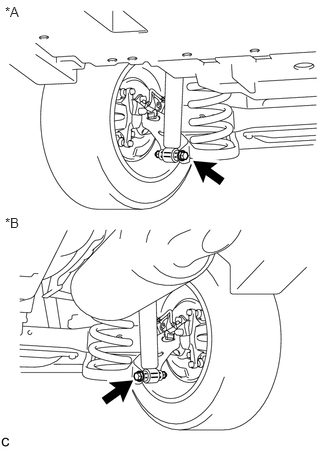
Fully tighten the 2 bolts.
| *A | LH Side |
| *B | RH Side |
- Torque:
- 90 N*m (918 kgf*cm, 66 ft.*lbf)
- NOTICE:
- ·
Since the stopper nut are used, turn the bolts.
·The final torque must be applied under the standard vehicle height conditions.
65638
15.INSTALL REAR WHEEL HOUSE LINER LH
Install the rear wheel house liner LH with the clip.
65637
16.INSTALL REAR WHEEL HOUSE LINER RH
- HINT:
-
Perform the same procedure as the LH side.
17.INSPECT REAR WHEEL ALIGNMENT
18.PLACE FRONT WHEELS FACING STRAIGHT AHEAD
19.PERFORM YAW RATE AND ACCELERATION SENSOR CALIBRATION
20.CHECK FOR SPEED SENSOR SIGNAL
21. INITIALIZE HEIGHT CONTROL SENSOR SIGNAL (w/ Height Control Sensor)
22.ADJUST HEADLIGHT AIMING (w/ Height Control Sensor)