BRAKE SYSTEM (OTHER) BRAKE PEDAL(for RHD) ADJUSTMENT
PROCEDURE

 1.INSPECT AND ADJUST BRAKE PEDAL HEIGHT
Check the brake pedal height.
Turn back the carpet.
Turn back the dash silencer from the slit provided on the dash silencer.
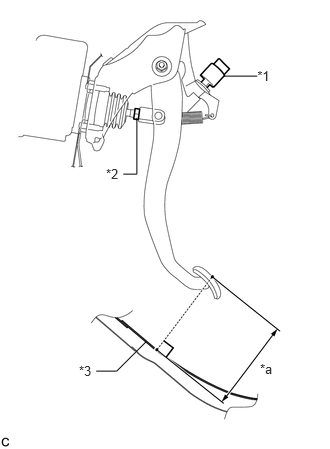
Measure the shortest distance between the brake pedal surface and floor panel.
| *1 | Stop Light Switch Assembly |
| *2 | Clevis Lock Nut |
| *3 | Floor Panel |
| *a | Brake Pedal Height |
- Brake pedal height from floor panel:
130.6 to 140.6 mm (5.15 to 5.53 in.)
Adjust the brake pedal height.
Remove the stop light switch assembly (See page Vehicle Exterior>LIGHTING (EXT)>STOP LIGHT SWITCH>REMOVAL).
Loosen the clevis lock nut.
Adjust the brake pedal height by turning the push rod.
Tighten the clevis lock nut.
- Torque:
- 26 N*m (260 kgf*cm, 19 ft.*lbf)
Install and adjust the stop light switch assembly (See page Vehicle Exterior>LIGHTING (EXT)>STOP LIGHT SWITCH>INSTALLATION).
89510D
2.INSPECT AND ADJUST BRAKE PEDAL STROKE SENSOR ASSEMBLY
Inspect the brake pedal stroke sensor assembly.
Connect the GTS to the DLC3.
Turn the power switch on (IG).
Turn the GTS on.
Enter the following menus: Chassis / ABS/VSC/TRC / Data List "Stroke Sensor".
Read the stroke sensor value without the brake pedal repressed.
- Standard voltage (without the brake pedal depressed):
0.8 to 1.2 V
If the stroke sensor value is not within the standard voltage, adjust the brake pedal stroke sensor assembly.
Adjust the brake pedal stroke sensor assembly.
Remove the No. 1 instrument panel under cover sub-assembly (See page Vehicle Interior>INTERIOR PANELS / TRIM>LOWER INSTRUMENT PANEL>REMOVAL).
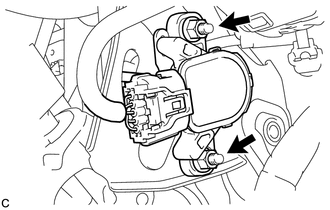
Loosen the 2 nuts.
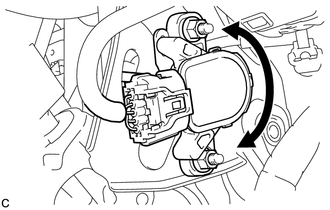
Read the stroke sensor value in the Data List, and turn the brake pedal stroke sensor assembly slowly to the right or left to adjust the output voltage so that it is within the following range.
- Standard voltage (without the brake pedal depressed):
0.8 to 1.2 V
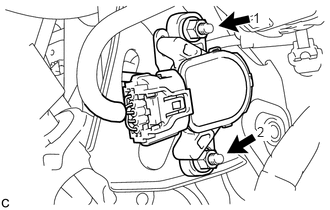
Tighten the 2 nuts.
- Torque:
- 7.0 N*m (71 kgf*cm, 62 in.*lbf)
- NOTICE:
- ·
Do not depress the brake pedal after turning the power switch on (IG).
·Tighten the 2 nuts in the order shown in the illustration.
Turn the GTS off and turn the power switch off.
Disconnect the GTS.
Install the No. 1 instrument panel under cover sub-assembly (See page Vehicle Interior>INTERIOR PANELS / TRIM>LOWER INSTRUMENT PANEL>INSTALLATION).
3.INSPECT BRAKE PEDAL FREE PLAY
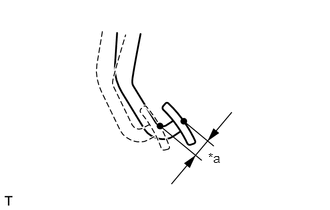
Depress the pedal until a slight resistance is felt. Measure the brake pedal free play as shown in the illustration.
| *a | Brake Pedal Free Play |
- Pedal free play:
1.0 to 6.0 mm (0.0394 to 0.236 in.)
If the pedal free play is not as specified, check the stop light switch clearance (See page Vehicle Exterior>LIGHTING (EXT)>STOP LIGHT SWITCH>INSTALLATION). If the pedal free play is as specified, proceed to the Inspect Brake Pedal Reserve Distance procedure.
4.INSPECT BRAKE PEDAL RESERVE DISTANCE
- HINT:
-
Measure the distance at the same point used for the brake pedal height inspection.
Release the parking brake.
With the power switch on (READY), depress the brake pedal and measure the pedal reserve distance.
- Pedal reserve distance from the floor panel at 196 N (20 kgf, 44.1 lbf):
More than 79 mm (3.11 in.)
If the distance is not as specified, troubleshoot the brake system (See page Brake>BRAKE SYSTEM (OTHER)>BRAKE SYSTEM>PROBLEM SYMPTOMS TABLE).
5. PERFORM INITIALIZATION AND CALIBRATION OF LINEAR SOLENOID VALVE