PARKING BRAKE PARKING BRAKE PEDAL(for RHD) REMOVAL
PROCEDURE

 89183A
1.REMOVE YAW RATE AND ACCELERATION SENSOR
67913
2.REMOVE FRONT DOOR SCUFF PLATE RH
- HINT:
-
Use the same procedure as for the LH side (See page Vehicle Interior>INTERIOR PANELS / TRIM>ROOF HEADLINING>REMOVAL).
62111C
3.REMOVE COWL SIDE TRIM SUB-ASSEMBLY RH
- HINT:
-
Use the same procedure as for the LH side (See page Vehicle Interior>INTERIOR PANELS / TRIM>ROOF HEADLINING>REMOVAL).
62311B
4.REMOVE FRONT DOOR OPENING TRIM WEATHERSTRIP RH
- HINT:
-
Use the same procedure as for the LH side (See page Vehicle Interior>INTERIOR PANELS / TRIM>ROOF HEADLINING>REMOVAL).
67917A
5.REMOVE REAR DOOR SCUFF PLATE RH
- HINT:
-
Use the same procedure as for the LH side (See page Vehicle Interior>INTERIOR PANELS / TRIM>ROOF HEADLINING>REMOVAL).
62331A
6.REMOVE REAR DOOR OPENING TRIM WEATHERSTRIP RH
- HINT:
-
Use the same procedure as for the LH side (See page Vehicle Interior>INTERIOR PANELS / TRIM>ROOF HEADLINING>REMOVAL).
73233
7.REMOVE LAP BELT OUTER ANCHOR COVER (for RH Side)
- HINT:
-
Use the same procedure as for the LH side (See page Vehicle Interior>SEAT BELT>FRONT SEAT OUTER BELT ASSEMBLY>REMOVAL).
73210
8.DISCONNECT FRONT SEAT OUTER BELT ASSEMBLY RH
- HINT:
-
Use the same procedure as for the LH side (See page Vehicle Interior>SEAT BELT>FRONT SEAT OUTER BELT ASSEMBLY>REMOVAL).
62413A
9.REMOVE CENTER PILLAR LOWER GARNISH RH
- HINT:
-
Use the same procedure as for the LH side (See page Vehicle Interior>INTERIOR PANELS / TRIM>ROOF HEADLINING>REMOVAL).
77306
10.REMOVE FUEL LID LOCK OPEN LEVER SUB-ASSEMBLY
87289A
11.REMOVE REAR NO. 1 HEATER REGISTER BEZEL
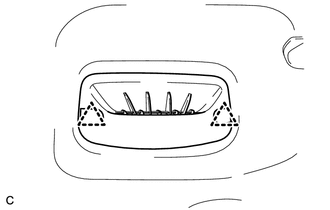
Remove the 2 clips and rear No. 1 heater register bezel.
G92D2
12.REMOVE NO. 2 HYBRID BATTERY INTAKE DUCT
Turn back the front floor carpet to a position where the No. 2 hybrid battery intake duct can be removed.
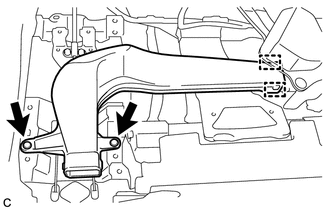
Remove the 2 clips.
Disengage the 2 guides and remove the No. 2 hybrid battery intake duct.
13.REMOVE INTEGRATION CONTROL AND PANEL
- HINT:
-
Use the same procedure as for LHD (See page Vehicle Interior>INTERIOR PANELS / TRIM>UPPER INSTRUMENT PANEL>REMOVAL).
55431B
14.REMOVE UPPER INSTRUMENT PANEL FINISH PANEL
- HINT:
-
Use the same procedure as for LHD (See page Vehicle Interior>INTERIOR PANELS / TRIM>UPPER INSTRUMENT PANEL>REMOVAL).
55480D
15.REMOVE LOWER INSTRUMENT PANEL FINISH PANEL ASSEMBLY
- HINT:
-
Use the same procedure as for LHD (See page Vehicle Interior>INTERIOR PANELS / TRIM>UPPER INSTRUMENT PANEL>REMOVAL).
55440D
16.REMOVE INSTRUMENT PANEL BOX ASSEMBLY
- HINT:
-
Use the same procedure as for LHD (See page Vehicle Interior>INTERIOR PANELS / TRIM>UPPER INSTRUMENT PANEL>REMOVAL).
55550
17.REMOVE GLOVE COMPARTMENT DOOR ASSEMBLY
- HINT:
-
Use the same procedure as for LHD (See page Vehicle Interior>INTERIOR PANELS / TRIM>LOWER INSTRUMENT PANEL>REMOVAL).
18.REMOVE LOWER INSTRUMENT PANEL FINISH PANEL SUB-ASSEMBLY
- HINT:
-
Use the same procedure as for LHD (See page Vehicle Interior>INTERIOR PANELS / TRIM>LOWER INSTRUMENT PANEL>REMOVAL).
55606
19.REMOVE NO. 1 INSTRUMENT PANEL UNDER COVER SUB-ASSEMBLY
- HINT:
-
Use the same procedure as for LHD (See page Vehicle Interior>INTERIOR PANELS / TRIM>LOWER INSTRUMENT PANEL>REMOVAL).
73900
20.REMOVE LOWER NO. 1 INSTRUMENT PANEL AIRBAG ASSEMBLY
- HINT:
-
Use the same procedure as for LHD (See page Vehicle Interior>SUPPLEMENTAL RESTRAINT SYSTEMS>KNEE AIRBAG ASSEMBLY>REMOVAL).
87201
21.REMOVE NO. 1 AIR DUCT SUB-ASSEMBLY
46441
22.LOOSEN ADJUSTING NUT
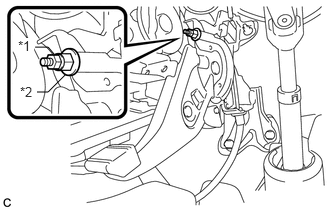
Remove the lock nut and loosen the adjusting nut.
| *1 | Lock Nut |
| *2 | Adjusting Nut |
46302
23.SEPARATE NO. 1 PARKING BRAKE PULL ROD SUB-ASSEMBLY
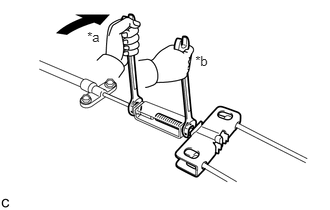
Separate the No. 1 parking brake pull rod sub-assembly from the parking brake control pedal assembly as shown in the illustration.
| *a | Turn |
| *b | Hold |
46200
24.REMOVE PARKING BRAKE CONTROL PEDAL ASSEMBLY
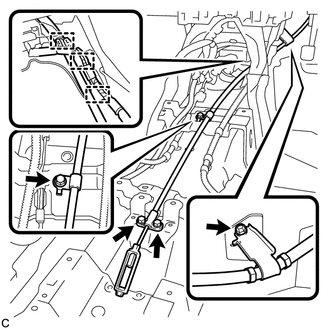
Remove the 4 bolts and separate the No. 1 parking brake cable assembly.
Disengage the 2 wire harness clamps.
Remove the No. 1 parking brake cable assembly from the clamp.
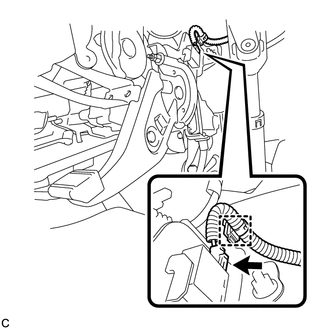
Disconnect the parking brake switch connector.
Disengage the wire harness clamp.
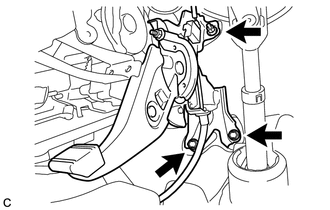
Remove the 2 bolts, nut and parking brake control pedal assembly.