LIGHTING (EXT) LIGHTING SYSTEM Automatic High Beam System does not Operate or Operation Indicator does not Illuminate
DESCRIPTION
The main body ECU (multiplex network body ECU) controls the automatic high beam system based on signals received from the forward recognition camera.
WIRING DIAGRAM
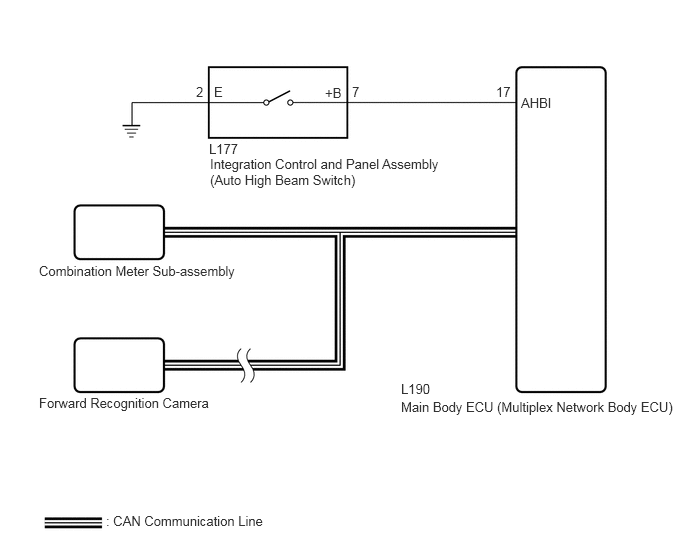
CAUTION / NOTICE / HINT
- NOTICE:
- ·
When replacing the forward recognition camera, always replace it with a new one. If a forward recognition camera which was installed to another vehicle is used, the information stored in the forward recognition camera will not match the information from the vehicle. As a result, a DTC may be stored.
·If the forward recognition camera has been replaced with a new one, be sure to perform Forward Recognition Camera Learning.
Click hereEngine / Hybrid System>CRUISE CONTROL>FRONT CAMERA>ADJUSTMENT (SEQUENTIAL RECOGNITION)
PROCEDURE
Check the operation of the automatic high beam indicator light.
Turn the power switch on (IG).
Turn the light control switch to the AUTO* or head position.
Cover the automatic light control sensor to turn the low beam headlights on.
Move the dimmer switch to the high position.
Press the integration control and panel assembly (auto high beam switch).
*: w/ Automatic Light Control
- OK:
Automatic high beam indicator light illuminates.
- Result:
Proceed to OK NG
OK
NG
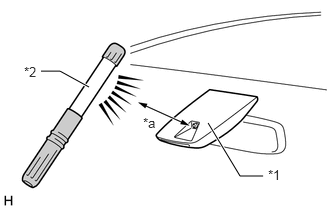
| *1 | Forward Recognition Camera
(Automatic High Beam Sensor) |
| *2 | Work Light or Equivalent |
| *a | 100 mm or less |
Shine a light on the automatic high beam sensor.
- HINT:
-
If troubleshooting is being performed in a bright area, such as outside on a sunny day, it will not be necessary to perform this step.
Connect the GTS to the DLC3.
Turn the power switch on (IG).
Turn the GTS on.
Enter the following menus: Body Electrical / Main Body / Data List.
Read the Data List according to the display on the GTS.
| Tester Display | Measurement Item | Range | Normal Condition | Diagnostic Note |
|---|---|---|---|---|
| Auto H Beam STS0 | Automatic high beam sensor current state | Undetec, CAM NA, No sens, Hlight, Taillgt, Speed, Daytime, Village, Malfunc, Delay, Aim Lmt, SAE Mod, Undefin or LIN Err | Condition can be displayed | - |
- OK:
"Daytime" is displayed on the GTS.
- Result:
Proceed to OK NG
OK
NG
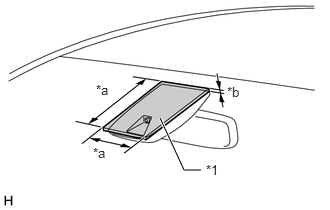
| *1 | Cardboard or Equivalent Object |
| *a | 150 mm or more |
| *b | 3 mm or more |
Cover the automatic high beam sensor with an opaque object, such as cardboard.
- NOTICE:
- ·
Make sure that there is no clearance between the cardboard or equivalent object and the area of the windshield glass in front of the automatic high beam sensor.
·If there is any clearance, light may shine on the automatic high beam sensor and the value of the Data List will not change.
Connect the GTS to the DLC3.
Turn the power switch on (IG).
Turn the GTS on.
Enter the following menus: Body Electrical / Main Body / Data List.
Read the Data List according to the display on the GTS.
- HINT:
-
As it may take time for the values in the Data List to change, wait at least 10 seconds before reading the Data List.
| Tester Display | Measurement Item | Range | Normal Condition | Diagnostic Note |
|---|---|---|---|---|
| Auto H Beam STS0 | Automatic high beam sensor current state | Undetec, CAM NA, No sens, Hlight, Taillgt, Speed, Daytime, Village, Malfunc, Delay, Aim Lmt, SAE Mod, Undefin or LIN Err | Condition can be displayed | - |
- OK:
"Speed" is displayed on the GTS.
- Result:
Proceed to OK NG
OK
Click hereGeneral>INTRODUCTION>HOW TO TROUBLESHOOT ECU CONTROLLED SYSTEMS>HOW TO PROCEED WITH TROUBLESHOOTING
NG
Connect the GTS to the DLC3.
Turn the power switch on (IG).
Turn the GTS on.
Enter the following menus: Body Electrical / Main Body / Data List.
Read the Data List according to the display on the GTS.
| Tester Display | Measurement Item | Range | Normal Condition | Diagnostic Note |
|---|---|---|---|---|
| Auto High Beam Main Switch | Auto high beam switch signal | OFF or ON | OFF: Integration control and panel assembly (auto high beam switch) not pressed
ON: Integration control and panel assembly (auto high beam switch) pressed |
- |
- OK:
Normal conditions listed above are displayed.
- Result:
Proceed to OK NG
OK
NG
Connect the GTS to the DLC3.
Turn the power switch on (IG).
Turn the GTS on.
Enter the following menus: Body Electrical / Main Body / Data List.
Read the Data List according to the display on the GTS.
| Tester Display | Measurement Item | Range | Normal Condition | Diagnostic Note |
|---|---|---|---|---|
| Auto H Beam STS0 | Automatic high beam sensor current state | Undetec, CAM NA, No sens, Hlight, Taillgt, Speed, Daytime, Village, Malfunc, Delay, Aim Lmt, SAE Mod, Undefin or LIN Err | Condition can be displayed | - |
- OK:
"Daytime" or "Speed" is displayed on the GTS.
- Result:
Proceed to OK NG
OK
NG
Connect the GTS to the DLC3.
Turn the power switch on (IG).
Turn the GTS on.
Enter the following menus: Body Electrical / Combination Meter / Active Test.
Perform the Active Test according to the display on the GTS.
| Tester Display | Measurement Item | Control Range | Diagnostic Note |
|---|---|---|---|
| Automatic High Beam Indicator | Automatic high beam indicator light | OFF or ON | - |
- OK:
The automatic high beam indicator light illuminates and turns off.
- Result:
Proceed to OK NG
OK
NG
Remove the integration control and panel assembly (auto high beam switch).
Click hereVehicle Exterior>LIGHTING (EXT)>AUTOMATIC HIGH BEAM MAIN SWITCH>REMOVAL
Inspect the integration control and panel assembly (auto high beam switch).
Click hereVehicle Exterior>LIGHTING (EXT)>AUTOMATIC HIGH BEAM MAIN SWITCH>INSPECTION
- Result:
Proceed to OK NG
OK
NG
Disconnect the L190 main body ECU (multiplex network body ECU) connector.
Measure the resistance according to the value(s) in the table below.
- Standard Resistance:
Tester Connection Condition Specified Condition L177-7 (+B) - L190-17 (AHBI) Always Below 1 Ω L177-7 (+B) or L190-17 (AHBI) - Body ground Always 10 kΩ or higher L177-2 (E) - Body ground Always Below 1 Ω
- Result:
Proceed to OK NG
OK
NG