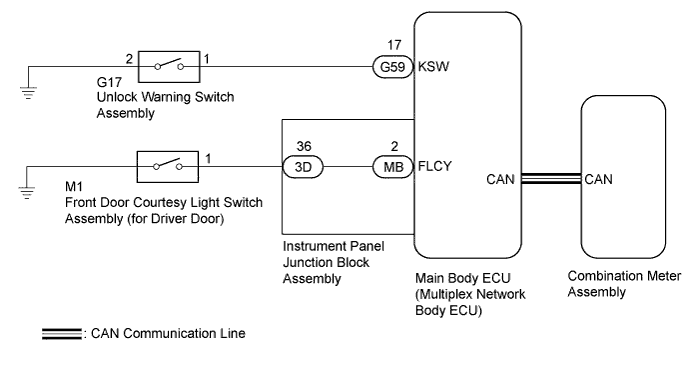
KEY REMINDER WARNING SYSTEM > Key Reminder Buzzer does not Sound |
| 1.CHECK COMBINATION METER ASSEMBLY (BUZZER OPERATION) |
Turn the ignition switch ON (IG). Place luggage on the front passenger seat to cause the front passenger seat belt warning light to blink.
When driving the vehicle at 20 km/h (12 mph) or higher, check that the seat belt warning buzzer sounds to inform that the front passenger seat belt is not fastened.
|
| ||||
| OK | |
 |
| 2.READ VALUE USING TECHSTREAM (FRONT DOOR COURTESY LIGHT SWITCH ASSEMBLY) |
Connect the Techstream to the DLC3.
Turn the ignition switch ON (IG).
Turn the Techstream on.
Enter the following menus: Body Electrical / Main Body / Data List.
Select FL Door Courtesy in the Data List and read the Techstream display.
| Tester Display | Measurement Item/Range | Normal Condition | Diagnostic Note |
| FL Door Courtesy SW | Front door courtesy light switch LH signal/ON or OFF | ON: Front door LH open OFF: Front door LH closed | - |
|
| ||||
| OK | |
|
| 3.READ VALUE USING TECHSTREAM (UNLOCK WARNING SWITCH ASSEMBLY) |
Connect the Techstream to the DLC3.
Turn the ignition switch ON (IG).
Turn the Techstream on.
Enter the following menus: Body Electrical / Main Body / Data List.
Select Key Unlock Warning SW in the Data List and read the Techstream display.
| Tester Display | Measurement Item/Range | Normal Condition | Diagnostic Note |
| Key Unlock Warning SW | Unlock warning switch signal/ON or OFF | ON: Key in ignition key cylinder OFF: No key in ignition key cylinder | - |
|
| ||||
| OK | ||
 | ||
| ||
| 4.INSPECT FRONT DOOR COURTESY LIGHT SWITCH ASSEMBLY (for DRIVER DOOR) |
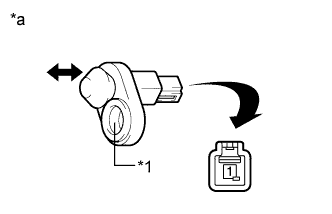 |
Remove the front door courtesy light switch assembly (for driver door) (Click here).
Measure the resistance according to the value(s) in the table below.
| Tester Connection | Switch Condition | Specified Condition |
| 1 - Switch body | Courtesy switch pushed (Door closed) | 10 kΩ or higher |
| 1 - Switch body | Courtesy switch not pushed (Door open) | Below 1 Ω |
| *1 | Switch Body |
| *a | Component without harness connected (Front Door Courtesy Light Switch Assembly (for Driver door)) |
|
| ||||
| OK | |
|
| 5.CHECK HARNESS AND CONNECTOR (FRONT DOOR COURTESY LIGHT SWITCH ASSEMBLY - INSTRUMENT PANEL JUNCTION BLOCK ASSEMBLY) |
Disconnect the 3D instrument panel junction block assembly connector.
Measure the resistance according to the value(s) in the table below.
| Tester Connection | Condition | Specified Condition |
| M1-1 - 3D-36 | Always | Below 1 Ω |
| M1-1 - Body ground | Always | 10 kΩ or higher |
|
| ||||
| OK | |
|
| 6.INSPECT INSTRUMENT PANEL JUNCTION BLOCK ASSEMBLY |
Remove the instrument panel junction block assembly (Click here).
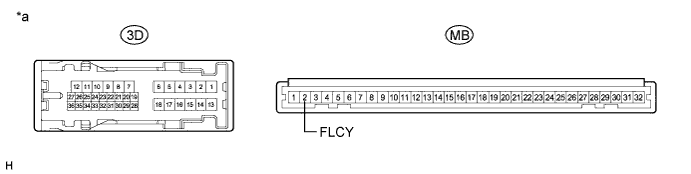
Remove the main body ECU (multiplex network body ECU) from the instrument panel junction block assembly.
Measure the resistance according to the value(s) in the table below.
| Tester Connection | Condition | Specified Condition |
| 3D-36 - MB-2 (FLCY) | Always | Below 1 Ω |
| *a | Component without harness connected (Instrument Panel Junction Block Assembly) | - | - |
|
| ||||
| OK | ||
| ||
| ||
| 7.INSPECT UNLOCK WARNING SWITCH ASSEMBLY |
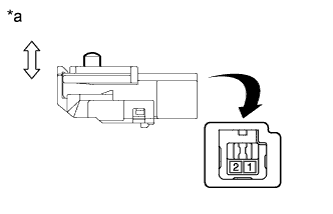 |
Remove the unlock warning switch assembly (Click here).
Measure the resistance according to the value(s) in the table below.
| Tester Connection | Switch Condition | Specified Condition |
| 1 - 2 | Switch not pushed (Key removed) | 10 kΩ or higher |
| 1 - 2 | Switch pushed (Key set) | Below 1 Ω |
| *a | Component without harness connected (Unlock Warning Switch Assembly) |
|
| ||||
| OK | |
|
| 8.CHECK HARNESS AND CONNECTOR (UNLOCK WARNING SWITCH ASSEMBLY - MAIN BODY ECU (MULTIPLEX NETWORK BODY ECU)) |
Disconnect the G59 main body ECU (multiplex network body ECU) connector.
Measure the resistance according to the value(s) in the table below.
| Tester Connection | Condition | Specified Condition |
| G17-1 - G59-17 (KSW) | Always | Below 1 Ω |
| G17-2 - Body ground | Always | Below 1 Ω |
| G17-1 - Body ground | Always | 10 kΩ or higher |
|
| ||||
| OK | ||
| ||
| ||

