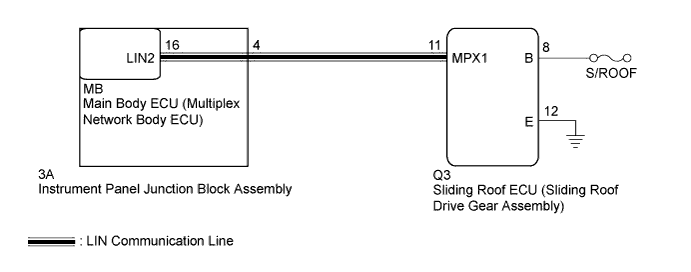
DTC B1273 Sliding Roof ECU Communication Stop |
| DTC No. | DTC Detection Condition | Trouble Area |
| B1273 | No communication between sliding roof ECU (sliding roof drive gear assembly) and main body ECU (multiplex network body ECU) for 10 seconds or more. |
|
| 1.INSPECT INSTRUMENT PANEL JUNCTION BLOCK ASSEMBLY |
Remove the instrument panel junction block assembly (Click here).
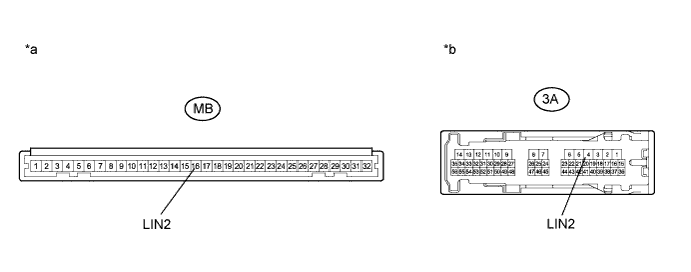
Remove the main body ECU (multiplex network body ECU) from the instrument panel junction block assembly.
Measure the resistance according to the value(s) in the table below.
| Tester Connection | Condition | Specified Condition |
| 3A-4 (LIN2)- MB-16 (LIN2) | Always | Below 1 Ω |
| *a | Component without harness connected (Instrument Panel Junction Block Assembly) | *b | Component without harness connected (Instrument Panel Junction Block Assembly) |
Install the main body ECU (multiplex network body ECU) to the instrument panel junction block assembly.
Install the instrument panel junction block assembly (Click here).
|
| ||||
| OK | |
 |
| 2.CHECK HARNESS AND CONNECTOR (INSTRUMENT PANEL JUNCTION BLOCK ASSEMBLY - SLIDING ROOF ECU) |
Disconnect the Q3 sliding roof ECU (sliding roof drive gear assembly) connector.
Measure the resistance according to the value(s) in the table below.
| Tester Connection | Condition | Specified Condition |
| 3A-4 (LIN2) - Q3-11 (MPX1) | Always | Below 1 Ω |
| 3A-4 (LIN2) - Body ground | Always | 10 kΩ or higher |
|
| ||||
| OK | |
|
| 3.CHECK HARNESS AND CONNECTOR (SLIDING ROOF ECU - AUXILIARY BATTERY, BODY GROUND) |
Measure the voltage according to the value(s) in the table below.
| Tester Connection | Condition | Specified Condition |
| Q3-8 (B) - Q3-12 (E) | Ignition switch off | 11 to 14 V |
Measure the resistance according to the value(s) in the table below.
| Tester Connection | Condition | Specified Condition |
| Q3-12 (E) - Body ground | Always | Below 1 Ω |
|
| ||||
| OK | |
|
| 4.REPLACE SLIDING ROOF ECU (SLIDING ROOF DRIVE GEAR ASSEMBLY) |
Replace the sliding roof ECU (sliding roof drive gear assembly) (Click here).
| NEXT | |
|
| 5.CHECK DTC OUTPUT |
Clear the DTC (Click here).
Recheck for DTCs.
|
| ||||
| OK | ||
 | ||
| ||
