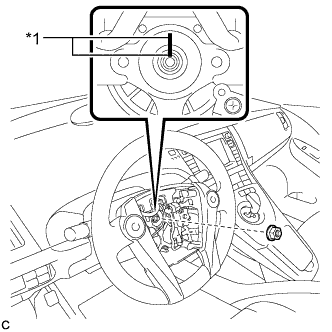
Home › Steering › STEERING COLUMN › STEERING COLUMN ASSEMBLY

STEERING COLUMN ASSEMBLY > INSTALLATION

for Preparation Click here


1. INSPECT STEERING COLUMN ASSEMBLY


  1. Inspect the bushings.


      C209250E01
    1. Check that the 2 bushings are securely installed to the steering column assembly.
      Text in Illustration 
      *1
      Bushing
      If the 2 bushings are installed improperly, replace the electric power steering column sub-assembly with a new one.

    2. Check the 2 bushings for deformation and damage.
      If the bushings are deformed or damaged, replace the electric power steering column sub-assembly with a new one.
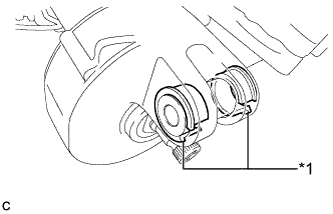


  1. Inspect the capsules.


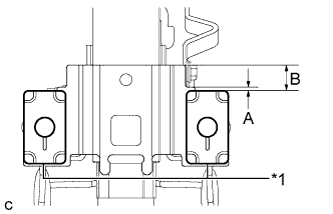
      C232485E01
    1. Check that the 2 capsules are securely installed to the steering column assembly as shown in the illustration.

      Standard Dimension:
      A
      B
      2 mm (0.0787 in.)
      17 mm (0.669 in.)

      Text in Illustration 
      *1
      Capsule
      If the capsules are not positioned as specified, replace the electric power steering column sub-assembly with a new one.

    2. Check the 2 capsules for deformation and damage.
      If either of the capsules is deformed, loose, missing or damaged, replace the electric power steering column sub-assembly with a new one.


2. INSTALL NO. 2 STEERING INTERMEDIATE SHAFT ASSEMBLY


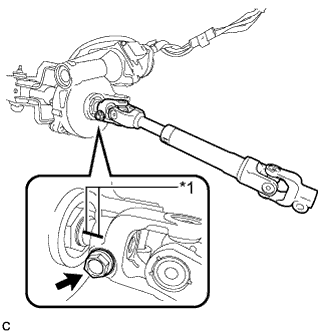
    C206269E01
  1. Align the matchmarks on the No. 2 steering intermediate shaft assembly and steering column assembly to install the No. 2 steering intermediate shaft assembly.
    Text in Illustration 
    *1
    Matchmark

  1. Install the bolt.

    Torque:
    35 N*m{ 359 kgf*cm , 26 ft.*lbf }


3. INSTALL STEERING POST ASSEMBLY (for Brush Type Motor)


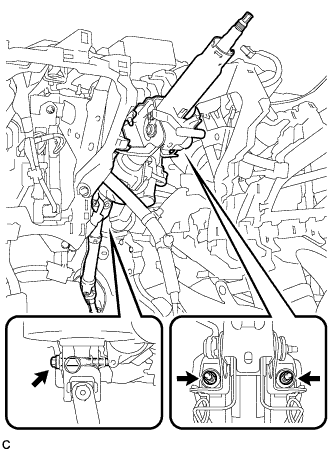
    C206267
  1. Install the steering post assembly with the bolt and 2 nuts.

    Torque:
    Bolt:
    36 N*m{ 367 kgf*cm , 27 ft.*lbf }
    Nut:
    25 N*m{ 255 kgf*cm , 18 ft.*lbf }

    NOTICE:
    There are two different bolt sizes (12 mm (0.472 in.) or 14 mm (0.551 in.)) available.

  1. Connect the connectors and engage the wire harness clamps to the steering post assembly.


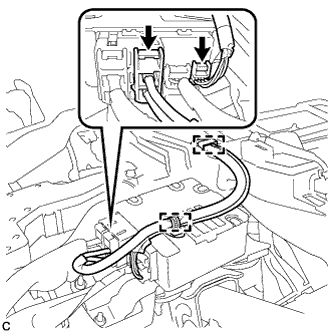
    C207304
  1. Connect the 2 connectors to the power steering ECU assembly.

  1. Engage the 2 wire harness clamps.


4. INSTALL STEERING POST ASSEMBLY (for Brushless Type Motor)


    C206267
  1. Install the steering post assembly with the bolt and 2 nuts.

    Torque:
    Bolt:
    36 N*m{ 367 kgf*cm , 27 ft.*lbf }
    Nut:
    25 N*m{ 255 kgf*cm , 18 ft.*lbf }

    NOTICE:
    There are two different bolt sizes (12 mm (0.472 in.) or 14 mm (0.551 in.)) available.

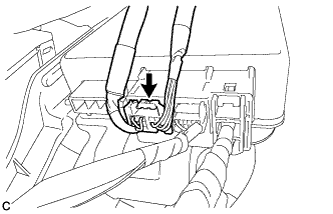
  1. Connect the connectors and engage the wire harness clamps to the steering post assembly.


    C206266
  1. Connect the connector to the power steering ECU assembly.


    C206265
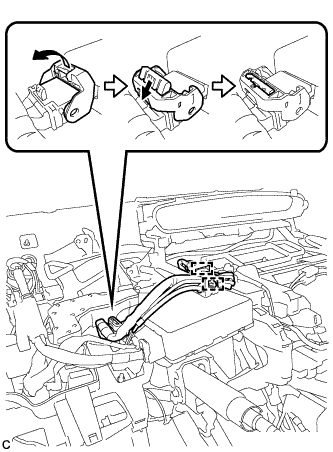
  1. Connect the connector to the power steering ECU assembly.

    HINT:
    As shown in the illustration, securely return the lock lever to its original position to connect the connector.

  1. Engage the 2 wire harness clamps.


5. CONNECT NO. 2 STEERING INTERMEDIATE SHAFT ASSEMBLY


    C206262E01
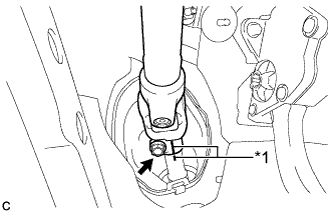
  1. Align the matchmarks on the No. 2 steering intermediate shaft assembly and steering intermediate shaft to connect the No. 2 steering intermediate shaft assembly to the steering intermediate shaft.
    Text in Illustration 
    *1
    Matchmark

  1. Install the bolt.

    Torque:
    35 N*m{ 357 kgf*cm , 26 ft.*lbf }


6. INSTALL COLUMN HOLE COVER SILENCER SHEET


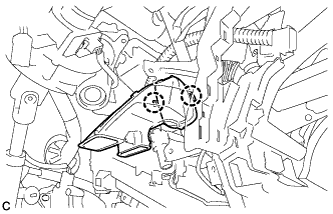
    C206261
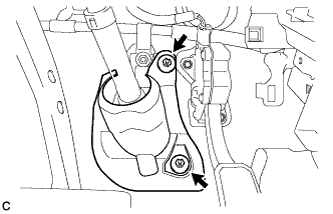
  1. Install the column hole cover silencer sheet with the 2 clips.

  1. Install the floor carpet.


7. INSTALL NO. 2 AIR DUCT SUB-ASSEMBLY


    C206263
  1. Engage the 2 claws to install the No. 2 air duct sub-assembly.


8. INSTALL NO. 1 HEATER TO REGISTER DUCT
  1. Install the No. 1 heater to register duct with the 3 clips.


9. INSTALL BRAKE PEDAL SUPPORT ASSEMBLY

HINT:
Refer to the instructions for Installation of the brake pedal support assembly (Click here).


10. INSTALL UPPER INSTRUMENT PANEL

HINT:
Refer to the instructions for Installation of the upper instrument panel (Click here).


11. INSTALL DRIVER SIDE KNEE AIRBAG ASSEMBLY

HINT:
Refer to the instructions for Installation of the driver side knee airbag assembly (Click here).


12. ALIGN FRONT WHEELS FACING STRAIGHT AHEAD


13. INSTALL TURN SIGNAL SWITCH ASSEMBLY WITH SPIRAL CABLE SUB-ASSEMBLY


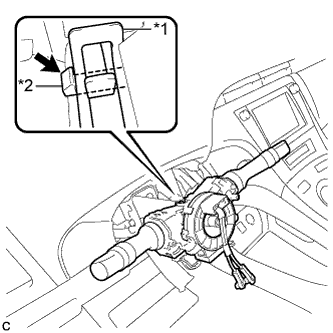
    C206260E01
  1. Using pliers, expand the clamp.
    Text in Illustration 
    *1
    Clamp
    *2
    Claw

  1. While holding the clamp expanded, install the turn signal switch assembly with spiral cable sub-assembly to the steering column assembly and engage the claw.

  1. Return the clamp to its original position.

  1. Connect the connectors to the turn signal switch assembly with spiral cable sub-assembly.


14. INSTALL UPPER STEERING COLUMN COVER


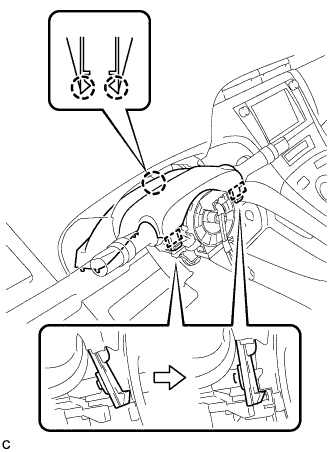
    C206259
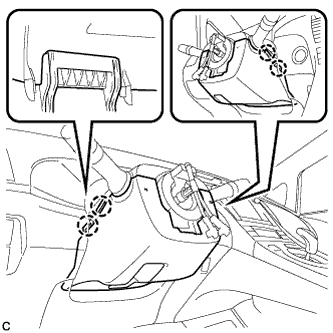
  1. Engage the 2 claws and 2 pins to install the upper steering column cover.


15. INSTALL LOWER STEERING COLUMN COVER

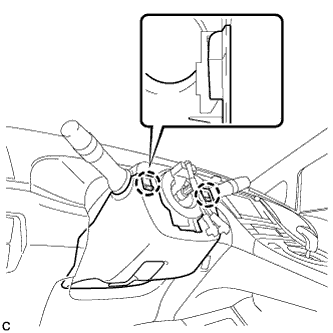
NOTICE:
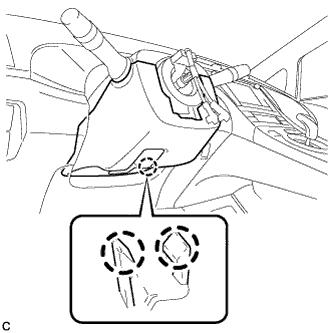
If the lower steering column cover is installed in the incorrect order, it will not be possible to assemble the lower steering column cover.


    C206256
  1. Engage the 2 claws to install the lower steering column cover.


    C206253
  1. Engage the 4 claws.


    C206257
  1. Engage the 2 claws.

    HINT:
    Press the area around the claws to engage them.


16. ALIGN FRONT WHEELS FACING STRAIGHT AHEAD


17. ADJUST SPIRAL CABLE WITH SENSOR SUB-ASSEMBLY
  1. Check that the power switch is off.

  1. Check that the cable is disconnected from the negative (-) auxiliary battery terminal.

    CAUTION:
    Wait at least 90 seconds after disconnecting the cable from the negative (-) auxiliary battery terminal to disable the SRS system.


    B226994
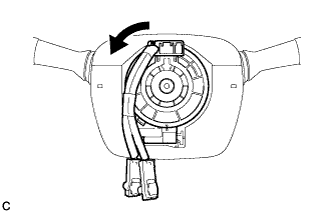
  1. Rotate the spiral cable counterclockwise slowly by hand until it stops.

    NOTICE:
    Do not turn the spiral cable using the airbag wire harness.


    B226995E01
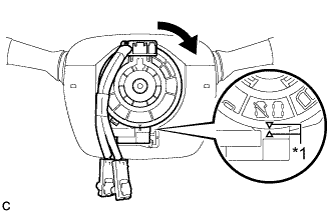
  1. Rotate the spiral cable clockwise approximately 2.5 turns to align the marks.
    Text in Illustration 
    *1
    Alignment Mark

    NOTICE:
    Do not turn the spiral cable using the airbag wire harness.

    HINT:
    The spiral cable will rotate approximately 2.5 turns to both the left and right from the center.


18. INSTALL STEERING WHEEL ASSEMBLY


    C248390E01
  1. Align the matchmarks on the steering wheel assembly and steering main shaft.
    Text in Illustration 
    *1
    Matchmark

  1. Install the steering wheel assembly set nut.

    Torque:
    50 N*m{ 510 kgf*cm , 37 ft.*lbf }

  1. Connect the connectors to the spiral cable sub-assembly.


19. INSTALL STEERING PAD

HINT:
Refer to the instructions for Installation of the steering pad (Click here).


20. ALIGN FRONT WHEELS FACING STRAIGHT AHEAD


21. CONNECT CABLE TO AUXILIARY BATTERY NEGATIVE TERMINAL

NOTICE:
Connect the cable to the negative (-) auxiliary battery terminal with the front wheels facing straight ahead.


22. INSPECT STEERING PAD


    B226975
  1. Visually check for defects with the steering pad installed on the vehicle.

    1. The defects are as follows:

      1. Cuts on the surface and in the grooves of the steering pad
      2. Small cracks on the surface and in the grooves of the steering pad
      3. Significant discoloration on the surface and in the grooves of the steering pad

      OK:
      No defects are found.

      HINT:
      If any of the defects is found, replace the steering pad with a new one.

  1. Make sure that the horn sounds.

    HINT:
    If the horn does not sound, inspect the horn system (Click here).


23. TORQUE SENSOR ZERO POINT CALIBRATION (for Brush Type Motor)
  1. Perform the torque sensor zero point calibration (Click here).


24. ROTATION ANGLE SENSOR INITIALIZATION AND TORQUE SENSOR ZERO POINT CALIBRATION (for Brushless Type Motor)
  1. Clear the rotation angle sensor calibration value, initialize the rotation angle sensor, and calibrate the torque sensor zero point (Click here).


25. INSPECT SRS WARNING LIGHT
  1. Inspect the SRS warning light (Click here).