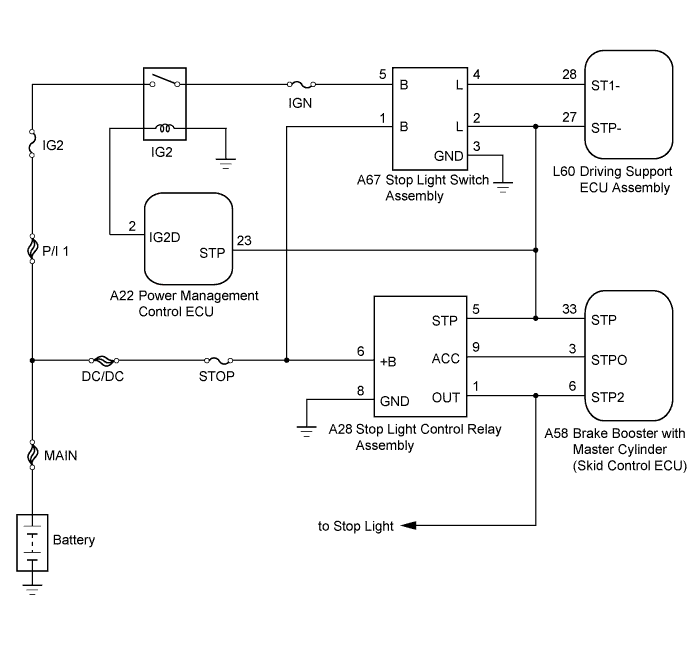
DTC C1A05 Stop Light Switch Circuit |
| DTC No. | DTC Detection Condition | Trouble Area |
| C1A05 | Voltages of terminals ST1- and STP- of driving support ECU are both below 1 V for 1 second |
|
| 1.CHECK STOP LIGHT OPERATION |
Check that the stop lights come on when the brake pedal is depressed, and go off when the brake pedal is released.
| Condition | Illumination Condition |
| Brake pedal depressed | ON |
| Brake pedal released | OFF |
|
| ||||
| OK | |
 |
| 2.READ VALUE USING TECHSTREAM (STOP LIGHT SWITCH ASSEMBLY) |
Connect the Techstream to the DLC3.
Turn the power switch on (IG).
Turn the Techstream on.
Enter the following menus: Powertrain / Radar Cruise / Data List.
Check the Data List for proper functioning of the stop light switch.
| Tester Display | Measurement Item/Range | Normal Condition | Diagnostic Note |
| Stop Light SW 1 (M CPU) | Stop light switch (Main-CPU) signal / ON or OFF | ON: Brake pedal depressed OFF: Brake pedal released | - |
| Stop Light SW 1 (S CPU) | Stop light switch (Sub-CPU) signal / ON or OFF | ON: Brake pedal depressed OFF: Brake pedal released | - |
| Stop Light SW 2 (M CPU) | Stop light switch (Main-CPU) signal / ON or OFF | ON: Brake pedal depressed OFF: Brake pedal released | - |
|
| ||||
| OK | |
|
| 3.CHECK HARNESS AND CONNECTOR (STOP LIGHT SWITCH ASSEMBLY - SKID CONTROL ECU) |
Disconnect the stop light switch assembly connector.
Disconnect the brake booster with master cylinder (skid control ECU) connector.
Measure the resistance according to the value(s) in the table below.
| Tester Connection | Condition | Specified Condition |
| A67-2 (L) - A58-33 (STP) | Always | Below 1 Ω |
| Tester Connection | Condition | Specified Condition |
| A67-2 (L) or A58-33 (STP) - Body ground | Always | 10 kΩ or higher |
Reconnect the stop light switch assembly connector.
Reconnect the brake booster with master cylinder (skid control ECU) connector.
|
| ||||
| OK | |
|
| 4.CHECK HARNESS AND CONNECTOR (STOP LIGHT CONTROL RELAY - SKID CONTROL ECU) |
Disconnect the stop light control relay assembly connector.
Disconnect the brake booster with master cylinder (skid control ECU) connectors.
Measure the resistance according to the value(s) in the table below.
| Tester Connection | Condition | Specified Condition |
| A28-1 (OUT) - A58-6 (STP2) | Always | Below 1 Ω |
| A28-5 (STP) - A58-33 (STP) | Always | Below 1 Ω |
| A28-9 (ACC) - A58-3 (STP0) | Always | Below 1 Ω |
| Tester Connection | Condition | Specified Condition |
| A28-1 (OUT) or A58-6 (STP2) - Body ground | Always | 10 kΩ or higher |
| A28-5 (STP) or A58-33 (STP) - Body ground | Always | 10 kΩ or higher |
| A28-9 (ACC) or A58-3 (STP0) - Body ground | Always | 10 kΩ or higher |
Reconnect the stop light control relay connector.
Reconnect the brake booster with master cylinder (skid control ECU) connectors.
|
| ||||
| OK | |
|
| 5.INSPECT STOP LIGHT CONTROL RELAY |
Inspect the stop light control relay (Click here).
|
| ||||
| OK | |
|
| 6.REPLACE BRAKE BOOSTER WITH MASTER CYLINDER (SKID CONTROL ECU) |
Replace the brake booster with master cylinder (skid control ECU) (Click here).
| NEXT | |
|
| 7.CHECK FOR DTCs (DTC C1A05) |
Connect the Techstream to the DLC3.
Turn the power switch on (IG).
Clear the DTCs (Click here).
Perform the following to make sure that the DTC detection conditions are met.
Drive the vehicle at a speed of between approximately 50 km/h (30 mph) and 170 km/h (105 mph).
Turn the cruise control system on using the cruise control switch (ON-OFF button).
Push the cruise control switch to -/SET to begin control of vehicle speed using the cruise control system.
Enter the following menus: Powertrain / Radar Cruise / Trouble Codes.
Check for DTCs.
| Result | Proceed to |
| DTC is not output | A |
| DTC C1A05 is output | B |
|
| ||||
| A | ||
 | ||
| ||
| 8.REPLACE POWER MANAGEMENT CONTROL ECU |
Replace the power management control ECU (Click here).
| NEXT | |
|
| 9.CHECK FOR DTCs (DTC C1A05) |
Connect the Techstream to the DLC3.
Turn the power switch on (IG).
Clear the DTCs (Click here).
Perform the following to make sure that the DTC detection conditions are met.
Drive the vehicle at a speed of between approximately 50 km/h (30 mph) and 170 km/h (105 mph).
Turn the cruise control system on using the cruise control switch (ON-OFF button).
Push the cruise control switch to -/SET to begin control of vehicle speed using the cruise control system.
Enter the following menus: Powertrain / Radar Cruise / Trouble Codes.
Check for DTCs.
| Result | Proceed to |
| DTC is not output | A |
| DTC C1A05 is output | B |
|
| ||||
| A | ||
| ||
| ||
| 10.CHECK HARNESS AND CONNECTOR (STOP LIGHT SWITCH ASSEMBLY - POWER SOURCE) |
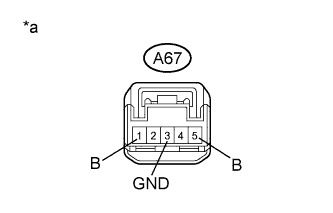 |
Disconnect the stop light switch assembly connector.
Measure the voltage and resistance according to the value(s) in the table below.
| Tester Connection | Condition | Specified Condition |
| A67-1 (B) - A67-3 (GND) | Power switch off | 11 to 14 V |
| A67-5 (B) - A67-3 (GND) | Power switch on (IG) | 11 to 14 V |
| Tester Connection | Condition | Specified Condition |
| A67-3 (GND) - Body ground | Always | Below 1 Ω |
| *a | Front view of wire harness connector (to Stop Light Switch Assembly) |
Reconnect the stop light switch assembly connector.
|
| ||||
| OK | |
|
| 11.INSPECT STOP LIGHT SWITCH ASSEMBLY |
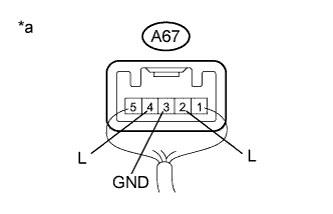 |
Remove the stop light switch assembly (Click here).
| *a | Component with harness connected (Stop Light Switch Assembly) |
Measure the voltage according to the value(s) in the table below.
| Tester Connection | Switch Condition | Specified Condition |
| A67-2 (L) - A67-3 (GND) | Power switch off, Brake pedal not depressed | Below 1 V |
| A67-4 (L) - A67-3 (GND) | 11 to 14 V | |
| A67-2 (L) - A67-3 (GND) | Power switch off, Brake pedal depressed | 11 to 14 V |
| A67-4 (L) - A67-3 (GND) | Below 1 V |
|
| ||||
| OK | |
|
| 12.CHECK HARNESS AND CONNECTOR (STOP LIGHT SWITCH ASSEMBLY - DRIVING SUPPORT ECU) |
Disconnect the connector.
Measure the resistance according to the value(s) in the table below.
| Tester Connection | Condition | Specified Condition |
| A67-2 (L) - L60-27 (STP-) | Always | Below 1 Ω |
| A67-4 (L) - L60-28 (ST1-) | Always | Below 1 Ω |
| Tester Connection | Condition | Specified Condition |
| A67-2 (L) or L60-27 (STP-) - Body ground | Always | 10 kΩ or higher |
| A67-4 (L) or L60-28 (ST1-) - Body ground | Always | 10 kΩ or higher |
Reconnect the stop light switch assembly connector.
Reconnect the connector.
|
| ||||
| OK | |
|
| 13.CHECK HARNESS AND CONNECTOR (STOP LIGHT SWITCH ASSEMBLY - BODY GROUND) |
Measure the resistance according to the value(s) in the table below.
| Tester Connection | Condition | Specified Condition |
| A67-2 (L) - Body ground | Always | 10 kΩ or higher |
| A67-4 (L) - Body ground | Always | 10 kΩ or higher |
Reconnect the stop light switch assembly connector.
|
| ||||
| OK | ||
| ||
| ||

