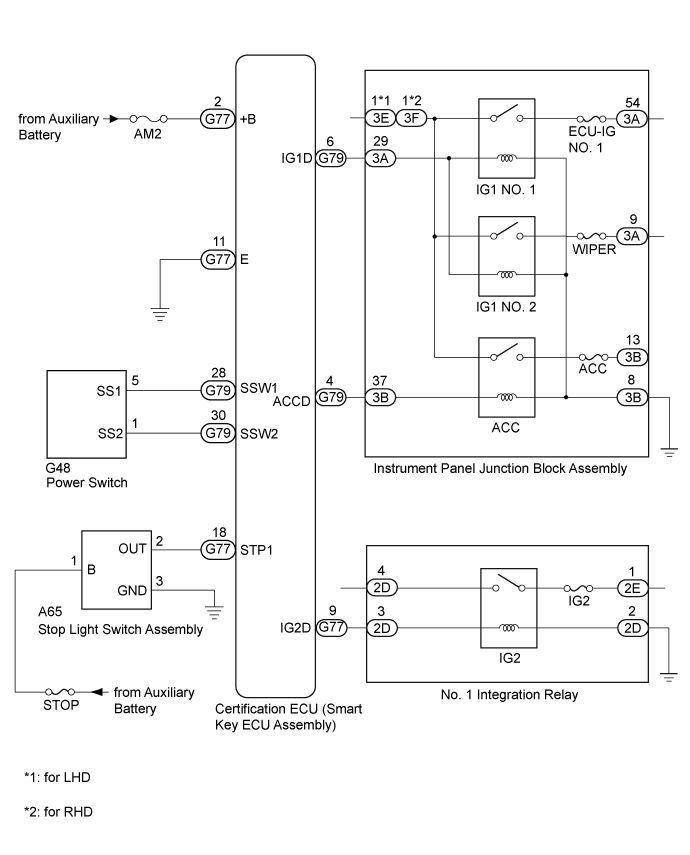
SMART ENTRY AND START SYSTEM (for Start Function) > Power Source Mode does not Change to ON (IG and ACC) |
| Problem Symptom | Data List Item | Active Test Item |
| Power source mode does not change to on (IG) or on (ACC) | Power Source Control
| - |
| 1.CHECK WIRELESS DOOR LOCK CONTROL SYSTEM |
Check the wireless door lock function by operating the electrical key transmitter sub-assembly.
|
| ||||
| OK | |
 |
| 2.CHECK HARNESS AND CONNECTOR (POWER SOURCE) |
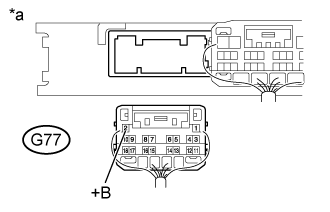 |
Disconnect the G77 connector from the certification ECU (smart key ECU assembly).
Measure the voltage according to the value(s) in the table below.
| Tester Connection | Condition | Specified Condition |
| G77-2 (+B) - Body ground | Power switch off | 11 to 14 V |
| *a | Rear view of wire harness connector (to Certification ECU (Smart Key ECU Assembly)) |
|
| ||||
| OK | |
|
| 3.CHECK HARNESS AND CONNECTOR (GROUND) |
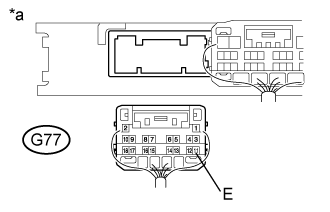 |
Measure the resistance according to the value(s) in the table below.
| Tester Connection | Condition | Specified Condition |
| G77-11 (E) - Body ground | Always | Below 1 Ω |
| *a | Rear view of wire harness connector (to Certification ECU (Smart Key ECU Assembly)) |
|
| ||||
| OK | |
|
| 4.CHECK SMART ENTRY AND START SYSTEM |
Remove the transmitter battery from the electrical key transmitter sub-assembly (Click here).
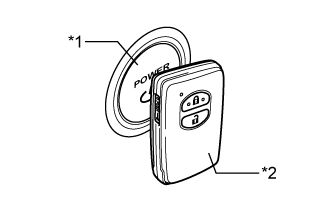 |
With the brake pedal depressed, hold the electrical key transmitter sub-assembly near the power switch and check if the power source mode changes.
| Result | Proceed to |
| The power source mode does not change. | A |
| The power source mode changes. | B |
| *1 | Power Switch |
| *2 | Electrical Key Transmitter Sub-assembly |
|
| ||||
| A | |
|
| 5.READ VALUE USING INTELLIGENT TESTER |
Connect the intelligent tester to the DLC3.
Turn the power switch on (IG).
Turn the intelligent tester on.
Enter the following menus: Body / Power Source Control / Data List.
Read the Data List according to the display on the intelligent tester.
| Tester Display | Measurement Item/Range | Normal Condition | Specified Condition |
| Stop Light Switch1 | State of brake pedal/ON or OFF | ON: Brake pedal depressed OFF: Brake pedal released |
|
|
| ||||
| OK | |
|
| 6.READ VALUE USING INTELLIGENT TESTER |
Read the Data List according to the display on the intelligent tester.
| Tester Display | Measurement Item/Range | Normal Condition | Diagnostic Note |
| Power Supply Condition | Power supply state/IG2 ON, ST ON, All OFF, IG1 ON or ACC ON | All OFF: Power switch off ACC ON: Power switch on (ACC) IG1 ON: Power switch on (IG) (IG1 relay on) IG2 ON: Power switch on (IG) (IG2 relay on) ST ON: Sending hybrid control system start request signal | Since the IG1 and IG2 relays turn on at approximately the same time, IG1 ON may not be displayed (the IG1 relay turns on for a very short time). |
With the power switch off and brake pedal depressed, hold the electrical key transmitter sub-assembly near the power switch for 2 seconds or more and read the Data List.
|
| ||||
| OK | |
|
| 7.CHECK CERTIFICATION ECU (SMART KEY ECU ASSEMBLY) |
Read the Data List according to the display on the intelligent tester.
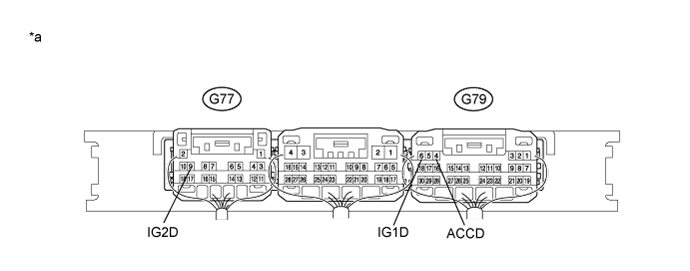
| *a | Component with harness connected (Certification ECU (Smart Key ECU Assembly)) |
Measure the voltage according to the value(s) in the table below.
| Tester Display | Measurement Item/Range | Normal Condition | Diagnostic Note |
| Power Supply Condition | Power supply state/IG2 ON, ST ON, All OFF, IG1 ON or ACC ON | All OFF: Power switch off ACC ON: Power switch on (ACC) IG1 ON: Power switch on (IG) (IG1 relay on) IG2 ON: Power switch on (IG) (IG2 relay on) ST ON: Sending hybrid control system start request signal | Since the IG1 and IG2 relays turn on at approximately the same time, IG1 ON may not be displayed (the IG1 relay turns on for a very short time). |
Measure the voltage while checking the Data List on the intelligent tester.
| Tester Connection | Condition | Specified Condition |
| G79-6 (IG1D) - Body ground | Power switch off | 1 V or less |
| Power switch on (ACC) | 1 V or less | |
| Power switch on (IG) | 9 V or higher | |
| G77-9 (IG2D) - Body ground | Power switch off | 1 V or less |
| Power switch on (ACC) | 1 V or less | |
| Power switch on (IG) | 9 V or higher | |
| G79-4 (ACCD) - Body ground | Power switch off | 1 V or less |
| Power switch on (IG) | 8.5 V or higher | |
| Power switch on (ACC) | 8.5 V or higher |
|
| ||||
| OK | ||
 | ||
| ||
| 8.READ VALUE USING INTELLIGENT TESTER |
Read the Data List according to the display on the intelligent tester.
| Tester Display | Measurement Item/Range | Normal Condition | Diagnostic Note |
| Start Switch1 | Power switch 1 status/ON or OFF | ON: Power switch pressed OFF: Power switch not pressed |
|
| Start Switch2 | Power switch 2 status/ON or OFF | ON: Power switch pressed OFF: Power switch not pressed |
|
| Result | Proceed to |
| NG | A |
| OK | B |
|
| ||||
| A | |
|
| 9.INSPECT POWER SWITCH |
Inspect the power switch (Click here).
|
| ||||
| OK | |
|
| 10.CHECK HARNESS AND CONNECTOR (CERTIFICATION ECU - POWER SWITCH) |
Disconnect the G79 certification ECU (smart key ECU assembly) connector.
Disconnect the G48 power switch connector.
Measure the resistance according to the value(s) in the table below.
| Tester Connection | Condition | Specified Condition |
| G79-28 (SSW1) - G48-5 (SS1) | Always | Below 1 Ω |
| G79-30 (SSW2) - G48-1 (SS2) | Always | Below 1 Ω |
| G79-28 (SSW1) or G48-5 (SS1) - Body ground | Always | 10 kΩ or higher |
| G79-30 (SSW2) or G48-1 (SS2) - Body ground | Always | 10 kΩ or higher |
|
| ||||
| OK | ||
| ||
| ||
| 11.CHECK HARNESS AND CONNECTOR (STOP LIGHT SWITCH ASSEMBLY - POWER SOURCE AND BODY GROUND) |
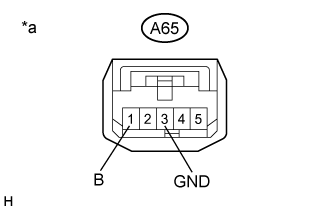 |
Disconnect the A65 stop light switch assembly connector.
Measure the voltage and resistance according to the value(s) in the table below.
| Tester Connection | Condition | Specified Condition |
| A65-1 (B) - A65-3 (GND) | Power switch off | 11 to 14 V |
| Tester Connection | Condition | Specified Condition |
| A65-3 (GND) - Body ground | Always | Below 1 Ω |
| *a | Front view of wire harness connector (to Stop Light Switch Assembly) |
|
| ||||
| OK | |
|
| 12.INSPECT STOP LIGHT SWITCH ASSEMBLY |
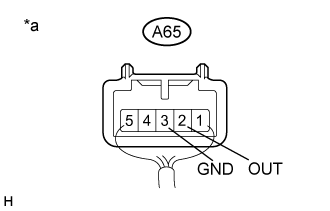 |
Reconnect the A65 stop light switch assembly connector.
Measure the voltage according to the value(s) in the table below.
| Tester Connection | Condition | Specified Condition |
| A65-2 (OUT) - A65-3 (GND) | Power switch off, brake pedal not depressed | Below 1 V |
| A65-2 (OUT) - A65-3 (GND) | Power switch off, brake pedal depressed | 11 to 14 V |
| *a | Component with harness connected (Stop Light Switch Assembly) |
|
| ||||
| OK | |
|
| 13.CHECK HARNESS AND CONNECTOR (CERTIFICATION ECU - STOP LIGHT SWITCH ASSEMBLY) |
Disconnect the G77 certification ECU (smart key ECU assembly) connector.
Disconnect the A65 stop light switch assembly connector.
Measure the resistance according to the value(s) in the table below.
| Tester Connection | Condition | Specified Condition |
| G77-18 (STP1) - A65-2 (OUT) | Always | Below 1 Ω |
| G77-18 (STP1) or A65-2 (OUT) - Body ground | Always | 10 kΩ or higher |
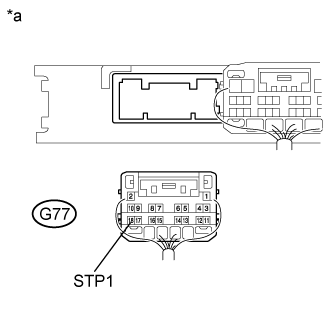 |
Reconnect the A65 stop light switch assembly connector.
Measure the voltage according to the value(s) in the table below.
| Tester Connection | Condition | Specified Condition |
| G77-18 (STP1) - Body ground | Brake pedal released | 1 V or less |
| Brake pedal depressed | 9 V or higher |
| *a | Rear view of wire harness connector (to Certification ECU (Smart Key ECU Assembly)) |
|
| ||||
| OK | ||
| ||
| ||
| 14.CHECK FOR DTC |
Enter the following menus:
for Entry&Start: Body / Entry&Start / Trouble Codes.
Check for DTCs.
| Result | Proceed to |
The following DTCs are not output:
| A |
The following DTCs are output:
| B |
| DTC B2785 is output. | C |
|
| ||||
|
| ||||
| A | ||
| ||
| ||

