METER / GAUGE / DISPLAY COMBINATION METER REMOVAL
CAUTION / NOTICE / HINT
The necessary procedures (adjustment, calibration, initialization, or registration) that must be performed after parts are removed and installed, or replaced during combination meter assembly removal/installation are shown below.
| Replaced Part or Performed Procedure | Necessary Procedure | Effect/Inoperative Function when Necessary Procedure not Performed | Link |
|---|---|---|---|
| Disconnect cable from negative auxiliary battery terminal | Memorize steering angle neutral point | Lane departure alert system (w/ Steering Control) | ( ) |
| Intelligent clearance sonar system*1 | |||
| Simple intelligent parking assist system*1 | |||
| Pre-crash safety system | |||
| Parking assist monitor system | ()
|
||
| Initialize back door lock | Power door lock control system | ()
|
*1: When performing learning using the GTS.
Click hereAudio / Visual / Telematics>PARK ASSIST / MONITORING>INTELLIGENT CLEARANCE SONAR SYSTEM>CALIBRATION
PROCEDURE

 1. PRECAUTION
- NOTICE:
-
After turning the power switch off, waiting time may be required before disconnecting the cable from the negative (-) auxiliary battery terminal. Therefore, make sure to read the disconnecting the cable from the negative (-) auxiliary battery terminal notices before proceeding with work.
-
Click hereGeneral>INTRODUCTION>REPAIR INSTRUCTION>PRECAUTION
2.DISCONNECT CABLE FROM NEGATIVE AUXILIARY BATTERY TERMINAL
- NOTICE:
-
When disconnecting the cable, some systems need to be initialized after the cable is reconnected.
-
Click hereGeneral>INTRODUCTION>REPAIR INSTRUCTION>INITIALIZATION
62312B
3.DISCONNECT FRONT DOOR OPENING TRIM WEATHERSTRIP LH
62212
4.REMOVE FRONT PILLAR GARNISH LH
55408F
5.REMOVE NO. 1 INSTRUMENT PANEL SPEAKER PANEL SUB-ASSEMBLY
62311B
6.DISCONNECT FRONT DOOR OPENING TRIM WEATHERSTRIP RH
62211
7.REMOVE FRONT PILLAR GARNISH RH
- HINT:
-
Use the same procedure as for the LH side.
55409F
8.REMOVE NO. 2 INSTRUMENT PANEL SPEAKER PANEL SUB-ASSEMBLY
55410C
9.REMOVE INSTRUMENT CLUSTER FINISH PANEL ASSEMBLY
Apply protective tape to the areas shown in the illustration.
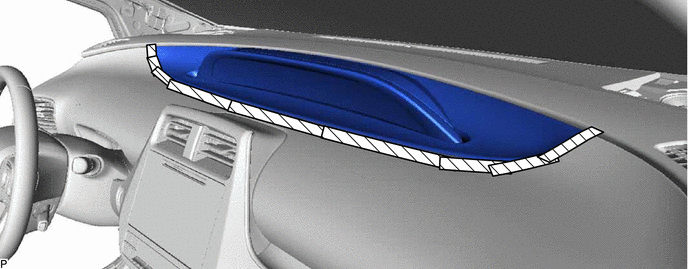

|
Protective Tape | - | - |
Remove the 2 clips.
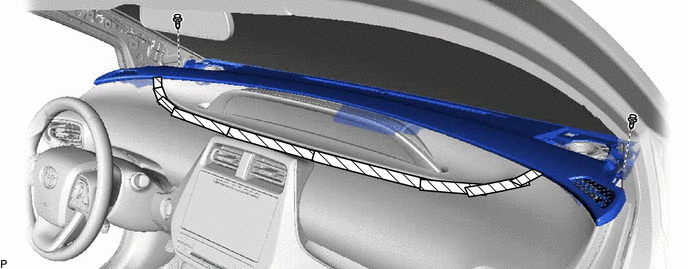
Disengage the 11 clips and 4 guides as shown in the illustration.
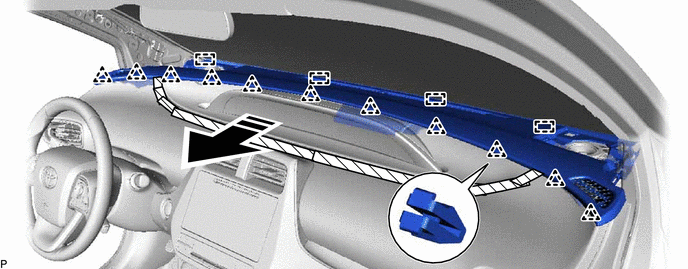

|
Remove in this Direction | - | - |
- NOTICE:
- ·
Do not damage the upper instrument panel assembly.
·Do not allow the wire harnesses to interfere with the surrounding parts.
Lift the upper instrument panel assembly as shown in the illustration.
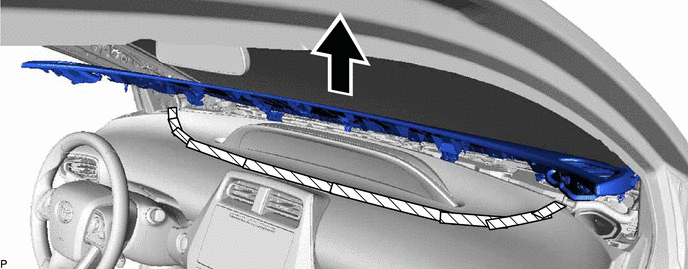
- NOTICE:
- ·
Do not damage the upper instrument panel assembly.
·Do not allow the wire harnesses to interfere with the surrounding parts.
Using a moulding remover, slightly lift the instrument cluster finish panel assembly and then disengage the 17 clips and 10 guides as shown in the illustration to remove the instrument cluster finish panel assembly.
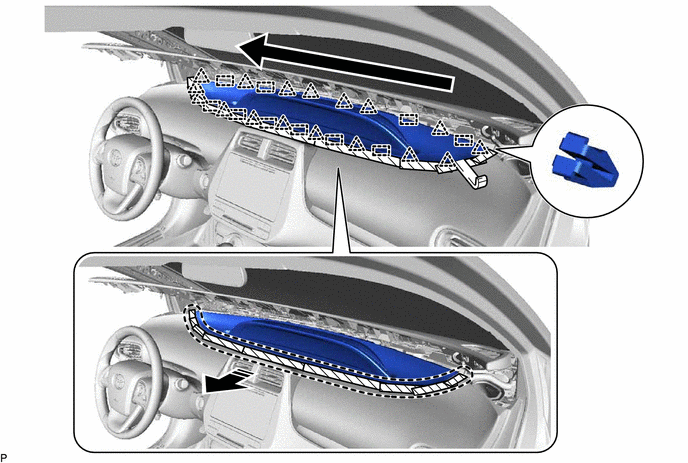

|
Insert Moulding Remover Here |
|
Remove in this Direction |

|
Order of Removal | - | - |
10.REMOVE COMBINATION METER ASSEMBLY
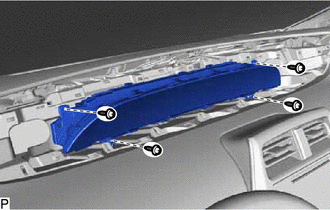
Remove the 4 screws.
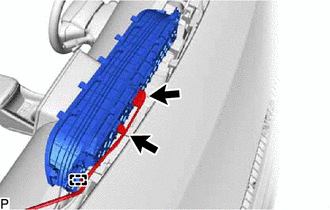
Disengage the clamp.
Disconnect the 2 connectors to remove the combination meter assembly.