FRONT SUSPENSION FRONT LOWER SUSPENSION ARM(for LH Side) INSTALLATION
PROCEDURE

 48069
1.TEMPORARILY INSTALL FRONT LOWER NO. 1 SUSPENSION ARM SUB-ASSEMBLY LH
Temporarily install the front lower No. 1 suspension arm sub-assembly LH to the front suspension crossmember sub-assembly with the 2 bolts and nut.
48069
2.CONNECT FRONT LOWER NO. 1 SUSPENSION ARM SUB-ASSEMBLY LH
Connect the front lower No. 1 suspension arm sub-assembly LH to the front lower ball joint assembly LH with the bolt and 2 nuts.
- Torque:
- 89 N*m (908 kgf*cm, 66 ft.*lbf)
3.INSTALL FRONT WHEEL
4.STABILIZE SUSPENSION
48069
5.FULLY TIGHTEN FRONT LOWER NO. 1 SUSPENSION ARM SUB-ASSEMBLY LH
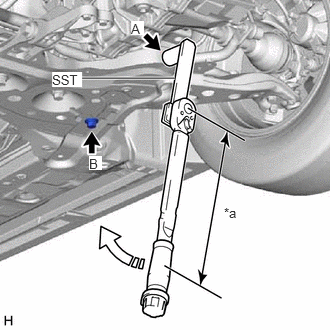
| *a | Torque Wrench Fulcrum Length |

|
Turn |
Using SST, fully tighten the bolt (A).
- SST
- 09961-01270
- Torque:
- Specified tightening torque : 240 N*m (2447 kgf*cm, 177 ft.*lbf)
- HINT:
- ·
Calculate the torque wrench reading when changing the fulcrum length of the torque wrench.
Click hereGeneral>INTRODUCTION>REPAIR INSTRUCTION>PRECAUTION
·When using SST (fulcrum length of 200 mm (7.87 in.)) + torque wrench (fulcrum length of 600 mm (1.97 ft.)):
180 N*m (1835 kgf*cm, 133 ft.*lbf)
Fully tighten the bolt (B).
- Torque:
- 125 N*m (1275 kgf*cm, 92 ft.*lbf)
- NOTICE:
-
Because the nut has its own stopper, do not turn the nut. Tighten the bolt with the nut secured.
51444C
6.INSTALL REAR MOTOR UNDER COVER LH
51441
7.INSTALL NO. 1 ENGINE UNDER COVER
8.INSPECT AND ADJUST FRONT WHEEL ALIGNMENT
9.PERFORM INITIALIZATION
| Intelligent clearance sonar system
Simple intelligent parking assist system |
( ) |
| Parking assist monitor system | ()
|
| Automatic headlight beam level control system | ()
|