2ZR-FXE ENGINE MECHANICAL ENGINE ASSEMBLY INSTALLATION
CAUTION / NOTICE / HINT
- CAUTION:
- ·
The engine assembly with transaxle is very heavy. Be sure to follow the procedure described in the repair manual, or the engine lifter may suddenly drop or the engine assembly with transaxle may fall off the engine lifter.
·To prevent burns, do not touch the engine, exhaust manifold or other high temperature components while the engine is hot.
PROCEDURE

 1.INSTALL ENGINE HANGERS
2.REMOVE ENGINE ASSEMBLY FROM ENGINE STAND
Remove the engine assembly from the engine stand.
13405
3.INSTALL FLYWHEEL SUB-ASSEMBLY
31270
4.INSTALL TRANSMISSION INPUT DAMPER ASSEMBLY
5.INSTALL ENGINE ASSEMBLY
82121
6.INSTALL ENGINE WIRE
Install the engine wire to the engine assembly with transaxle.
11363A
7.INSTALL FLYWHEEL HOUSING SIDE COVER
28193
8.INSTALL STARTER HOLE INSULATOR
12305
9.INSTALL ENGINE MOUNTING INSULATOR SUB-ASSEMBLY RH
- HINT:
-
Perform this procedure only when replacement of the engine mounting insulator sub-assembly RH is necessary.
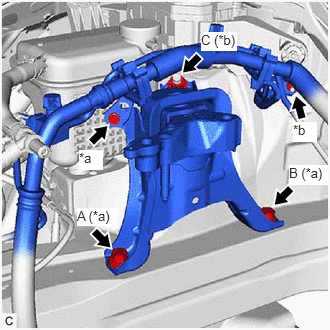
| *a | Bolt |
| *b | Nut |
Install the engine mounting insulator sub-assembly RH with the 2 bolts and nut.
- Torque:
- 72 N*m (734 kgf*cm, 53 ft.*lbf)
- NOTICE:
-
Temporarily tighten the bolt (A), and then fully tighten the 2 bolts and nut in the order of (B), (A), and (C).
Connect the 2 cooler brackets to the engine mounting insulator sub-assembly RH with the bolt and nut.
- Torque:
- 9.8 N*m (100 kgf*cm, 87 in.*lbf)
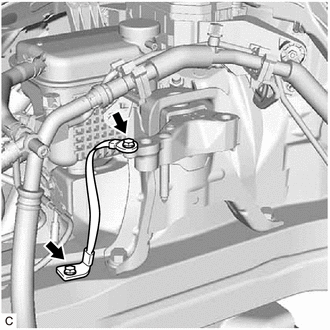
Install the No. 2 earth wire to the engine mounting insulator sub-assembly RH and vehicle body with the 2 bolts.
- Torque:
- 10.5 N*m (107 kgf*cm, 8 ft.*lbf)
12372A
10.INSTALL ENGINE MOUNTING INSULATOR LH
- HINT:
-
Perform this procedure only when replacement of the engine mounting insulator LH is necessary.
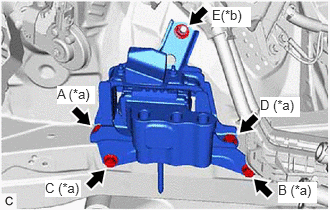
| *a | Bolt |
| *b | Nut |
Install the engine mounting insulator LH with the 4 bolts and nut.
- Torque:
- 42 N*m (428 kgf*cm, 31 ft.*lbf)
- NOTICE:
-
Temporarily tighten the bolt (A), and then fully tighten the 4 bolts and nut in the order of (B), (C), (D), (A) and (E).
11.INSTALL ENGINE ASSEMBLY WITH TRANSAXLE
Using height adjustment attachments and plate lift attachments to keep the engine assembly with transaxle and front suspension crossmember sub-assembly level, set an engine lifter underneath the engine assembly with transaxle and front suspension crossmember sub-assembly.
- NOTICE:
- ·
Do not perform any procedures while the engine assembly is suspended because doing so may cause the engine assembly to drop, resulting in injury. However, the engine assembly needs to be suspended when it is installed to or removed from an engine stand.
·To prevent the engine assembly from unexpectedly moving, securely support the engine assembly until it is secured to an engine stand.
Remove the 2 bolts, No. 1 engine hanger and No. 2 engine hanger.
Install the wiring harness clamp bracket to the cylinder head sub-assembly with the bolt.
- Torque:
- 39 N*m (398 kgf*cm, 29 ft.*lbf)
Engage the 3 clamps.
Operate the engine lifter and install the engine assembly with transaxle to the vehicle.
- CAUTION:
-
Do not raise the engine assembly with transaxle more than necessary. If the engine is raised excessively, the vehicle may also be lifted up.
- NOTICE:
- ·
Make sure that the engine assembly with transaxle is clear of all wiring and hoses.
·While raising the engine assembly with transaxle into the vehicle, do not allow it to contact the vehicle.
Connect the front suspension crossmember sub-assembly to the vehicle with the 4 bolts.
- Torque:
- 141 N*m (1438 kgf*cm, 104 ft.*lbf)
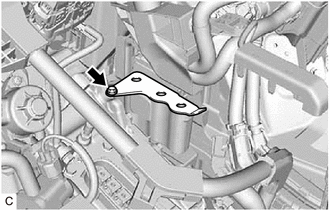
Install the No. 2 engine mounting stay LH with the bolt.
- Torque:
- 12 N*m (122 kgf*cm, 9 ft.*lbf)
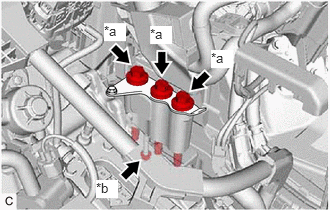
| *a | Bolt |
| *b | Nut |
Connect the engine mounting insulator LH to the hybrid vehicle transaxle assembly with the 3 bolts and nut.
- Torque:
- Bolt : 70 N*m (714 kgf*cm, 52 ft.*lbf)
- Nut : 20 N*m (204 kgf*cm, 15 ft.*lbf)
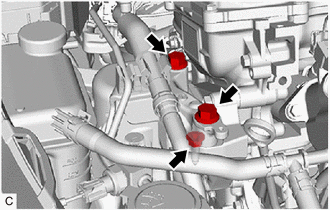
Connect the engine mounting insulator sub-assembly RH to the engine mounting bracket RH with the 2 bolts.
- Torque:
- 72 N*m (734 kgf*cm, 53 ft.*lbf)
Install the nut.
- Torque:
- 41 N*m (418 kgf*cm, 30 ft.*lbf)
51108A
12.INSTALL REAR SIDE RAIL REINFORCEMENT SUB-ASSEMBLY LH
51107A
13.INSTALL REAR SIDE RAIL REINFORCEMENT SUB-ASSEMBLY RH
- HINT:
-
Use the same procedure as for the LH side.
43420G
14.INSTALL FRONT DRIVE SHAFT HOLE SNAP RING
43420
15.INSTALL FRONT DRIVE SHAFT ASSEMBLY LH
43410
16.INSTALL FRONT DRIVE SHAFT ASSEMBLY RH
- HINT:
-
Use the same procedure as for the LH side.
48069
17.CONNECT FRONT LOWER NO. 1 SUSPENSION ARM SUB-ASSEMBLY LH
48068
18.CONNECT FRONT LOWER NO. 1 SUSPENSION ARM SUB-ASSEMBLY RH
- HINT:
-
Use the same procedure as for the LH side.
48810
19.INSTALL FRONT STABILIZER LINK ASSEMBLY LH
48820B
20.INSTALL FRONT STABILIZER LINK ASSEMBLY RH
- HINT:
-
Use the same procedure as for the LH side.
45047
21.CONNECT TIE ROD END SUB-ASSEMBLY LH
45046
22.CONNECT TIE ROD END SUB-ASSEMBLY RH
- HINT:
-
Use the same procedure as for the LH side.
89543
23.INSTALL FRONT SPEED SENSOR LH
89542
24.INSTALL FRONT SPEED SENSOR RH
- HINT:
-
Use the same procedure as for the LH side.
43502H
25.INSTALL FRONT AXLE SHAFT NUT LH
43501H
26.INSTALL FRONT AXLE SHAFT NUT RH
- HINT:
-
Use the same procedure as for the LH side.
17410
27.INSTALL FRONT EXHAUST PIPE ASSEMBLY (TWC: Rear Catalyst)
57533B
28.INSTALL FRONT CENTER FLOOR BRACE
58166
29.INSTALL FRONT FLOOR COVER LH
58165B
30.INSTALL FRONT FLOOR COVER RH
- HINT:
-
Use the same procedure as for the LH side.
45025D
31.CONNECT NO. 1 STEERING COLUMN HOLE COVER SUB-ASSEMBLY
45260
32.CONNECT NO. 2 STEERING INTERMEDIATE SHAFT ASSEMBLY
45259A
33.INSTALL COLUMN HOLE COVER SILENCER SHEET
82123
34.CONNECT NO. 3 ENGINE WIRE
Connect the No. 3 engine wire to hybrid vehicle transaxle assembly with the bolt.
- Torque:
- 12.5 N*m (127 kgf*cm, 9 ft.*lbf)
Engage the clamp.
88370
35.INSTALL COMPRESSOR WITH MOTOR ASSEMBLY
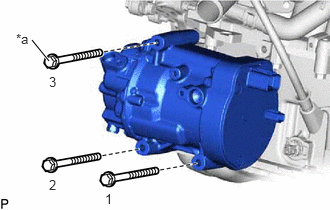
| *a | Bolt (A) |
Temporarily install the compressor with motor assembly with the bolt (A).
Install the compressor with motor assembly with the 3 bolts.
- Torque:
- 25 N*m (255 kgf*cm, 18 ft.*lbf)
- HINT:
-
Tighten the 3 bolts in the order shown in the illustration.
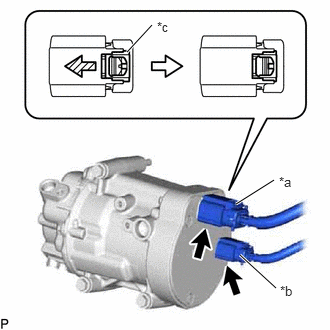
| *a | Connector (A) |
| *b | Connector (B) |
| *c | Green-colored Lock |
Connect connector (B).
Connect connector (A) and slide the green-colored lock as shown in the illustration to lock it securely.
- CAUTION:
-
Make sure to wear insulating gloves.
- NOTICE:
-
Make sure that the connector is connected securely.
Connect the bracket with the bolt.
- Torque:
- 8.0 N*m (82 kgf*cm, 71 in.*lbf)
G922F
36.CONNECT OUTLET NO. 1 HYBRID WATER PUMP HOSE
Connect the outlet No. 1 hybrid water pump hose to the motor cooling cooler and slide the clip to secure it.
G922H
37.CONNECT INLET HYBRID RADIATOR HOSE
Connect the inlet hybrid radiator hose to the motor cooling cooler and slide the clip to secure it.
23901
38.CONNECT FUEL TUBE SUB-ASSEMBLY
23826
39.CONNECT NO. 1 FUEL VAPOR FEED HOSE
Connect the No. 1 fuel vapor feed hose to the fuel vapor feed pipe and slide the clip to secure it.
87245A
40.CONNECT INLET HEATER WATER HOSE A
Connect the inlet heater water hose A to the EGR valve assembly and slide the clip to secure it.
87246E
41.CONNECT OUTLET HEATER WATER HOSE E
Connect the outlet heater water hose E to the No. 1 water by-pass pipe and slide the clip to secure it.
16572D
42.CONNECT NO. 2 RADIATOR HOSE
Connect the No. 2 radiator hose to the water inlet sub-assembly and slide the clip to secure it.
16573B
43.CONNECT NO. 3 RADIATOR HOSE
Connect the No. 3 radiator hose to the water outlet and slide the clip to secure it.
Install the 2 bolts to the hybrid vehicle transaxle assembly.
- Torque:
- 19 N*m (194 kgf*cm, 14 ft.*lbf)
G9200
44.INSTALL INVERTER WITH CONVERTER ASSEMBLY
17751
45.INSTALL INLET NO. 1 AIR CLEANER
17771A
46.INSTALL AIR CLEANER BRACKET
17701
47.INSTALL AIR CLEANER CASE SUB-ASSEMBLY
17801
48.INSTALL AIR CLEANER FILTER ELEMENT SUB-ASSEMBLY
22210
49.INSTALL THROTTLE BODY WITH MOTOR ASSEMBLY
17752
50.INSTALL INLET NO. 2 AIR CLEANER
53289A
51.INSTALL RADIATOR SUPPORT OPENING COVER
16296
52.CONNECT NO. 8 WATER BY-PASS HOSE
Connect the No. 8 water by-pass hose to the No. 2 water by-pass hose assembly and slide the clip to secure it.
53.ADD ENGINE OIL
54.ADD HYBRID TRANSAXLE FLUID
55.ADD ENGINE COOLANT (for Engine)
56.CHECK ENGINE OIL LEVEL
57.INSPECT HYBRID TRANSAXLE FLUID
58.INSPECT FOR COOLANT LEAK (for Inverter)
59.INSPECT FOR COOLANT LEAK (for Engine)
60.INSPECT FOR FUEL LEAK
61.INSPECT FOR OIL LEAK
62.INSPECT FOR EXHAUST GAS LEAK
51442
63.INSTALL NO. 2 ENGINE UNDER COVER
Install the No. 2 engine under cover with the 3 bolts.
- Torque:
- 5.0 N*m (51 kgf*cm, 44 in.*lbf)
51444C
64.INSTALL REAR MOTOR UNDER COVER LH
except Rough Road Area Specification Vehicles:
Install the rear motor under cover LH with the 4 clips and screw.
for Rough Road Area Specification Vehicles:
Install the rear motor under cover LH with the 5 clips and screw.
51443E
65.INSTALL REAR MOTOR UNDER COVER RH
except Rough Road Area Specification Vehicles:
Install the rear motor under cover RH with the 4 clips and screw.
for Rough Road Area Specification Vehicles:
Install the rear motor under cover RH with the 5 clips and screw.
51441
66.INSTALL NO. 1 ENGINE UNDER COVER
Install the No. 1 engine under cover with the 10 clips and 4 bolts.
- Torque:
- 7.5 N*m (76 kgf*cm, 66 in.*lbf)
67.INSTALL FRONT WHEELS
68.INSPECT IGNITION TIMING
69.INSPECT ENGINE IDLE SPEED
70.INSPECT CO/HC
71.INSPECT AND ADJUST FRONT WHEEL ALIGNMENT
12601B
72.INSTALL NO. 1 ENGINE COVER SUB-ASSEMBLY
Engage the 3 clips to install the No. 1 engine cover sub-assembly.
- NOTICE:
- ·
Be sure to engage the clips securely.
·Do not apply excessive force or hit the No. 1 engine cover sub-assembly to engage the clips. This may cause the No. 1 engine cover sub-assembly to break.
73.CHECK SPEED SENSOR SIGNAL