Home › Engine / Hybrid System › 2ZR-FXE ENGINE CONTROL › SFI SYSTEM(w/o Canister Pump Module)
RM3210E _51 Engine / Hybrid System _047494 2ZR-FXE ENGINE CONTROL _0231250 SFI SYSTEM(w/o Canister Pump Module) J

2ZR-FXE ENGINE CONTROL  SFI SYSTEM(w/o Canister Pump Module)  VC Output Circuit  


DESCRIPTION

The ECM constantly generates 5 V power source voltage from the auxiliary battery voltage supplied to the +B, +B2 (BATT) terminal of the ECM to operate the microprocessor. The ECM also provides this power source voltage to the sensors through the VC output circuit.
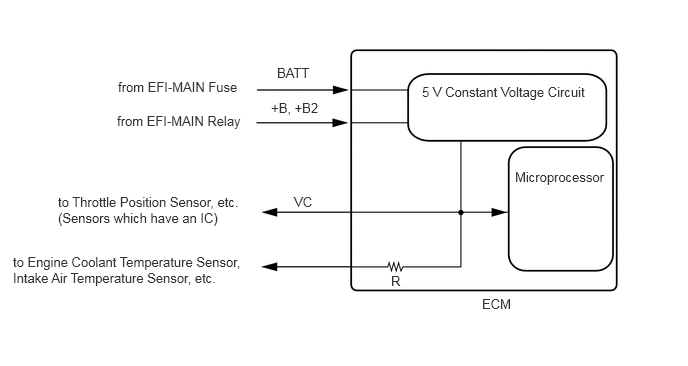
A256646E40
1.229,0.823 3.042,1.125 1.813,0.302 10 false from EFI-MAIN Fuse 1.219,1.177 2.979,1.531 1.76,0.354 10 false from EFI-MAIN Relay 0.604,2.021 2.573,2.448 1.969,0.427 10 false to Throttle Position Sensor, etc. (Sensors which have an IC) 0.135,2.646 2.563,3.031 2.427,0.385 10 false to Engine Coolant Temperature Sensor, Intake Air Temperature Sensor, etc. 5.021,3.083 6.521,3.406 1.5,0.323 10 false ECM 2.885,0.677 3.563,1 0.677,0.323 10 false BATT 2.823,1.042 3.49,1.292 0.667,0.25 10 false +B, +B2 3.063,2.021 3.427,2.25 0.365,0.229 10 false VC 4.396,0.875 6.188,1.229 1.792,0.354 10 false 5 V Constant Voltage Circuit 5.365,1.76 6.354,2.115 0.99,0.354 10 false Microprocessor 4.073,2.844 4.333,3.063 0.26,0.219 10 false R

When the VC circuit has a short circuit, the microprocessor in the ECM and sensors that are supplied power through the VC circuit are deactivated because power is not supplied from the VC circuit. When the system is in this condition, it will not start.

HINT:

Under normal conditions, the MIL is illuminated when the power switch is turned on (IG). The MIL goes off when the power switch is turned on (READY).


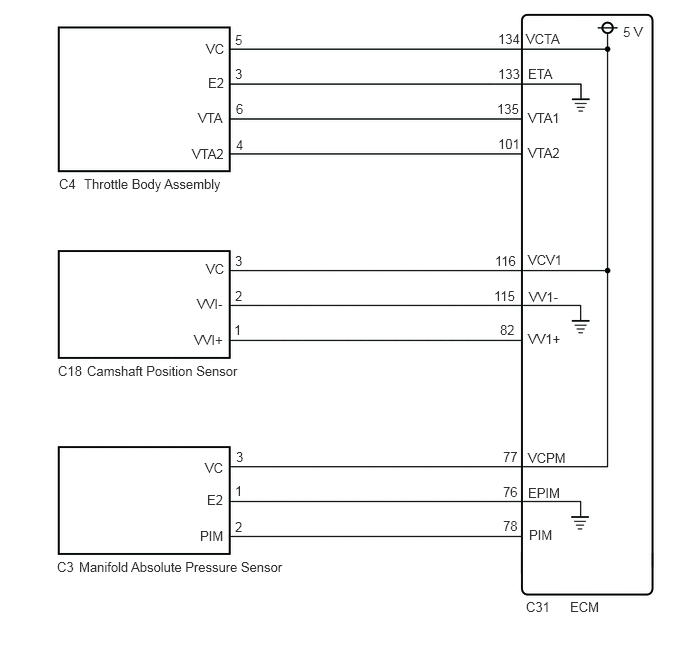
WIRING DIAGRAM

·

For the circuit diagram of the ECM power source refer to the ECM power source circuit.

Click hereEngine / Hybrid System>2ZR-FXE ENGINE CONTROL>SFI SYSTEM(w/o Canister Pump Module)>ECM Power Source Circuit

·

VC Output Circuit

A317837E07
0.615,1.833 0.979,2.021 0.365,0.188 10 false C4 0.875,1.833 2.896,2.042 2.021,0.208 10 false Throttle Body Assembly 2.146,0.427 2.458,0.625 0.313,0.198 10 false VC 2.167,0.781 2.479,0.979 0.313,0.198 10 false E2 2.448,0.333 2.76,0.531 0.313,0.198 10 false 5 2.063,1.146 2.375,1.344 0.313,0.198 10 false VTA 2,1.521 2.604,1.813 0.604,0.292 10 false VTA2 2.448,0.688 2.76,0.885 0.313,0.198 10 false 3 2.458,1.052 2.771,1.25 0.313,0.198 10 false 6 2.458,1.427 2.771,1.625 0.313,0.198 10 false 4 5.188,0.688 5.5,0.885 0.313,0.198 10 false 133 5.188,0.323 5.5,0.521 0.313,0.198 10 false 134 5.177,1.052 5.49,1.25 0.313,0.198 10 false 135 5.188,1.417 5.5,1.615 0.313,0.198 10 false 101 5.479,0.323 6.125,0.521 0.646,0.198 10 false VCTA 5.5,0.688 6.146,0.885 0.646,0.198 10 false ETA 5.5,1.146 6.146,1.344 0.646,0.198 10 false VTA1 5.5,1.51 6.104,1.802 0.604,0.292 10 false VTA2 6.49,0.25 6.844,0.521 0.354,0.271 10 false 5 V 0.604,3.781 0.917,3.979 0.313,0.198 10 false C18 0.906,3.781 2.927,3.99 2.021,0.208 10 false Camshaft Position Sensor 2.146,2.719 2.458,2.917 0.313,0.198 10 false VC 2.052,3.083 2.865,3.313 0.813,0.229 10 false VVI- 2.021,3.458 2.833,3.688 0.813,0.229 10 false VVI+ 5.156,2.635 5.469,2.833 0.313,0.198 10 false 116 5.208,3.354 5.521,3.552 0.313,0.198 10 false 82 5.146,3 5.458,3.198 0.313,0.198 10 false 115 5.51,3.01 6.323,3.24 0.813,0.229 10 false VV1- 5.5,3.448 6.313,3.677 0.813,0.229 10 false VV1+ 5.5,2.625 6.146,2.823 0.646,0.198 10 false VCV1 5.5,4.688 6.146,4.885 0.646,0.198 10 false VCPM 5.5,5.052 6.146,5.25 0.646,0.198 10 false EPIM 5.51,5.49 6.156,5.688 0.646,0.198 10 false PIM 2.135,4.792 2.448,4.99 0.313,0.198 10 false VC 2.156,5.125 2.802,5.323 0.646,0.198 10 false E2 2.083,5.5 2.729,5.698 0.646,0.198 10 false PIM 0.594,5.823 0.99,6.031 0.396,0.208 10 false C3 0.823,5.823 3.427,6.063 2.604,0.24 10 false Manifold Absolute Pressure Sensor 2.448,2.635 2.76,2.833 0.313,0.198 10 false 3 2.458,4.677 2.771,4.875 0.313,0.198 10 false 3 2.448,3 2.76,3.198 0.313,0.198 10 false 2 2.448,5.031 2.76,5.229 0.313,0.198 10 false 1 2.438,3.354 2.75,3.552 0.313,0.198 10 false 1 2.448,5.406 2.76,5.604 0.313,0.198 10 false 2 5.938,6.24 6.396,6.438 0.458,0.198 10 false ECM 5.479,6.24 5.792,6.438 0.313,0.198 10 false C31 5.24,4.677 5.552,4.875 0.313,0.198 10 false 77 5.24,5.042 5.552,5.24 0.313,0.198 10 false 76 5.24,5.396 5.552,5.594 0.313,0.198 10 false 78


CAUTION / NOTICE / HINT

NOTICE:

Check the fuses for circuits related to this system before performing the following inspection procedure.


PROCEDURE

1.CHECK GTS
a.

Connect the GTS to the DLC3.


b.

Turn the power switch on (IG).


c.

Turn the GTS on.


d.

Check the communication between the GTS and ECM.

HINT:

Communication can be checked by using the Data List item Engine.


Result:
Result Proceed to
Communication is not possible A
Communication is possible B


A

2.CHECK EFI NO. 2 FUSE VOLTAGE

B

PROCEED TO NEXT SUSPECTED AREA SHOWN IN PROBLEM SYMPTOMS TABLE

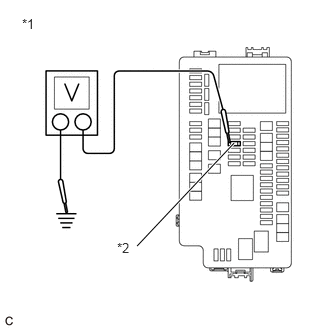
2.CHECK EFI NO. 2 FUSE VOLTAGE
A375462C02
1.427,2.563 2.438,1.49 true 0.229,0.167 0.542,0.365 0.313,0.198 10 false *1 1.219,2.5 1.531,2.698 0.313,0.198 10 false *2
*1 No. 1 Engine Room Relay Block and No. 1 Junction Block Assembly
*2 EFI NO. 2 Fuse


a.

Turn the power switch on (IG).


b.

Measure the voltage according to the value(s) in the table below.

Standard Voltage:
Tester Connection Condition Specified Condition
1 (EFI NO. 2 fuse) - Body ground Power switch on (IG) 11 to 14 V


HINT:
·

Check the fuse with it installed to the No. 1 engine room relay block and No. 1 junction block assembly.

·

If the result is not as specified, since current is not flowing to the +B and +B2 terminals of the ECM, the system may not be started.


Result:
Proceed to
OK
NG


OK

3.CHECK CONNECTION BETWEEN GTS AND ECM (THROTTLE POSITION SENSOR)

NG

3.CHECK CONNECTION BETWEEN GTS AND ECM (THROTTLE POSITION SENSOR)
a.

Disconnect the throttle body assembly connector.


b.

Turn the power switch on (IG).


c.

Turn the GTS on.


d.

Check the communication between the GTS and ECM.

HINT:

Communication can be checked by using the Data List item Engine.


Result:
Result Proceed to
Communication is not possible A
Communication is possible B


HINT:

Perform "Inspection After Repair" after replacing the throttle body assembly.

Click hereEngine / Hybrid System>2ZR-FXE ENGINE CONTROL>SFI SYSTEM(w/o Canister Pump Module)>INITIALIZATION


A

4.CHECK CONNECTION BETWEEN GTS AND ECM (CAMSHAFT POSITION SENSOR)

B

4.CHECK CONNECTION BETWEEN GTS AND ECM (CAMSHAFT POSITION SENSOR)
a.

Disconnect the camshaft position sensor connector.


b.

Turn the power switch on (IG).


c.

Turn the GTS on.


d.

Check the communication between the GTS and ECM.

HINT:

Communication can be checked by using the Data List item Engine.


Result:
Result Proceed to
Communication is not possible A
Communication is possible B


A

5.CHECK CONNECTION BETWEEN GTS AND ECM (MANIFOLD ABSOLUTE PRESSURE SENSOR)

B

5.CHECK CONNECTION BETWEEN GTS AND ECM (MANIFOLD ABSOLUTE PRESSURE SENSOR)
a.

Disconnect the manifold absolute pressure sensor connector.


b.

Turn the power switch on (IG).


c.

Turn the GTS on.


d.

Check the communication between the GTS and ECM.

HINT:

Communication can be checked by using the Data List item Engine.


Result:
Result Proceed to
Communication is not possible A
Communication is possible B


A

6.CHECK HARNESS AND CONNECTOR

B

REPLACE MANIFOLD ABSOLUTE PRESSURE SENSOR

6.CHECK HARNESS AND CONNECTOR
a.

Disconnect the throttle body assembly connector.


b.

Disconnect the crankshaft position sensor connector.


c.

Disconnect the manifold absolute pressure sensor connector.


d.

Disconnect the ECM connectors.


e.

Measure the resistance according to the value(s) in the table below.

Standard Resistance:
Tester Connection Condition Specified Condition
C31-134 (VCTA) - Body ground Always 10 kΩ or higher
C31-116 (VCV1) - Body ground Always 10 kΩ or higher
C31-77 (VCPM) - Body ground Always 10 kΩ or higher
A40-2 (+B) - 1 (EFI NO. 2 fuse) Always Below 1 Ω
A40-3 (+B2) - 1 (EFI NO. 2 fuse) Always Below 1 Ω
A40-2 (+B) - Body ground Always 10 kΩ or higher
A40-3 (+B2) - Body ground Always 10 kΩ or higher


Result:
Proceed to
OK
NG


OK

NG

REPAIR OR REPLACE HARNESS OR CONNECTOR