2ZR-FXE ENGINE CONTROL THROTTLE BODY INSTALLATION
PROCEDURE

 22271
1.INSTALL THROTTLE BODY GASKET
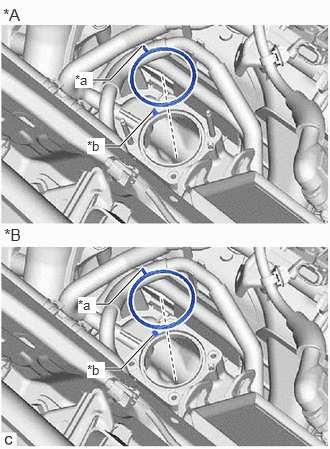
| *A | w/ Stud Bolt |
| *B | w/o Stud Bolt |
| *a | Protrusion |
| *b | Gutter |
Install a new throttle body gasket to the intake manifold with the protrusion of the throttle body gasket oriented as shown in the illustration.
22210
2.INSTALL THROTTLE BODY ASSEMBLY
- HINT:
-
Perform "Inspection After Repair" after replacing the throttle body assembly.
- ·
w/ Canister Pump Module:
Click hereEngine / Hybrid System>2ZR-FXE ENGINE CONTROL>SFI SYSTEM(w/ Canister Pump Module)>INITIALIZATION
·w/o Canister Pump Module:
Click hereEngine / Hybrid System>2ZR-FXE ENGINE CONTROL>SFI SYSTEM(w/o Canister Pump Module)>INITIALIZATION
w/ Stud Bolt:
Install the throttle body assembly to the intake manifold with the 2 bolts and 2 nuts.
- Torque:
- 10 N*m (102 kgf*cm, 7 ft.*lbf)
- NOTICE:
-
If the throttle body assembly has been struck or dropped, replace it.
w/o Stud Bolt:
Install the throttle body assembly to the intake manifold with the 4 bolts.
- Torque:
- 10 N*m (102 kgf*cm, 7 ft.*lbf)
- NOTICE:
-
If the throttle body assembly has been struck or dropped, replace it.
Connect the water by-pass hose and No. 2 water by-pass hose to the throttle body assembly and slide the 2 clips to secure them.
Connect the throttle body assembly connector.
3.INSTALL AIR CLEANER HOSE ASSEMBLY
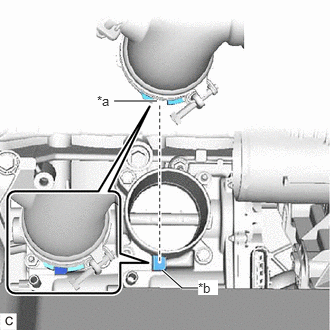
| *a | Cutout |
| *b | Protrusion |
Install the air cleaner hose assembly to the throttle body assembly.
- NOTICE:
-
Align the cutout of the air cleaner hose assembly with the protrusion of the throttle body assembly.
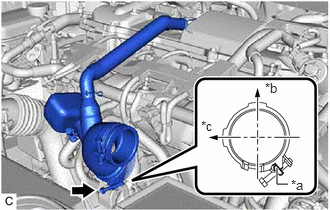
| *a | Stopper |
| *b | Top |
| *c | Right of Vehicle |
Tighten the hose clamp in the position shown in the illustration.
- Torque:
- 2.0 N*m (20 kgf*cm, 18 in.*lbf)
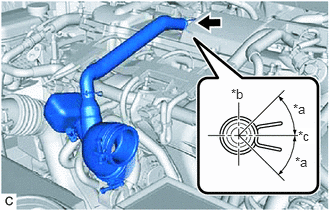
| *a | 45° |
| *b | Top |
| *c | Left of Vehicle |
Connect the No. 2 ventilation hose to the cylinder head cover sub-assembly and slide the clip to secure it.
- NOTICE:
-
Make sure that the clip is in the correct position.
17705
4.INSTALL AIR CLEANER CAP SUB-ASSEMBLY
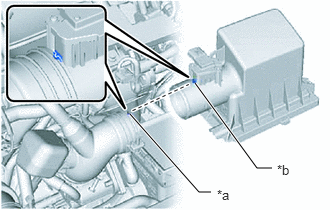
| *a | Cutout |
| *b | Protrusion |
Install the air cleaner cap sub-assembly to the air cleaner hose assembly.
- NOTICE:
-
Align the cutout of the air cleaner hose assembly with the protrusion of the air cleaner cap sub-assembly.
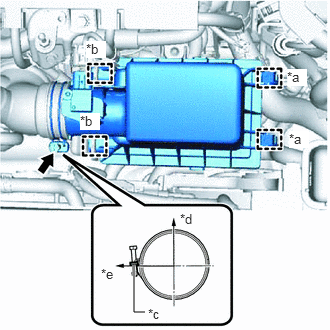
| *a | Clamp |
| *b | Guide |
| *c | Stopper |
| *d | Top |
| *e | Front of Vehicle |
Tighten the hose clamp in the position shown in the illustration.
- Torque:
- 2.0 N*m (20 kgf*cm, 18 in.*lbf)
- HINT:
-
Make sure that the condition of the hose clamp is as shown in the illustration.
Engage the 2 guides and install the air cleaner cap sub-assembly to the air cleaner case sub-assembly.
Engage the 2 clamps.
Connect the wire harness clamp.
Connect the mass air flow meter sub-assembly connector.
12601B
5.INSTALL NO. 1 ENGINE COVER SUB-ASSEMBLY
6.ADD ENGINE COOLANT (for Engine)
7.INSPECT FOR COOLANT LEAK (for Engine)
51444C
8.INSTALL REAR MOTOR UNDER COVER LH
9.PERFORM INITIALIZATION
- NOTICE:
- ·
Be sure to perform this procedure after removing and reinstalling the throttle body assembly or any throttle body assembly components.
·Perform the following procedure after replacing the throttle body assembly or any throttle body assembly components. The following procedure should also be performed if the throttle body assembly is cleaned.
Connect the GTS to the DLC3.
Clear the DTCs.
w/ Canister Pump Module:
Click hereEngine / Hybrid System>2ZR-FXE ENGINE CONTROL>SFI SYSTEM(w/ Canister Pump Module)>DTC CHECK / CLEAR
w/o Canister Pump Module:
Click hereEngine / Hybrid System>2ZR-FXE ENGINE CONTROL>SFI SYSTEM(w/o Canister Pump Module)>DTC CHECK / CLEAR
Perform "Inspection After Repair".
w/ Canister Pump Module:
Click hereEngine / Hybrid System>2ZR-FXE ENGINE CONTROL>SFI SYSTEM(w/ Canister Pump Module)>INITIALIZATION
w/o Canister Pump Module:
Click hereEngine / Hybrid System>2ZR-FXE ENGINE CONTROL>SFI SYSTEM(w/o Canister Pump Module)>INITIALIZATION
Put the engine in inspection mode (maintenance mode).
Click hereGeneral>INTRODUCTION>REPAIR INSTRUCTION>INSPECTION MODE PROCEDURE
Start the engine without operating the accelerator pedal and check that the MIL is not illuminated. After the engine is warmed up, check that the idle speed is within the specified range with the A/C switch off.
- Standard:
950 to 1050 rpm
- NOTICE:
- ·
If the accelerator pedal is operated, perform the above steps again.
·Be sure to perform this step with all accessories off.
·Make sure that the shift lever is in P.
Perform a road test and confirm that there are no abnormalities.