INSTALLATION
Removal / installation · Vehicles built from Aug 2007
Versions by build date: Nov 2005 – Dec 2006 Jan 2007 – Jul 2007 from Aug 2007
| 1. INSTALL ENGINE OIL LEVEL SENSOR |

Install the level sensor with the 4 bolts.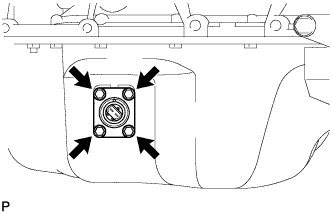

- Torque:
- 7.0 N*m{ 71 kgf*cm , 62 in.*lbf }
| 2. INSTALL EXHAUST MANIFOLD (for CCo) |
Loosely install the 2 collars of the exhaust manifold with the nuts labeled A. Tighten the nuts until the contact surface of the exhaust manifold contacts with the cylinder head.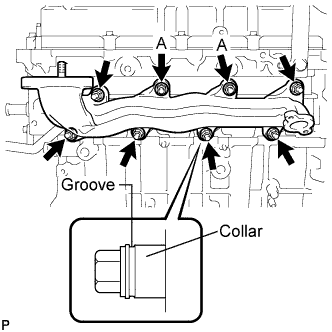
Loosely install the 6 collars with the 6 nuts.
- HINT:
- When installing the collars, pay attention to the mounting orientation. Ring groove of the collar should be outside. Refer to the illustration.
- Tighten the nuts so that the position of the exhaust manifold can be adjusted in a later step.
- When installing the collars, pay attention to the mounting orientation. Ring groove of the collar should be outside. Refer to the illustration.
Install a new gasket and the turbocharger with the 3 nuts.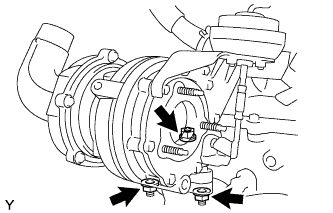
- Torque:
- 60 N*m{ 612 kgf*cm , 44 ft.*lbf }
Install the turbocharger stay with the 2 nuts and 2 spacers.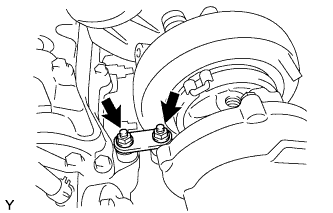
- Torque:
- 36 N*m{ 367 kgf*cm , 27 ft.*lbf }
- HINT:
- Do not reuse the turbocharger stay.
Tighten the 8 nuts.
- Torque:
- 47 N*m{ 479 kgf*cm , 35 ft.*lbf }
| 3. INSTALL EXHAUST MANIFOLD (for DPF) |
Loosely install the 2 collars of the exhaust manifold with the nuts labeled A. Tighten the nuts until the contact surface of the exhaust manifold contacts with the cylinder head.
Loosely install the 6 collars with the 6 nuts.
- HINT:
- When installing the collars, pay attention to the mounting orientation. Ring groove of the collar should be outside. Refer to the illustration.
- Tighten the nuts so that the position of the exhaust manifold can be adjusted in a later step.
- When installing the collars, pay attention to the mounting orientation. Ring groove of the collar should be outside. Refer to the illustration.
Temporarily install 2 new gaskets and the No. 2 turbo oil pipe with the 2 bolts.
Install a new gasket and the turbocharger with the 3 nuts.
- Torque:
- 60 N*m{ 612 kgf*cm , 44 ft.*lbf }
Install the turbocharger stay with the 2 nuts and 2 spacers.
- Torque:
- 36 N*m{ 367 kgf*cm , 27 ft.*lbf }
- HINT:
- Do not reuse the turbocharger stay.
Tighten the 8 nuts.
- Torque:
- 47 N*m{ 479 kgf*cm , 35 ft.*lbf }
| 4. INSTALL NO. 2 TURBO OIL PIPE (for CCo) |
Install 2 new gaskets and the turbo oil pipe with the 2 bolts.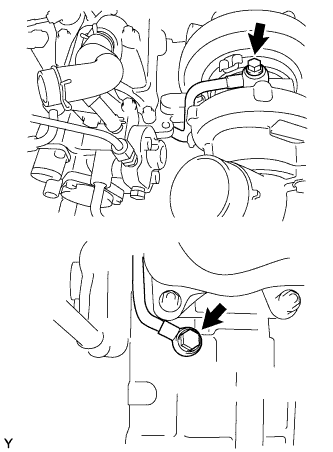
- Torque:
- 35 N*m{ 357 kgf*cm , 26 ft.*lbf }
| 5. TIGHTEN NO. 2 TURBO OIL PIPE (for DPF) |
Tighten the turbo oil pipe with the 2 bolts.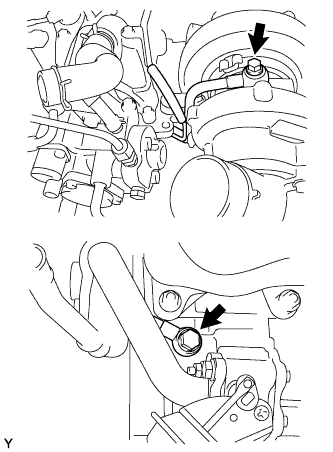
- Torque:
- 35 N*m{ 357 kgf*cm , 26 ft.*lbf }
Connect the 2 vacuum hoses.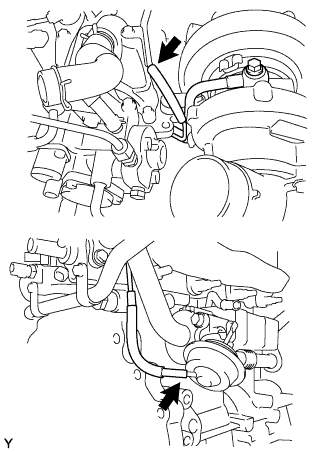
| 6. INSTALL EGR COOLER ASSEMBLY (for CCo) |
Install 2 new gaskets and a new O-ring to the EGR cooler.
Temporarily install the EGR cooler with the 2 bolts and 2 nuts.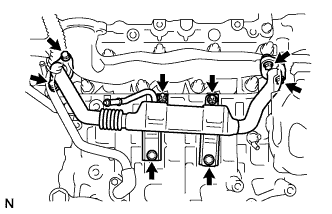
Temporarily install the 4 bolts.
Tighten the 2 bolts and 2 nuts holding the EGR cooler to the cylinder block.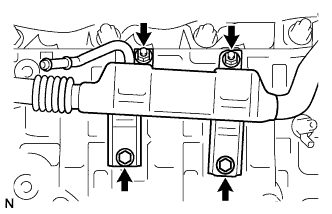
- Torque:
- 10 N*m{ 102 kgf*cm , 7 ft.*lbf }
Tighten the 2 bolts holding the EGR cooler to the exhaust manifold.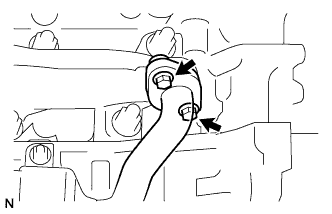
- Torque:
- 16 N*m{ 163 kgf*cm , 12 ft.*lbf }
Tighten the 2 bolts holding the EGR cooler to the cylinder head.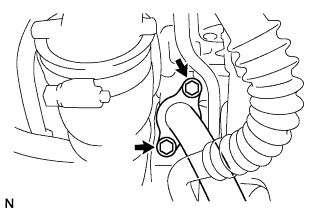
- Torque:
- 24 N*m{ 245 kgf*cm , 18 ft.*lbf }
| 7. INSTALL EGR COOLER ASSEMBLY (for DPF) |
Temporarily assemble 2 new gaskets, the No. 2 EGR valve, No. 1 EGR pipe and EGR cooler with the 2 bolts and 2 nuts.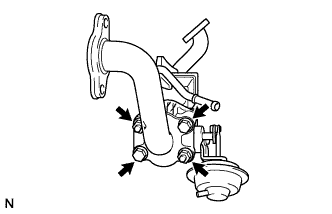
Install a new O-ring to the EGR cooler.
Install a new gasket to the No. 1 EGR pipe.
Install a new gasket to the EGR cooler.
Temporarily install the EGR cooler with the 2 bolts and 2 nuts.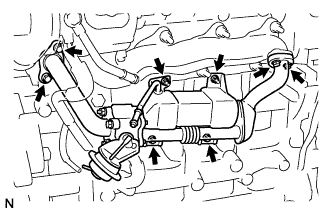
Temporarily install the 4 bolts.
Tighten the 2 bolts and 2 nuts holding the EGR cooler to the cylinder block.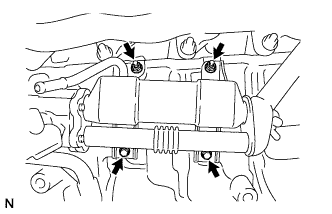
- Torque:
- 10 N*m{ 102 kgf*cm , 7 ft.*lbf }
Tighten the 2 bolts holding the EGR cooler to the exhaust manifold.
- Torque:
- 16 N*m{ 163 kgf*cm , 12 ft.*lbf }
Tighten the 2 bolts holding the EGR cooler to the cylinder head.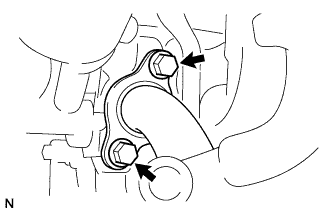
- Torque:
- 24 N*m{ 245 kgf*cm , 18 ft.*lbf }
Tighten the 2 bolts and 2 nuts holding the EGR pipe to the EGR valve.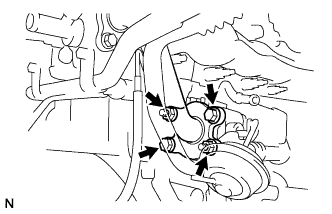
- Torque:
- 21 N*m{ 214 kgf*cm , 16 ft.*lbf }
Connect the vacuum hose to the No. 2 EGR valve.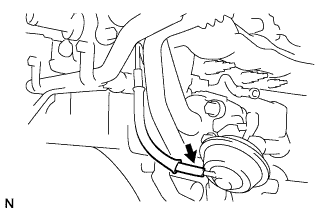
| 8. INSTALL TURBO OIL OUTLET PIPE (for CCo) |
Install 2 new gaskets and the oil pipe with the 4 bolts.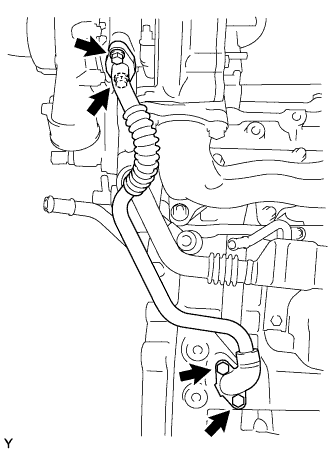
- Torque:
- 11 N*m{ 112 kgf*cm , 8 ft.*lbf }
| 9. INSTALL TURBO OIL OUTLET PIPE (for DPF) |
Install 2 new gaskets and the oil pipe with the 4 bolts.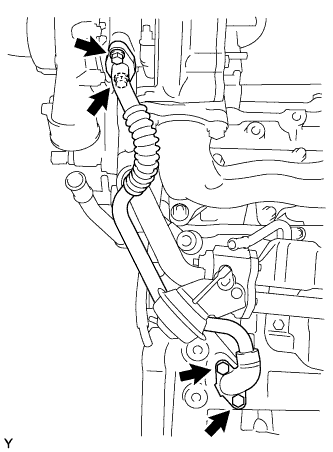
- Torque:
- 11 N*m{ 112 kgf*cm , 8 ft.*lbf }
| 10. INSTALL NO. 5 WATER BY-PASS PIPE (for CCo) |
Using needle-nose pliers, grip the claws of the clip and slide the clip to install the No. 2 and No. 3 water by-pass hoses.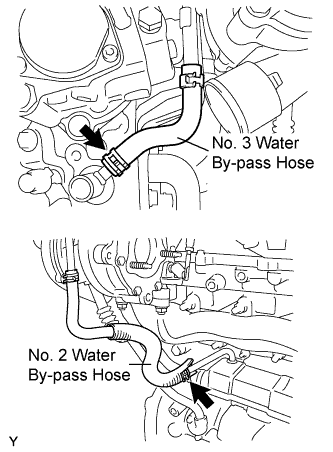
Install the pipe with the 2 bolts.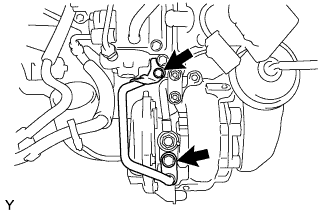
- Torque:
- 28 N*m{ 285 kgf*cm , 21 ft.*lbf }
| 11. INSTALL NO. 5 WATER BY-PASS PIPE (for DPF) |
Using needle-nose pliers, grip the claws of the clip and slide the clip to install the No. 2 and No. 3 water by-pass hoses.
Install the pipe with the 2 bolts.
- Torque:
- 28 N*m{ 285 kgf*cm , 21 ft.*lbf }
| 12. INSTALL NO. 1 TURBO INSULATOR (for CCo) |
Install the insulator with the 2 bolts.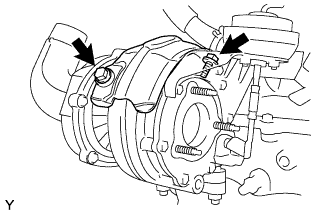
- Torque:
- 20.5 N*m{ 209 kgf*cm , 15 ft.*lbf }
| 13. INSTALL NO. 1 TURBO INSULATOR (for DPF) |
Install the insulator with the 2 bolts.
- Torque:
- 21 N*m{ 209 kgf*cm , 15 ft.*lbf }
| 14. INSTALL EXHAUST MANIFOLD CONVERTER SUB-ASSEMBLY (for CCo) |
Temporarily install a new gasket and the exhaust manifold converter with the 3 nuts.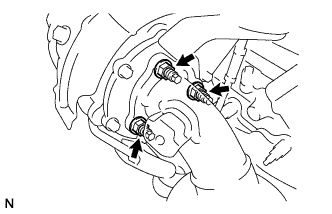
Temporarily install the No. 2 exhaust manifold stay with the nut and 2 bolts.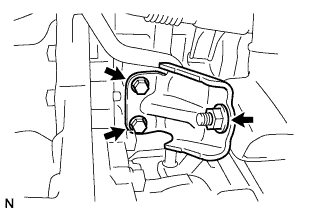
Temporarily install the No. 2 manifold stay with the 3 bolts.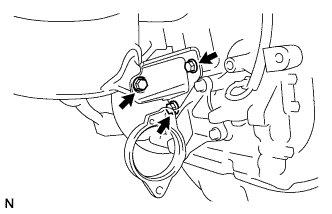
Temporarily install the No. 1 manifold stay with the bolt and nut.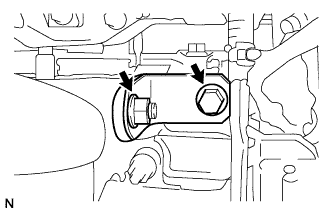
Tighten the 2 bolts holding the No. 2 exhaust manifold stay to the cylinder block (upper bolt → lower bolt).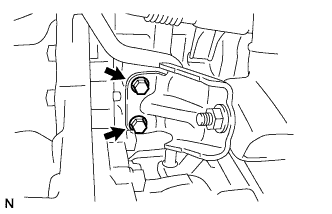
- Torque:
- 56 N*m{ 571 kgf*cm , 41 ft.*lbf }
While tightening the manifold converter towards turbocharger, tighten the 3 nuts holding the exhaust manifold converter to the turbocharger.
- Torque:
- 25 N*m{ 255 kgf*cm , 18 ft.*lbf }
Tighten the nut holding the No. 2 exhaust manifold stay to the exhaust manifold converter.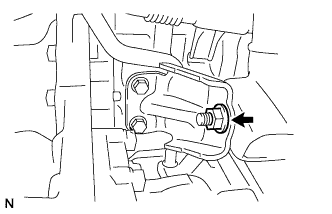
- Torque:
- 56 N*m{ 571 kgf*cm , 41 ft.*lbf }
Tighten the bolt holding the No. 2 manifold stay to the exhaust manifold converter.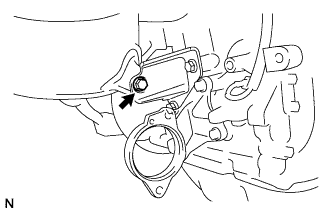
- Torque:
- 56 N*m{ 571 kgf*cm , 41 ft.*lbf }
- HINT:
- Ensure that the stay is pushed flush to the cylinder block and manifold converter while tightening.
Tighten the 2 bolts holding the No. 2 manifold stay to the cylinder block.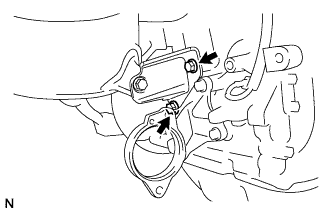
- Torque:
- 56 N*m{ 571 kgf*cm , 41 ft.*lbf }
Tighten the bolt holding the No. 1 manifold stay to the cylinder head.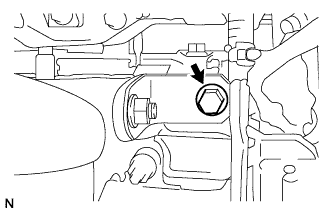
- Torque:
- 25 N*m{ 255 kgf*cm , 18 ft.*lbf }
- HINT:
- Ensure that the stay is pushed flush to the cylinder head and manifold converter while tightening.
Tighten the nut holding the No. 1 manifold stay to the exhaust manifold converter.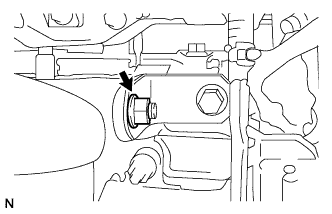
- Torque:
- 25 N*m{ 255 kgf*cm , 18 ft.*lbf }
| 15. INSTALL EXHAUST MANIFOLD CONVERTER SUB-ASSEMBLY (for DPF) |
Temporarily install a new gasket and the exhaust manifold converter with the 3 nuts.
Temporarily install the No. 2 exhaust manifold stay with the 2 bolts and nut.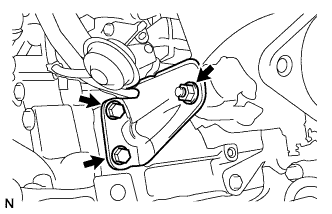
Temporarily install the No. 2 manifold stay with the 3 bolts.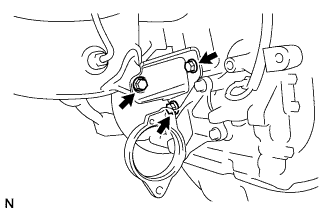
Temporarily install the No. 1 manifold stay with the bolt and nut.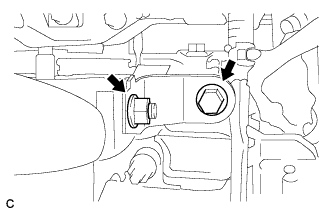
Tighten the 2 bolts holding the No. 2 exhaust manifold stay to the cylinder block.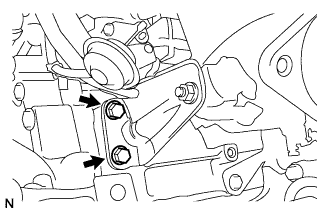
- Torque:
- 56 N*m{ 571 kgf*cm , 41 ft.*lbf }
- NOTICE:
- Make sure to tighten the upper bolt first and the lower bolt last.
While pushing the manifold converter towards the cylinder block, tighten the 3 nuts holding the exhaust manifold converter to the turbocharger.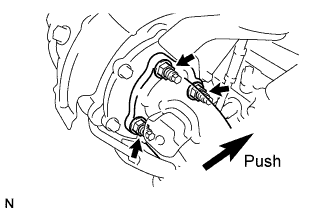
- Torque:
- 25 N*m{ 255 kgf*cm , 18 ft.*lbf }
Tighten the nut holding the No. 2 exhaust manifold stay to the exhaust manifold converter.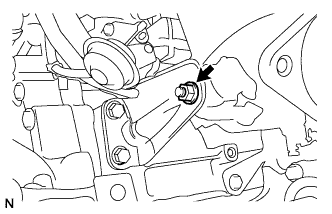
- Torque:
- 56 N*m{ 571 kgf*cm , 41 ft.*lbf }
Tighten the bolt holding the No. 2 manifold stay to the exhaust manifold converter.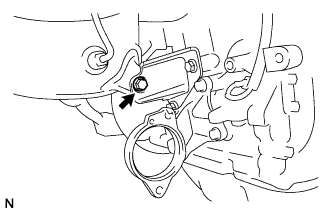
- Torque:
- 56 N*m{ 571 kgf*cm , 41 ft.*lbf }
- HINT:
- Ensure that the stay is pushed flush to the cylinder block and manifold converter while tightening.
Tighten the 2 bolts holding the No. 2 manifold stay to the cylinder block.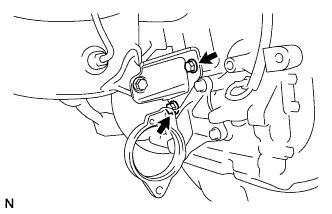
- Torque:
- 56 N*m{ 571 kgf*cm , 41 ft.*lbf }
Tighten the bolt holding the No. 1 manifold stay to the cylinder head.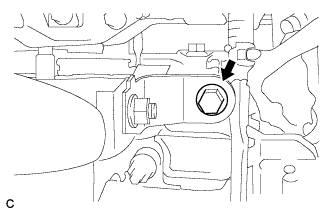
- Torque:
- 25 N*m{ 255 kgf*cm , 18 ft.*lbf }
- HINT:
- Ensure that the stay is pushed flush to the cylinder head and manifold converter while tightening.
Tighten the nut holding the No. 1 manifold stay to the exhaust manifold converter.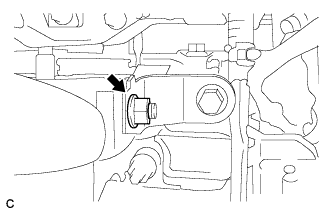
- Torque:
- 25 N*m{ 255 kgf*cm , 18 ft.*lbf }
| 16. INSTALL NO. 1 MANIFOLD CONVERTER INSULATOR (for CCo) |
Install the manifold converter insulator with the 4 bolts.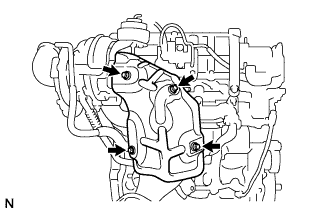
- Torque:
- 28.5 N*m{ 291 kgf*cm , 21 ft.*lbf }
| 17. INSTALL NO. 1 MANIFOLD CONVERTER INSULATOR (for DPF) |
Install the manifold converter insulator with the 5 bolts.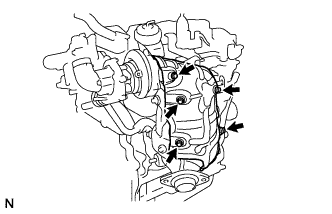
- Torque:
- 29 N*m{ 291 kgf*cm , 21 ft.*lbf }
| 18. INSTALL DRIVE SHAFT BEARING BRACKET |
Install the bearing bracket with the 3 bolts.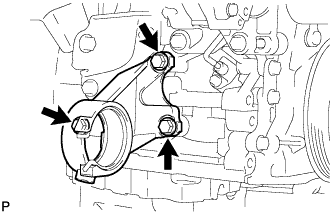
- Torque:
- 64 N*m{ 653 kgf*cm , 47 ft.*lbf }
| 19. INSTALL CRANKSHAFT POSITION SENSOR |
Apply a light coat of engine oil to the O-ring of the sensor.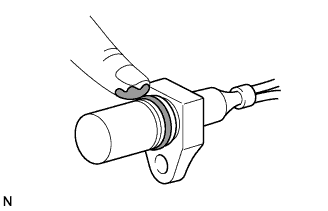
Install the sensor with the bolt.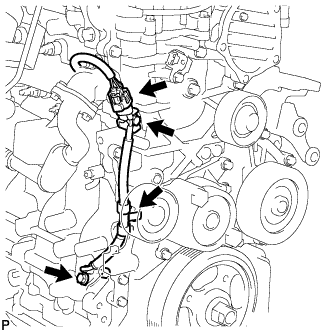
- Torque:
- 8.8 N*m{ 90 kgf*cm , 78 in.*lbf }
Connect the sensor wire harness clamp.
Connect the sensor connector to the bracket.
Connect the sensor connector.
| 20. INSTALL GLOW PLUG ASSEMBLY |
Install the 4 glow plugs.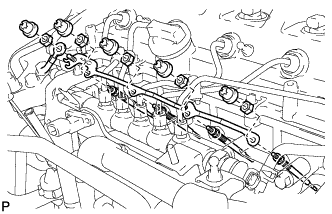
- Torque:
- 12.3 N*m{ 125 kgf*cm , 9 ft.*lbf }
Install the glow plug connector with the 5 nuts.
- Torque:
- 2.2 N*m{ 22 kgf*cm , 19 in.*lbf } for glow plug connector
- 4.0 N*m{ 41 kgf*cm , 35 in.*lbf } for wire harness
Install the 5 grommets.
| 21. INSTALL WATER INLET HOUSING |
Install a new gasket and the inlet housing with the 3 nuts.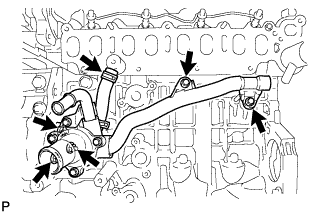
- Torque:
- 9.0 N*m{ 92 kgf*cm , 80 in.*lbf }
Connect the hose.
Install a new O-ring and the by-pass pipe with the 2 bolts.
- Torque:
- 11 N*m{ 112 kgf*cm , 8 ft.*lbf }
| 22. INSTALL NO. 1 OIL COOLER BRACKET |
Apply a light coat of engine oil to 2 new O-rings.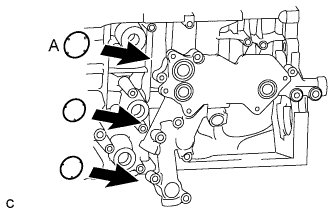
- NOTICE:
- Do not apply engine oil to a new O-ring labeled A.
Install the 3 O-rings to the oil cooler bracket.
Install the oil cooler bracket with the 6 bolts and nut.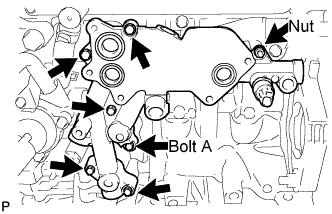
- Torque:
- 11 N*m{ 112 kgf*cm , 8 ft.*lbf }
- HINT:
- Each bolt length is indicated below.
- Bolt length:
- 36 mm (1.42 in.) for bolt A
- 49 mm (1.93 in.) for except bolt A
| 23. INSTALL NO. 1 TURBO OIL PIPE |
Install the oil pipe and 2 new gaskets with the 2 union bolts.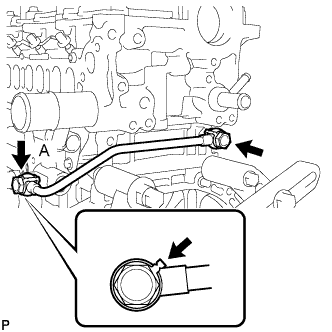
- Torque:
- 35 N*m{ 357 kgf*cm , 26 ft.*lbf }
- HINT:
- Be sure to install the union bolt A so that the gasket is positioned as shown in the illustration.
| 24. INSTALL NO. 3 WATER BY-PASS PIPE |
Install a new O-ring and the by-pass pipe with the 2 bolts.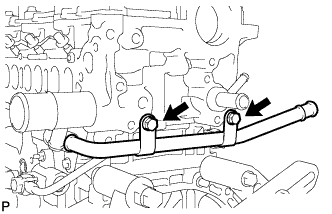
- Torque:
- 21 N*m{ 214 kgf*cm , 15 ft.*lbf }
| 25. INSTALL DIESEL ENGINE COOLANT TEMPERATURE SENSOR |
Install a new gasket and the sensor.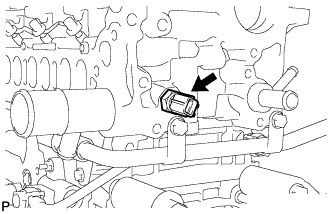
- Torque:
- 19.6 N*m{ 200 kgf*cm , 14 ft.*lbf }
| 26. INSTALL OIL COOLER |
Install 3 new O-rings and the oil cooler with the 5 bolts.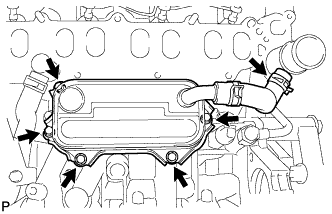
- Torque:
- 11 N*m{ 112 kgf*cm , 8 ft.*lbf }
Install the by-pass hose and position the 2 clips.
Connect the oil pressure switch connector.
| 27. INSTALL INTAKE MANIFOLD |
Install a new gasket and the intake manifold with the 7 bolts and 2 nuts.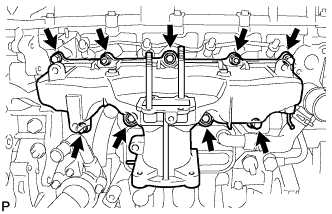
- Torque:
- 26 N*m{ 265 kgf*cm , 19 ft.*lbf }
| 28. INSTALL DIESEL THROTTLE BODY |
Install a new gasket and the diesel throttle body with the 2 nuts and 2 bolts.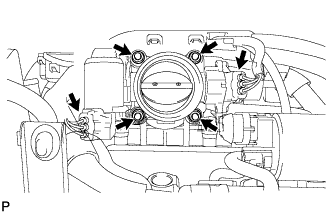
- Torque:
- 21 N*m{ 214 kgf*cm , 15 ft.*lbf }
Connect the throttle position sensor connector.
Connect the throttle motor connector.
| 29. INSTALL COMMON RAIL ASSEMBLY |
Install the common rail (Click here).
| 30. INSTALL ENGINE COVER BRACKET |
Install the cover bracket with the 2 bolts.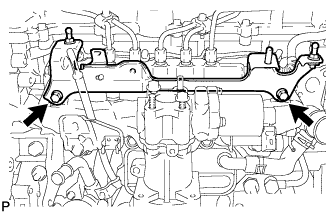
- Torque:
- 20 N*m{ 204 kgf*cm , 15 ft.*lbf }
Install the pressure sensor with the bolt.
- Torque:
- 8.8 N*m{ 90 kgf*cm , 78 in.*lbf }
| 31. INSTALL EGR VALVE ASSEMBLY |
Install a new gasket and the EGR valve with the 2 bolts.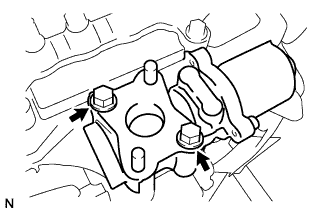
- Torque:
- 24 N*m{ 245 kgf*cm , 18 ft.*lbf }
Connect the EGR valve connector.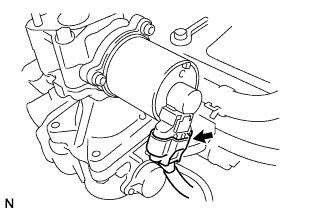
| 32. INSTALL NO. 2 EGR PIPE SUB-ASSEMBLY |
Temporarily install 2 new gaskets and EGR pipe with the nut and bolt as shown in the illustration.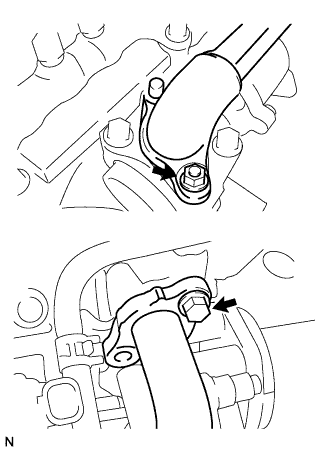
Temporarily install the bolt and nut as shown in the illustration.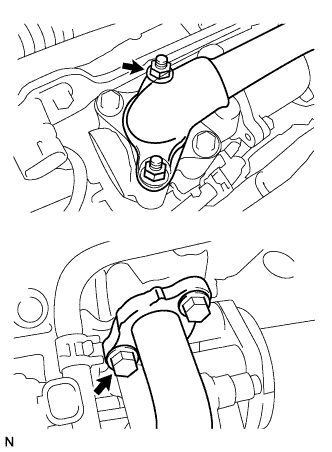
Tighten the 2 bolts holding the EGR pipe to the cylinder head.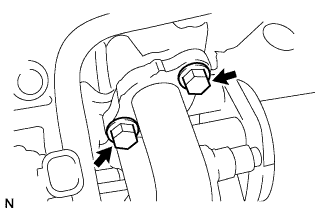
- Torque:
- 24 N*m{ 245 kgf*cm , 18 ft.*lbf }
Tighten the 2 nuts holding the EGR pipe to the EGR valve.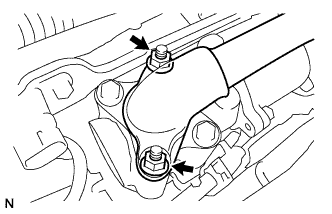
- Torque:
- 24 N*m{ 245 kgf*cm , 18 ft.*lbf }
| 33. INSTALL OIL DIPSTICK GUIDE |
Install a new O-ring to the dipstick guide.
Install the dipstick guide with the 2 bolts.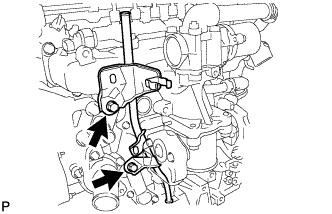
- Torque:
- 33 N*m{ 337 kgf*cm , 24 ft.*lbf }
| 34. INSTALL INJECTION OR SUPPLY PUMP ASSEMBLY (for CCo) |
Install the supply pump (Click here).
| 35. INSTALL INJECTION OR SUPPLY PUMP ASSEMBLY (for DPF) |
Install the supply pump (Click here)
| 36. INSTALL EXHAUST FUEL ADDITION INJECTOR ASSEMBLY (for DPF) |
Install a new gasket, the exhaust fuel addition injector and nozzle holder clamp with the washer and bolt.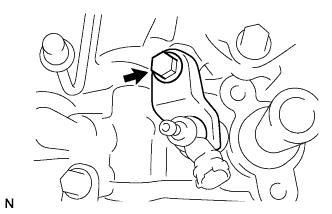
- Torque:
- 29 N*m{ 296 kgf*cm , 21 ft.*lbf }
- HINT:
- Install the nozzle holder clamp while holding it.
| 37. INSTALL FUEL TUBE SUB-ASSEMBLY (for DPF) |
Turn the retainer in the direction indicated by the arrow until the retainer stops.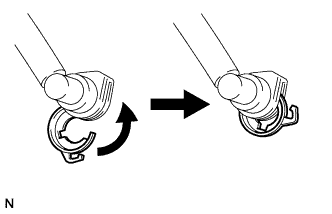
Install a new gasket and the fuel tube with the union bolt.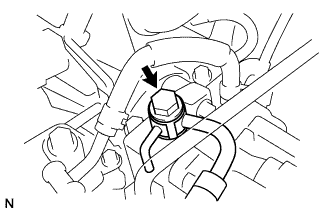
- Torque:
- 23 N*m{ 235 kgf*cm , 17 ft.*lbf }
Insert the fuel tube connector into the injector.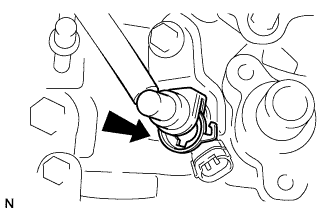
Turn the retainer in the direction indicated by the arrow until it makes a "click" sound.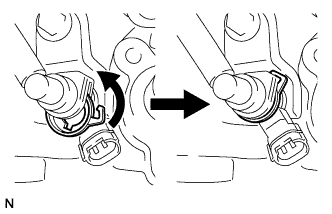
- NOTICE:
- If the fuel tube connector is not inserted in the correct position to the injector, the retainer cannot be turned farther than indicated by the arrow.
Connect the exhaust fuel addition injector connector.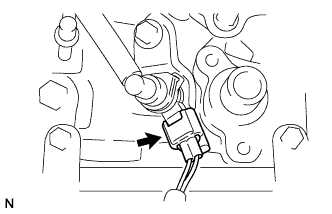
| 38. INSTALL FUEL HOSE PROTECTOR (for DPF) |
Install the bolt, then install the fuel hose protector.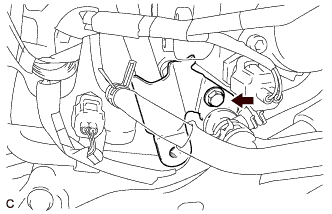
- Torque:
- 40 N*m{ 408 kgf*cm , 30 ft.*lbf }
| 39. INSTALL CAMSHAFT POSITION SENSOR |
Apply a light coat of engine oil to the O-ring of the sensor.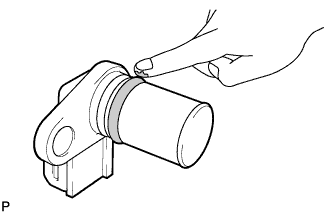
Install the sensor with the bolt.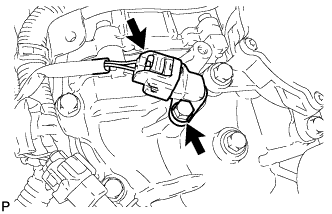
- Torque:
- 8.8 N*m{ 90 kgf*cm , 78 in.*lbf }
Connect the sensor connector.
| 40. INSTALL VACUUM PUMP ASSEMBLY |
Apply engine oil to the oil pipe at the tip of the vacuum pump.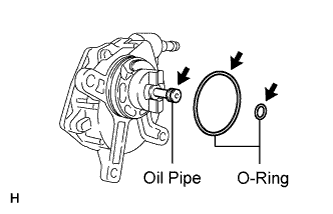
Coat 2 new O-rings with engine oil, and install them to the vacuum pump.
Install the vacuum pump so that the coupling teeth of the vacuum pump (labeled A) and the groove of the camshaft (labeled B) can engage.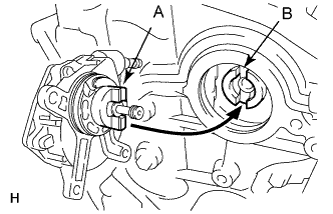
Install 3 new flange bolts.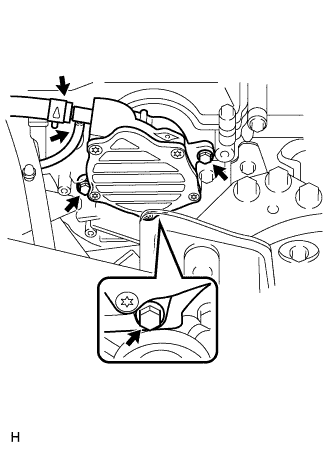
- Torque:
- 21 N*m{ 214 kgf*cm , 15 ft.*lbf }
Connect the 2 vacuum hoses.
| 41. INSTALL V-RIBBED BELT TENSIONER ASSEMBLY |
Install the tensioner with the 3 bolts.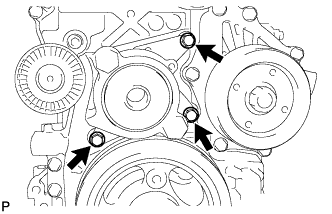
- Torque:
- 20 N*m{ 204 kgf*cm , 15 ft.*lbf }
| 42. INSTALL TRANSVERSE ENGINE MOUNTING BRACKET |
Set the mounting bracket.
Temporarily tighten the 2 bolts (B) and 2 nuts.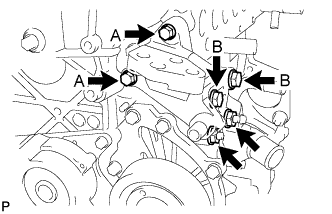
Tighten the 2 bolts (A).
- Torque:
- 28 N*m{ 286 kgf*cm , 21 ft.*lbf } for bolt A
Tighten the 2 bolts (B) and 2 nuts.
- Torque:
- 80 N*m{ 816 kgf*cm , 59 ft.*lbf } for bolt B, nut
| 43. INSTALL NO. 1 IDLER PULLEY ASSEMBLY |
Install the idler pulley with the bolt.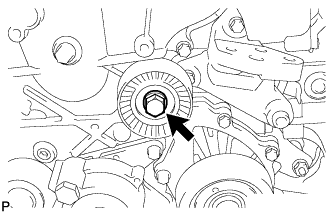
- Torque:
- 40 N*m{ 408 kgf*cm , 30 ft.*lbf }
Install the idler pulley cover plate.
| 44. INSTALL NO. 2 IDLER PULLEY SUB-ASSEMBLY |
Install the idler pulley with the bolt.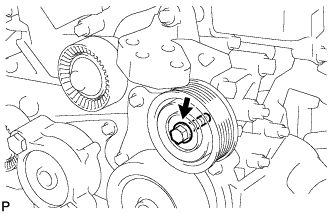
- Torque:
- 40 N*m{ 408 kgf*cm , 30 ft.*lbf }
| 45. INSTALL GENERATOR ASSEMBLY |
Install the generator with the 3 bolts.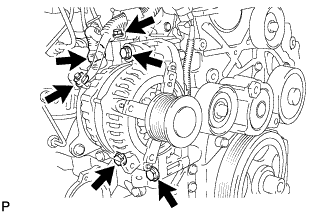
- Torque:
- 25 N*m{ 255 kgf*cm , 18 ft.*lbf }
- NOTICE:
- Be careful that the wire harness of the crankshaft position sensor does not get caught between the cylinder block and generator when installing the generator.
Connect the generator wire with the nut and bolt.
- Torque:
- 9.8 N*m{ 100 kgf*cm , 87 in.*lbf } for nut
- 7.7 N*m{ 79 kgf*cm , 68 in.*lbf } for bolt
Install the terminal cap.
Connect the generator connector.
| 46. INSTALL COMPRESSOR WITH PULLEY ASSEMBLY |
w/o Stud Bolt: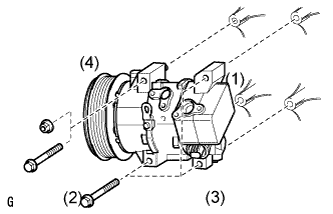
Install the cooler compressor with the 4 bolts.- Torque:
- 25 N*m{ 255 kgf*cm , 18 ft.*lbf }
- NOTICE:
- Tighten the bolts in the order shown in the illustration to install the cooler compressor.
w/ Stud Bolt:
Install the cooler compressor with the 3 bolts and nut.- Torque:
- 25 N*m{ 255 kgf*cm , 18 ft.*lbf }
- NOTICE:
- Tighten the bolts in the order shown in the illustration to install the cooler compressor.
Connect the connector.
| 47. INSTALL FAN AND GENERATOR V BELT |
Using SST and 22 mm wrench, rotate the tensioner pulley counterclockwise, and then install the V-ribbed belt.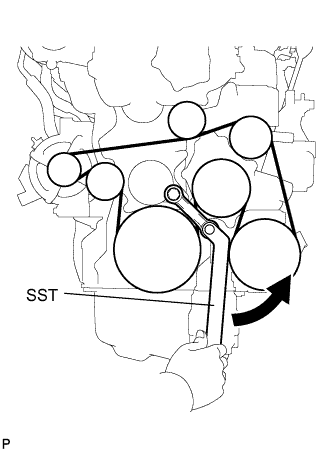
- SST
- 09216-42010
- NOTICE:
- Make sure that the V-ribbed belt is set properly at each pulley.
- Make sure SST is installed as shown in the illustration. If not, SST and/or the V-ribbed belt may not be able to be removed.
- Make sure that the V-ribbed belt is set properly at each pulley.
| 48. REMOVE ENGINE STAND |
Install a sling device and chain block.
Remove the engine stand.
| 49. INSTALL FLYWHEEL SUB-ASSEMBLY |
Hold the crankshaft with SST.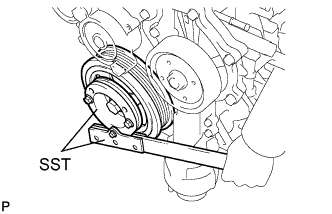
- SST
- 09213-58013
09330-00021
Using several steps, install and tighten 8 new bolts with a T55 "torx" socket wrench uniformly in the sequence shown in the illustration.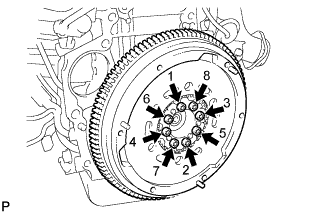
- HINT:
- Do not reuse the flywheel installation bolts.
- Be sure to check the tightening torque within 5 minutes after tightening.
- Do not impact or damage the flywheel installation bolts. Be sure to handle them carefully.
- Make sure that the seating surface of the flywheel installation bolts and the installation surfaces of the crankshaft and flywheel are free from oil or foreign matter.
- Do not reuse the flywheel installation bolts.
- Torque:
- 70.5 N*m{ 719 kgf*cm , 52 ft.*lbf }
| 50. INSTALL CLUTCH DISC ASSEMBLY |
Insert SST into the clutch disc, and then insert them into the flywheel.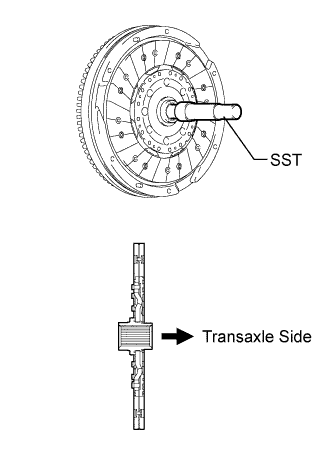
- SST
- 09301-00310
- NOTICE:
- Do not insert the clutch disc in the wrong direction.
| 51. INSTALL CLUTCH COVER ASSEMBLY |
Align the matchmarks on the clutch cover with the one on the flywheel.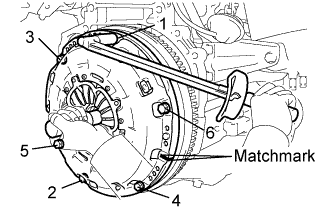
Tighten the 6 bolts uniformly in the order shown in the illustration, starting with the bolt located near the knock pin on the top.
- Torque:
- 19 N*m{ 195 kgf*cm , 14 ft.*lbf }
- NOTICE:
- Following the order in the illustration, make sure to uniformly tighten the bolts 180°.
- After checking that the disc is in the center, gently move SST up and down, and right and left to tighten the bolts.
- Following the order in the illustration, make sure to uniformly tighten the bolts 180°.
| 52. INSTALL MANUAL TRANSAXLE ASSEMBLY |
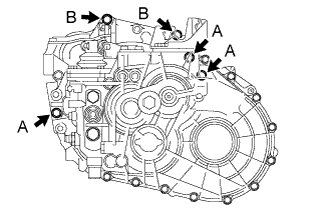 |
Align the input shaft with the clutch disc and install the transaxle to the engine.
Install the 10 bolts.
- Torque:
- 46 N*m{ 469 kgf*cm , 34 ft.*lbf } for bolt A
- 64 N*m{ 653 kgf*cm , 47 ft.*lbf } for bolt B
| 53. INSTALL STIFFENER PLATE LH |
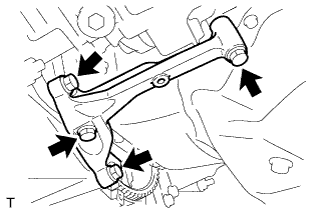 |
Install the stiffener plate with the 4 bolts.
- Torque:
- 46 N*m{ 469 kgf*cm , 34 ft.*lbf }
| 54. INSTALL STIFFENER PLATE RH |
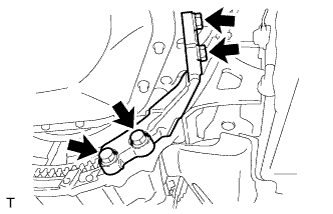 |
Install the stiffener plate with the 4 bolts.
- Torque:
- 46 N*m{ 469 kgf*cm , 34 ft.*lbf }
| 55. INSTALL OIL PAN INSULATOR |
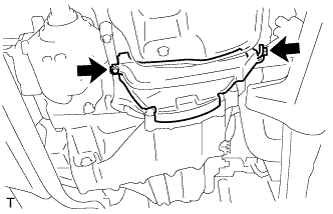 |
Install the insulator with the 2 bolts.
- Torque:
- 9.0 N*m{ 92 kgf*cm , 80 in.*lbf }
| 56. INSTALL STARTER ASSEMBLY |
Install the starter with the 2 bolts.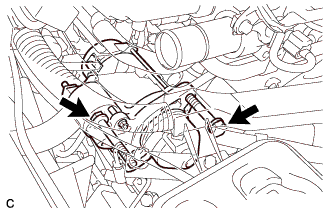
- Torque:
- 64 N*m{ 652 kgf*cm , 47 ft.*lbf }
Install the starter wire and nut with the terminal cap.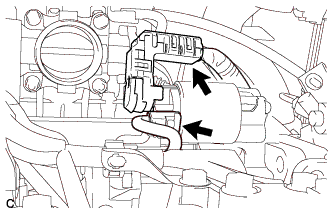
- Torque:
- 9.8 N*m{ 100 kgf*cm , 87 in.*lbf }
Connect the starter connector.
| 57. INSTALL ENGINE WIRE |
Install the engine wire to the engine.
| 58. INSTALL NO. 1 AIR TUBE |
Install the No.1 air tube with the 2 bolts.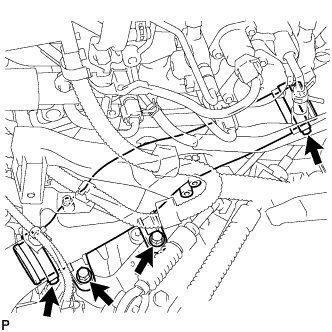
- Torque:
- 29 N*m{ 296 kgf*cm , 21 ft.*lbf }
Tighten the 2 clamps.
- Torque:
- 6.3 N*m{ 64 kgf*cm , 56 in.*lbf }
Install the wire harness with the 2 bolts.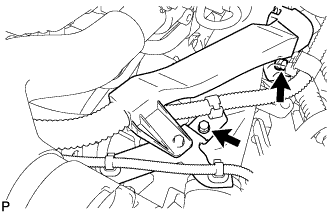
- Torque:
- 7.5 N*m{ 76 kgf*cm , 66 in.*lbf }
| 59. INSTALL FRONT SUSPENSION CROSSMEMBER SUB-ASSEMBLY |
Attach the engine together with the transaxle to the suspension crossmember and mounting.
Install the bolt which secures the engine mounting bracket to the mounting insulator.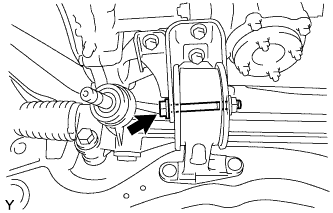
- Torque:
- 95 N*m{ 969 kgf*cm , 70 ft.*lbf }
| 60. INSTALL FRONT CROSS MEMBER SUB-ASSEMBLY |
Install the bolt and nut which secures the engine mounting bracket to the mounting insulator.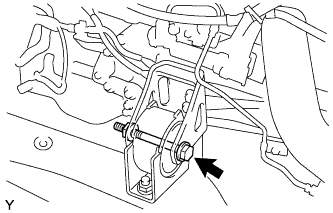
- Torque:
- 145 N*m{ 1,479 kgf*cm , 107 ft.*lbf }
| 61. INSTALL ENGINE WITH TRANSAXLE |
Place the engine on an engine lifter.
- HINT:
- Place the engine on wooden blocks or equivalent so that the engine is level.
Using the chain block, slowly install the engine to the vehicle and the intermediate shaft to the pinion.
- CAUTION:
- Do not raise the engine more than necessary. If the engine is raised excessively, the vehicle may also be lifted up.
- NOTICE:
- Make sure that the engine is clear of all wiring and hoses.
- While raising the engine into the vehicle, do not allow it to contact the vehicle.
- Align the matchmarks on the intermediate shaft and pinion.
- Make sure that the engine is clear of all wiring and hoses.
Temporarily install the suspension member, crossmember with the 10 bolts.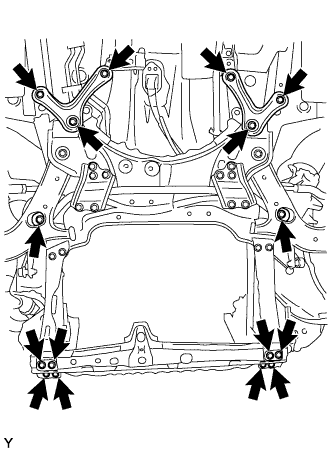
Temporarily install the member brace rear RH and LH with the 6 bolts.
Install the engine mounting insulator LH with the bolt and nut.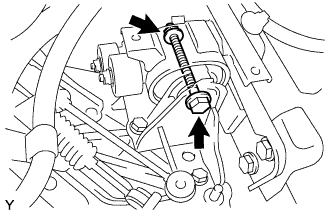
- Torque:
- 56 N*m{ 571 kgf*cm , 41 ft.*lbf }
- NOTICE:
- While holding the bolt in place, tighten the nut.
Install the engine mounting insulator RH with the 2 bolts and 2 nuts.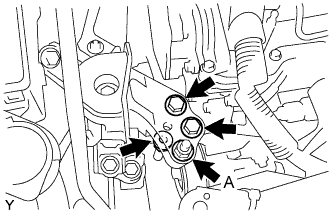
- Torque:
- 95 N*m{ 969 kgf*cm , 70 ft.*lbf } for bolt, nut A
- 52 N*m{ 530 kgf*cm , 38 ft.*lbf } for nut
Tighten the suspension member and crossmember's bolts.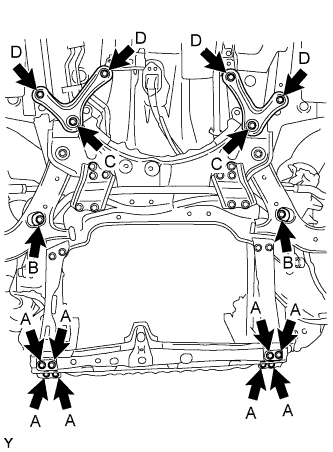
- Torque:
- 96 N*m{ 979 kgf*cm , 71 ft.*lbf } for bolt A
- 145 N*m{ 1,478 kgf*cm , 107 ft.*lbf } for bolt B
Tighten the member brace rear's bolts.
- Torque:
- 145 N*m{ 1,478 kgf*cm , 107 ft.*lbf } for bolt C
- 93 N*m{ 948 kgf*cm , 69 ft.*lbf } for bolt D
Remove the sling device and chain block.
Remove the 2 bolts and No. 1 and No. 2 engine hangers.
| 62. INSTALL FRONT DRIVE SHAFT ASSEMBLY |
Install the drive shaft (Click here).
| 63. INSTALL PROPELLER WITH CENTER BEARING SHAFT ASSEMBLY |
Install the propeller shaft (Click here).
| 64. INSTALL FRONT EXHAUST PIPE ASSEMBLY (for CCo) |
Install the exhaust pipe (Click here).
| 65. INSTALL FRONT EXHAUST PIPE ASSEMBLY (for DPF) |
Install the exhaust pipe (Click here)
| 66. CONNECT CLUTCH RELEASE CYLINDER ASSEMBLY |
Connect the release cylinder and flexible hose bracket with the 5 bolts.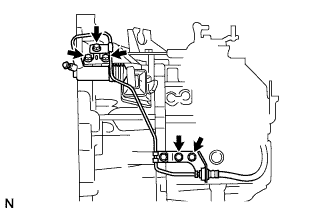
- Torque:
- 12 N*m{ 122 kgf*cm , 9 ft.*lbf }
| 67. CONNECT TRANSMISSION CONTROL CABLE ASSEMBLY |
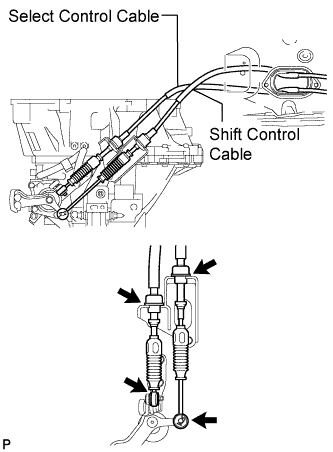 |
Connect the 2 cable ends with the 2 washers and 2 clips.
Install 2 new clips to the control cable bracket.
| 68. CONNECT SUCTION HOSE SUB-ASSEMBLY |
Remove the attached vinyl tape from the hose.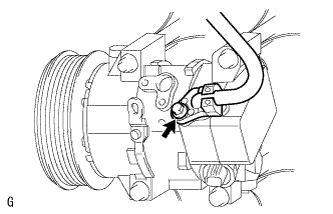
Sufficiently apply compressor oil to a new O-ring and the fitting surface of the cooler compressor.
- Compressor oil:
- ND-OIL 8 or equivalent
Install the O-ring on the cooler refrigerant suction hose.
Install the cooler refrigerant suction hose on the cooler compressor with the bolt.
- Torque:
- 9.8 N*m{ 100 kgf*cm , 7 ft.*lbf }
| 69. INSTALL DISCHARGE HOSE SUB-ASSEMBLY |
Install the discharge hose for compressor with the bolt.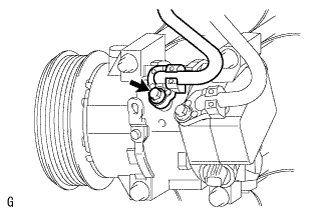
- Torque:
- 9.8 N*m{ 100 kgf*cm , 7 ft.*lbf }
| 70. INSTALL RADIATOR AND INTERCOOLER |
- NOTICE:
- When reusing the air hose or air tube, check that there is no damage and foreign objects. If necessary, clean it.
Align the intercooler with the radiator, and then install the intercooler to the radiator with the 4 bolts.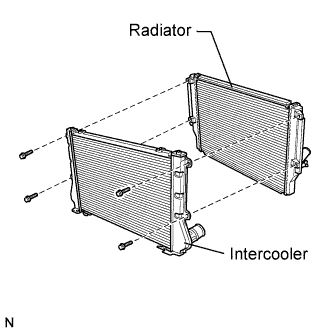
- Torque:
- 6.0 N*m{ 61 kgf*cm , 53 in.*lbf }
Install the No. 2 air tube to the intercooler and No. 3 air hose.
Install the bolt.
- Torque:
- 31 N*m{ 316 kgf*cm , 23 ft.*lbf }
Tighten the 2 clamps as shown in the illustration.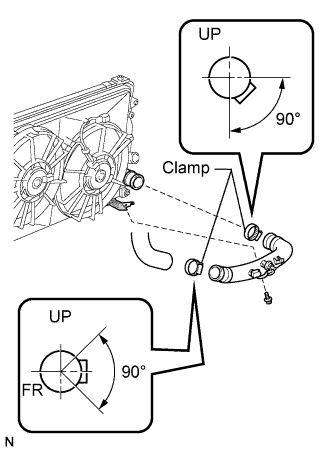
Install the No. 2 air hose to the intercooler. Tighten the clamp as shown in the illustration.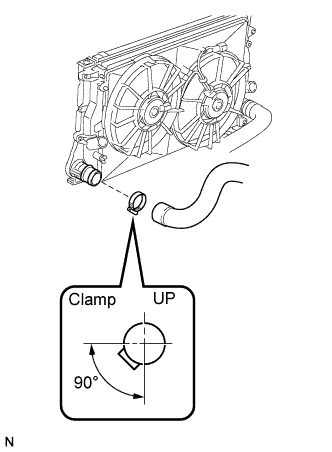
Install the radiator (with intercooler) to the vehicle.
Connect the No. 2 and No. 3 air hoses to the engine.
Tighten the 2 clamps as shown in the illustration.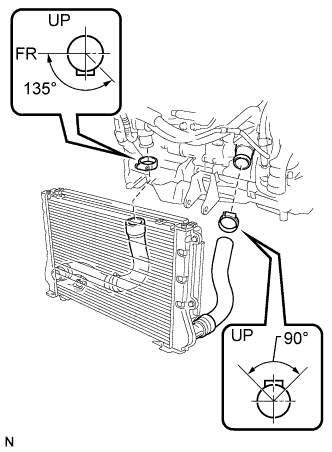
| 71. CONNECT OUTLET RADIATOR HOSE |
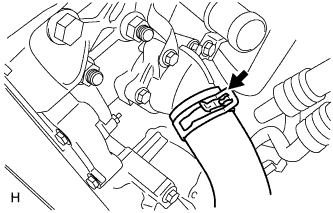 |
Connect the outlet radiator hose to the engine.
Position the clip as illustrated.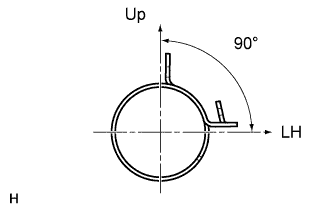
| 72. CONNECT INLET RADIATOR HOSE |
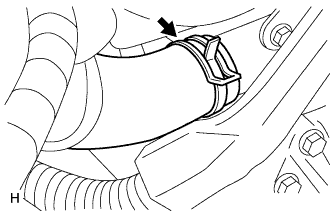 |
Connect the inlet radiator hose to the engine.
Position the clip as illustrated.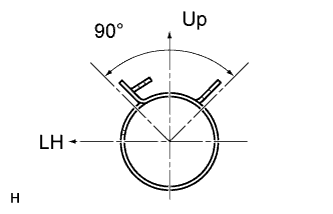
| 73. INSTALL RADIATOR SUPPORT UPPER |
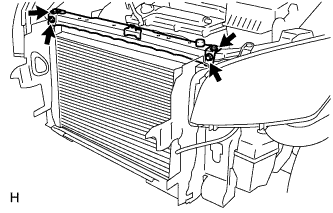 |
Install the radiator support upper with the 4 bolts.
- Torque:
- 29 N*m{ 296 kgf*cm , 21 ft.*lbf }
| 74. INSTALL HOOD LOCK ASSEMBLY |
Connect the cable to the lock.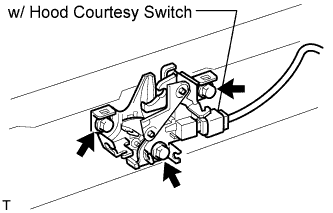
Install the lock with the 3 bolts.
- Torque:
- 8.0 N*m{ 82 kgf*cm , 71 in.*lbf }
Adjust the lock.
w/ Hood courtesy switch:
Connect the connector.
| 75. INSTALL COOLER CONDENSER ASSEMBLY |
Install the cooler condenser.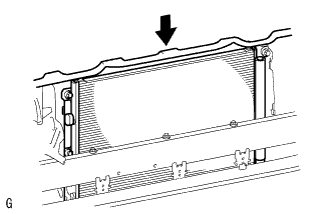
| 76. INSTALL RADIATOR SUPPORT UPPER BRACKET |
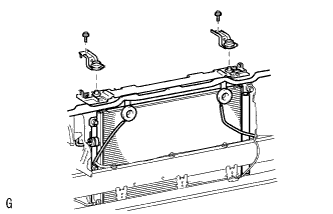 |
Install the 2 brackets with the 2 bolts.
- Torque:
- 45 N*m{ 459 kgf*cm , 33 ft.*lbf }
| 77. INSTALL FRONT BUMPER REINFORCEMENT SUB-ASSEMBLY UPPER |
Install the reinforcement and install the 2 bolt.
Connect the 2 horns connectors.
| 78. INSTALL FRONT BUMPER |
Install the front bumper (Click here).
| 79. INSTALL RADIATOR RESERVE TANK ASSEMBLY |
Install the reservoir with the 2 bolts.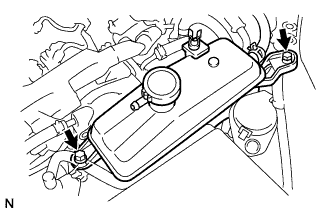
- Torque:
- 5.0 N*m{ 51 kgf*cm , 44 in.*lbf }
| 80. INSTALL ECM |
Install the 2 ECM brackets with the 4 screws.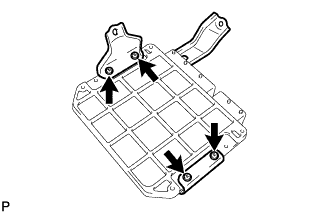
- Torque:
- 3.0 N*m{ 30 kgf*cm , 27 in.*lbf }
Connect the 2 ECM connectors.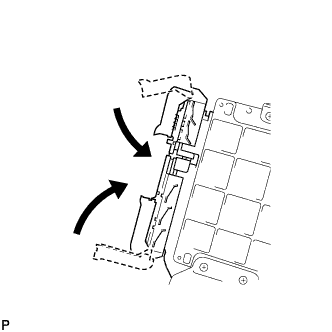
Connect the 2 connectors to the ECM and lower the 2 levers.
- NOTICE:
- Make sure that the 2 levers are securely lowered.
Install the ECM with the 3 bolts.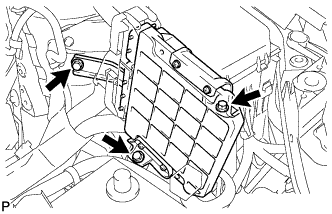
- Torque:
- 6.5 N*m{ 66 kgf*cm , 57 in.*lbf }
| 81. CONNECT HOSES AND CONNECTORS |
Install the vacuum switching valve bracket and vacuum transmitting pipe with the 3 bolts.
- Torque:
- 9.0 N*m{ 92 kgf*cm , 80 in.*lbf }
Connect the 2 ECM connectors.
Connect the 2 heater hoses.
Connect the 2 fuel hoses.
Connect the vacuum pump hose.
Connect the 2 injector driver connectors.
Connect the starter wire with the nut.
- Torque:
- 9.8 N*m{ 100 kgf*cm , 7 ft.*lbf }
Connect the 3 connectors and wire with the nut.
- Torque:
- 12 N*m{ 122 kgf*cm , 9 ft.*lbf }
Install the engine room junction block cover (upper).
| 82. INSTALL AIR CLEANER BRACKET |
Install the bracket with the 3 bolts.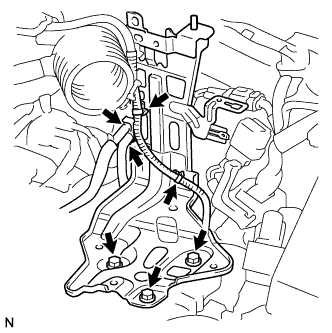
- Torque:
- 7.5 N*m{ 76 kgf*cm , 66 in.*lbf }
Connect the 2 fuel hoses to the bracket.
Connect the 2 wire harness clamps.
Install the glow plug relay and connect the fuel filter level switch connector.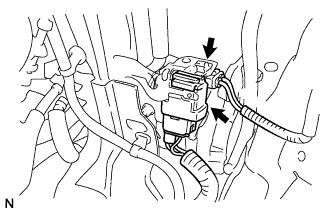
| 83. INSTALL FUEL FILTER ASSEMBLY |
Install the fuel filter with the bolt.
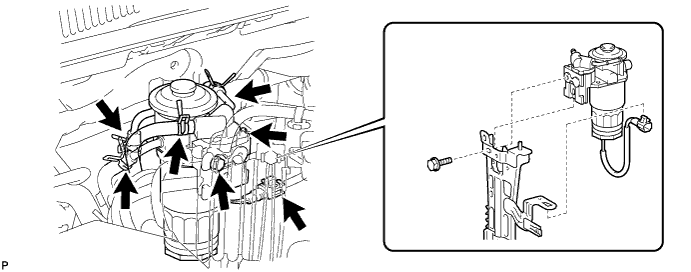
- Torque:
- 7.0 N*m{ 71 kgf*cm , 62 in.*lbf }
Connect the 4 hoses.
Connect the level warning switch connector.
| 84. INSTALL AIR CLEANER CASE |
Install the air cleaner case with the 3 bolts and connect the wire harness clamp.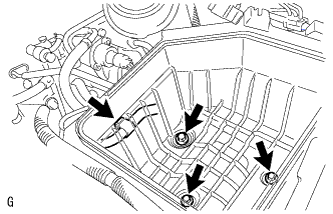
- Torque:
- 5.0 N*m{ 51 kgf*cm , 44 in.*lbf }
Install the air cleaner element.
| 85. INSTALL AIR CLEANER CAP SUB-ASSEMBLY |
Insert the hinge parts of the air cleaner cap into the air cleaner case, and then hang the 3 hook clamps.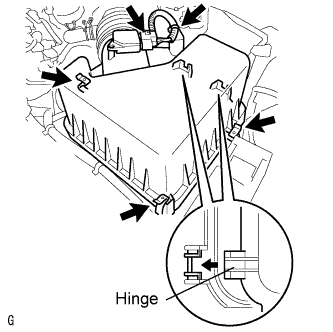
Connect the mass air flow meter connector.
Connect the wire harness clamp.
| 86. INSTALL BATTERY BRACKET REINFORCEMENT |
Install the bracket reinforcement with the 2 bolts.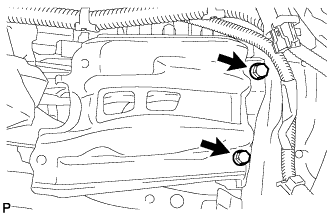
- Torque:
- 19 N*m{ 194 kgf*cm , 14 ft.*lbf }
| 87. INSTALL FRONT BATTERY BRACKET |
Install the front bracket with the 4 bolts.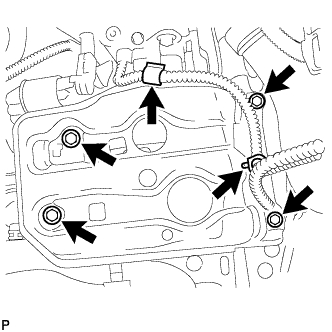
- Torque:
- 19 N*m{ 194 kgf*cm , 14 ft.*lbf }
Attach the 2 wire harness clamps.
| 88. INSTALL BATTERY |
| 89. INSTALL BATTERY CLAMP SUB-ASSEMBLY |
Attach the hook of the battery clamp to the front battery bracket.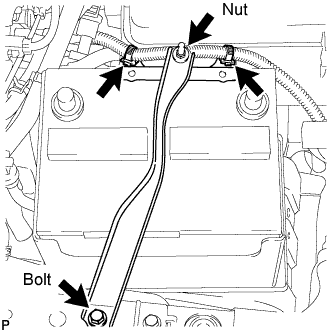
Temporarily tighten the nut and install the bolt.
Adjust the battery clamp's position.
Fully tighten the nut and bolt.
- Torque:
- 5.0 N*m{ 51 kgf*cm , 44 in.*lbf }
Attach the 2 wire harness clamps.
| 90. CONNECT CABLE TO NEGATIVE BATTERY TERMINAL |
| 91. INSTALL HOOD SUB-ASSEMBLY |
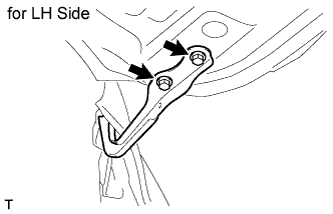 |
Install the hood with the 4 bolts.
- Torque:
- 13.0 N*m{ 133 kgf*cm , 10 ft.*lbf }
Adjust the hood position (Click here).
| 92. ADD MANUAL TRANSAXLE OIL |
Stop the vehicle in a level place.
Remove the transmission filler plug and the gasket.
Check that the oil level is between 0 to 5 mm (0 to 0.20 in.) from the bottom lip of the filler plug opening. If the result is not as specified, add transmission oil.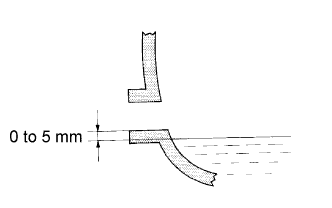
- Oil grade:
- GL-4
- Viscosity:
- SAE 75W
- Standard capacity:
- 2.1 liters (2.2 US qts, 1.8 Imp. qts)
- NOTICE:
- Too much or too little oil may cause trouble.
- After adjusting the oil level, drive the vehicle and check the oil level again.
- Too much or too little oil may cause trouble.
Check for oil leakage if the oil level is low.
Install the transmission filler plug and a new gasket.
- Torque:
- 39 N*m{ 400 kgf*cm , 29 ft.*lbf }
| 93. ADD TRANSFER OIL |
Remove the case plug (for filler) and gasket.
Pour oil so that the oil level is between 0 to 5.0 mm (0 to 0.197 in.) from the bottom lip of the case plug (for filler) hole.
- NOTICE:
- When adding oil, pour it slowly.
- Add oil a little at a time, waiting several minutes between each addition of oil.
- When adding oil, pour it slowly.
Wait approximately 5 minutes and check that the oil level has not changed.
Install a new gasket and the case plug (for filler).
- Torque:
- 39 N*m{ 398 kgf*cm , 28 ft.*lbf }
| 94. ADD ENGINE OIL |
Wipe the oil pan and drain plug before installing the plug.
Install a new gasket and the oil pan drain plug.
- Torque:
- 38 N*m{ 387 kgf*cm , 28 ft.*lbf }
Close the oil pan drain service cover and install the clip.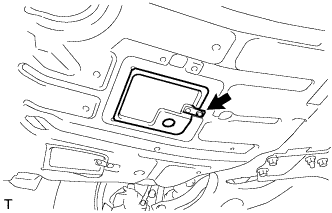
Add new oil.
- Standard oil capacity:
Item
Specified Condition
Drain and refill with oil filter change
5.9 liters ( 6.2 US qts, 5.2 Imp. qts)
Drain and refill without oil filter change
5.5 liters ( 5.8 US qts, 4.8 Imp. qts)
Dry fill
6.7 liters ( 7.1 US qts, 5.9 Imp. qts)
Install the oil filler cap.
| 95. ADD ENGINE COOLANT |
Tighten the radiator drain cock plug by hand.
Tighten the cylinder block drain cock plug.
- Torque:
- 12.7 N*m{ 130 kgf*cm , 10 ft.*lbf }
Add TOYOTA Super Long Life Coolant (SLLC) to the radiator reservoir filler opening.
Continue adding TOYOTA SLLC until it is filled to the B line.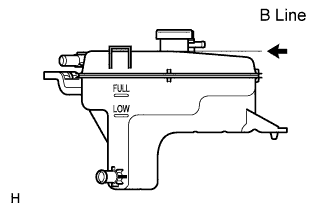
- HINT:
- The B line is the lower edge of the inner wall of the filler neck.
- Standard capacity:
Item
Specified Condition
w/o Combustion Type Power Heater
7.3 liters
(7.7 US qts, 6.4 Imp. qts)
w/ Combustion Type Power Heater
7.7 liters
(8.1 US qts, 6.8 Imp. qts)
- HINT:
- TOYOTA vehicles are filled with TOYOTA SLLC at the factory. In order to avoid damage to the engine cooling system and other technical problems, only use TOYOTA SLLC or similar high quality ethylene glycol based non-silicate, non-amine, non-nitrite, non-borate coolant with long-life hybrid organic acid technology (coolant with long-life hybrid organic acid technology consists of a combination of low phosphates and organic acids).
- NOTICE:
- Never use water as a substitute for engine coolant.
Press the inlet and outlet radiator hoses several times by hand, and then check the level of the coolant.
If the coolant level drops below the B line, add TOYOTA SLLC to the B line.
Install the radiator reservoir cap.
Start the engine, and warm it up until the cooling fan operates.
Set the air conditioning as follows while warming up the engine.
Item
Specified Condition
Manual Air Conditioning System
Fan speed - Any setting except "OFF"
Temperature - Toward WARM
Air conditioning switch "OFF"
Automatic Air Conditioning System
Temperature - Toward MAX
Air conditioning switch "OFF"
Maintain the engine speed at 2,000 to 2,500 rpm and warm up the engine until the cooling fan operates.
- NOTICE:
- Make sure that the radiator reservoir still has some coolant in it.
- Pay attention to the needle of the water temperature meter. Make sure that the needle does not show an abnormally high temperature.
- If there is not enough coolant, the engine may burn out or overheat.
- Immediately after starting the engine, if the radiator reservoir does not have any coolant, perform the following: 1) stop the engine, 2) wait until the coolant has cooled down, and 3) add coolant until the coolant is filled to the B line.
- Until the coolant level has stabilized, run the engine at 2,000 rpm.
- Make sure that the radiator reservoir still has some coolant in it.
Press the inlet and outlet radiator hoses several times by hand to bleed air.
- CAUTION:
- When pressing the radiator hoses:
- Wear protective gloves.
- Be careful as the radiator hoses are hot.
- Keep your hands away from the radiator fan.
- Wear protective gloves.
Stop the engine and wait until the coolant cools down to ambient temperature.
Check that the coolant level is between the FULL and LOW line.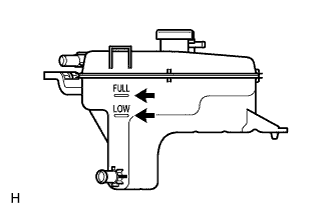
If the coolant level is below the LOW line, repeat all of the procedures above.
If the coolant level is above the FULL line, drain coolant so that the coolant level is between the FULL and LOW line.
| 96. BLEED AIR FROM FUEL SYSTEM |
Using the hand pump, bleed air from the fuel system until pumping becomes difficult.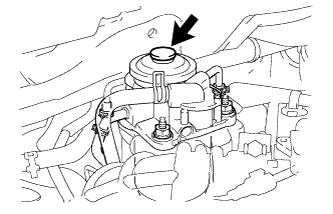
| 97. REGISTRATION OF INJECTOR COMPENSATION CODE (for CCo) |
Register injector compensation code (Click here).
| 98. REGISTRATION OF INJECTOR COMPENSATION CODE (for DPF) |
Register injector compensation code (Click here).
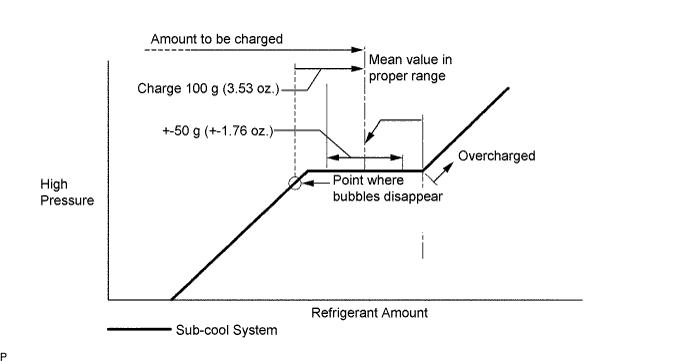
| 99. CHARGE REFRIGERANT |
Perform vacuum purging using a vacuum pump.
Charge refrigerant HFC-134a (R134a).
- Standard:
- 430 +-30 g (15.2 +-1.1 oz.)
- SST
- 07110-58060
(07117-58060, 07117-58070, 07117-58080, 07117-58090, 07117-78050, 07117-88060, 07117-88070, 07117-88080)
- NOTICE:
- Do not operate the cooler compressor before charging refrigerant as the cooler compressor will not work properly without any refrigerant, and will overheat.
- Approximately 100 g (3.53 oz.) of refrigerant may need to be charged after bubbles disappear. The refrigerant amount should be checked by measuring its quantity, and not with the sight glass.
- Do not operate the cooler compressor before charging refrigerant as the cooler compressor will not work properly without any refrigerant, and will overheat.
| 100. CHECK ENGINE OIL LEAKS |
Start the engine. Make sure that no oil leaks from the connection point of the oil filter cap assembly.
| 101. CHECK ENGINE COOLANT LEAKS |
Remove the radiator reservoir cap.
- CAUTION:
- To avoid the danger of being burned, do not remove the radiator reservoir cap while the engine and radiator are still hot. Thermal expansion will cause hot engine coolant and steam to blow out from the radiator.
Fill the radiator with coolant, and then attach a radiator cap tester.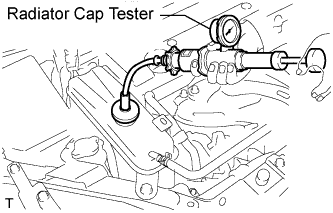
Warm up the engine.
Pump the radiator cap tester to 137 kPa (1.4 kgf/cm2, 19 psi), and then check that the pressure does not drop.
If the pressure drops, check the hoses, radiator and water pump for leakage.
If there are no signs of external coolant leaks, check the heater core, cylinder block and head.
Reinstall the radiator cap.
| 102. CHECK FUEL LEAKS |
PERFORM ACTIVE TEST
Connect the intelligent tester to the DLC3.
Start the engine.
Turn the intelligent tester ON.
Enter the following menus: Powertrain / Engine / Active Test.
Perform the Active Test.
Intelligent Tester Display
Test Details
Control Range
Diagnostic Notes
Test the Fuel Leak
Pressurizing common rail internal fuel pressure, and checking for fuel leaks
Stop/Start
- Fuel pressure inside common rail pressurized to specified value and engine speed increased to 2,000 rpm when start is selected
- Above conditions to be maintained while test is started
- Fuel pressure inside common rail pressurized to specified value and engine speed increased to 2,000 rpm when start is selected
| 103. CHECK EXHAUST GAS LEAKS (for CCo) |
| 104. CHECK EXHAUST GAS LEAKS (for DPF) |
| 105. CHECK FOR LEAKAGE OF REFRIGERANT |
After recharging the refrigerant gas, check for refrigerant gas leakage using a halogen leak detector.
Perform the operation under these conditions:
- Stop the engine.
- Secure good ventilation (the gas leak detector may react to volatile gases other than refrigerant, such as evaporated gasoline or exhaust gas).
- Repeat the test 2 or 3 times.
- Make sure that some refrigerant remains in the refrigeration system. When compressor is off: approximately 392 to 588 kPa (4 to 6 kgf/cm2, 57 to 85 psi)
- Stop the engine.
Using a gas leak detector, check the refrigerant line for leakage.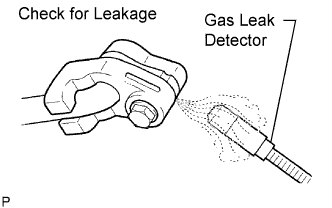
If a gas leak is not detected on the drain hose, remove the blower motor control (blower resistor) from the cooling unit. Insert the gas leak detector sensor into the unit and perform the test.
Disconnect the connector and leave the pressure switch on for approximately 20 minutes. Bring the gas leak detector close to the pressure switch and perform the test.
| 106. ADJUST TRANSMISSION CONTROL CABLE ASSEMBLY |
- HINT:
- After the shift lever or the shift cable is replaced, be sure to adjust the transmission control cable assembly.
- If the shift lever does not move (or the shift lever is difficult to move) to the 1st or 2nd position, or if it is possible to move the shift lever to the reverse position without pulling up the slider shaft, the length of the cable must be adjusted.
- After the shift lever or the shift cable is replaced, be sure to adjust the transmission control cable assembly.
To release the lock (lock condition to lock release condition).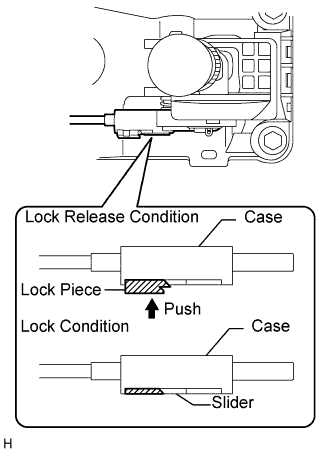
- HINT:
- While holding the shift lever in the reverse direction, lock the cable length adjustment mechanism of the select cable.
Pressing the shift and select lever shaft (*1) and pin (*2), push in pin (*3) and check that the shift and select lever shaft is secured at the 1st-2nd gear selected position (the shaft comes to a stop at the position 8 mm (0.31 in.) below the N position).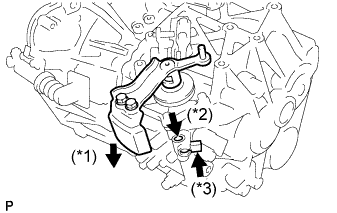
Remove the stopper pin, release the lock, and reinsert the stopper pin.
Turn the shift lever in the reverse direction without pulling up the slider shaft.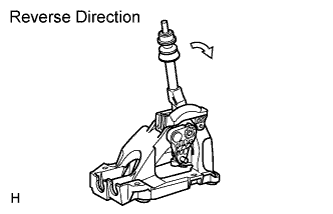
While holding the shift lever in the reverse direction, lock the cable length adjustment mechanism of the select cable.
Release the pin that fixes the transmission outer lever.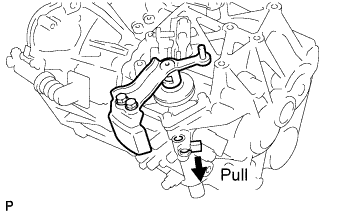
Pull the pin toward the left front side of the vehicle.
for new shift lever: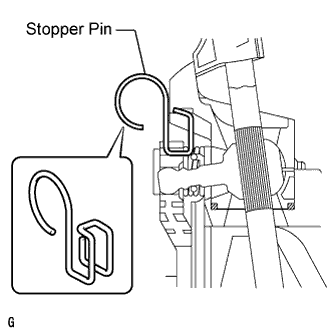
Remove the stopper pin and dispose of it.
| 107. INSTALL FRONT FLOOR COVER |
Install the floor cover with the 3 clips, bolt, nut.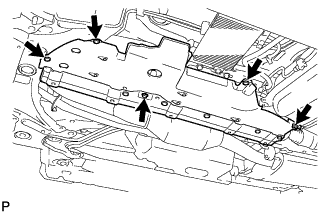
| 108. INSTALL NO. 2 ENGINE UNDER COVER |
Install the under cover with the 2 clips.
| 109. INSTALL ENGINE UNDER COVER REAR LH |
Install the under cover with the 2 clips.
| 110. INSTALL ENGINE UNDER COVER REAR RH |
Install the under cover with the 2 clips.
| 111. INSTALL NO. 1 ENGINE UNDER COVER |
Install the under cover with the 4 bolts and 12 clips.
| 112. INSTALL NO. 1 ENGINE COVER |
Attach the 4 clips to install the engine cover.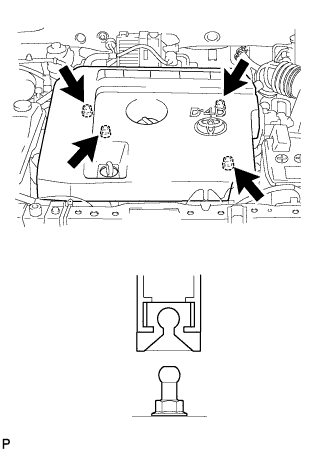
| 113. INSTALL RADIATOR SUPPORT OPENING COVER |
Install the cover with the 9 clips.
| 114. ADJUST FRONT WHEEL ALIGNMENT |
Adjust the front wheel alignment (Click here).
| 115. CHECK IDLE SPEED |
- NOTICE:
- When checking the idle speed, shift the transmission to the neutral position.
- HINT:
- For more information about the intelligent tester, refer to its operator's manual.
- If an intelligent tester is not available, use a tachometer's tester probe as a substitute.
- For more information about the intelligent tester, refer to its operator's manual.
Warm up and stop the engine.
Connect the intelligent tester to the DLC3.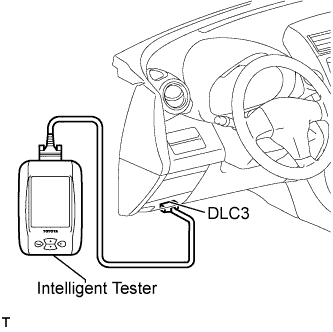
Turn the ignition switch on (IG).
Select the item:
Powertrain / Engine / Data List / Engine SPD.- HINT:
- Refer to the intelligent tester operator's manual if you need help to select Data List.
Inspect the engine idle speed.
- HINT:
- Turn all the electrical system and the A/C OFF.
- Inspect the engine idle speed with the cooling fan OFF.
- Turn all the electrical system and the A/C OFF.
- Standard idle speed:
- 750 to 850 rpm
Turn the ignition switch off.
Disconnect the intelligent tester from the DLC3.
| 116. CHECK MAXIMUM ENGINE SPEED |
Start the engine.
Depress the accelerator pedal to the limit.
Check the maximum engine speed.
- Maximum engine speed:
- 5,100 to 5,250 rpm