REMOVAL
Removal / installation · Vehicles built from Aug 2007
| 1. DISCHARGE REFRIGERANT FROM REFRIGERATION SYSTEM |

Start up the engine.
Turn the A/C switch ON.
Operate the cooler compressor with an engine speed of approximately 1,000 rpm for 5 to 6 minutes to circulate the refrigerant and collect the compressor oil remaining in each component into the cooler compressor.
Stop the engine.
Using SST, discharge the refrigerant gas.
- SST
- 07110-58060
(07117-58060, 07117-58070, 07117-58080, 07117-58090, 07117-78050, 07117-88060, 07117-88070, 07117-88080)
| 2. DISCHARGE FUEL SYSTEM PRESSURE |
- CAUTION:
- The "DISCHARGE FUEL SYSTEM PRESSURE" procedures must be performed before disconnecting any part of the fuel system.
- After performing the "DISCHARGE FUEL SYSTEM PRESSURE" procedures, pressure will remain in the fuel lines. When disconnecting a fuel line, cover it with a shop rag or a piece of cloth to prevent fuel from spraying or coming out.
- The "DISCHARGE FUEL SYSTEM PRESSURE" procedures must be performed before disconnecting any part of the fuel system.
Remove the console box (Click here).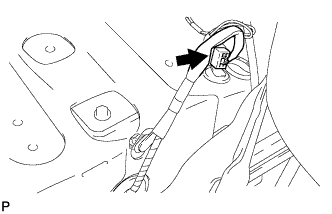

Start the engine. After the engine has stopped, turn the ignition switch off.
- HINT:
- DTC P0171/P0172 (system too lean) may be set.
Check that the engine does not start.
Remove the fuel tank cap, and let the air out of the fuel tank.
Connect the connector.
Install the console box (Click here).
| 3. DISCONNECT CABLE FROM NEGATIVE BATTERY TERMINAL |
| 4. REMOVE NO. 1 ENGINE UNDER COVER |
Remove the 2 bolts, 4 screw, 10 clips and under cover.
| 5. REMOVE REAR ENGINE UNDER COVER RH |
Remove the 2 clips and under cover.
| 6. REMOVE REAR ENGINE UNDER COVER LH |
Remove the 2 clips and under cover.
| 7. REMOVE NO. 2 ENGINE UNDER COVER |
Remove the 2 clips and under cover.
| 8. DRAIN ENGINE COOLANT |
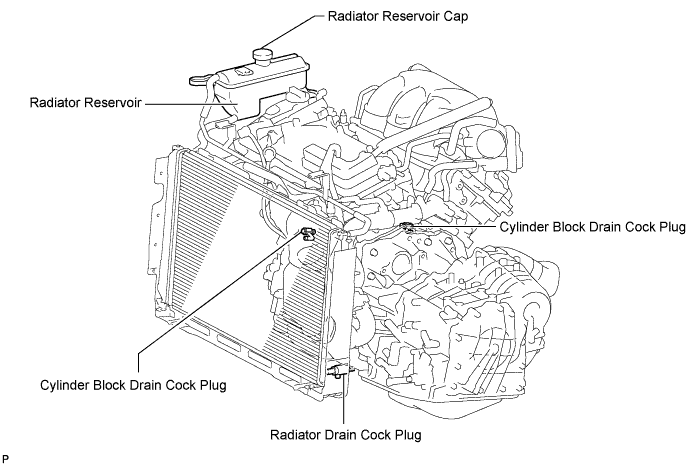
Loosen the radiator drain cock plug.
- HINT:
- Collect the coolant in a container and dispose of it according to the regulations in your area.
Remove the radiator reservoir cap.
- CAUTION:
- Do not remove the radiator reservoir cap while the engine and radiator are still hot. Pressurized, hot engine coolant and steam may be released and cause serious burns.
Loosen the 2 cylinder block drain cock plugs.
| 9. DRAIN ENGINE OIL |
Remove the oil filler cap.
Remove the oil drain plug and gasket, and drain the engine oil into a container.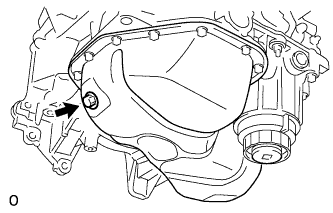
| 10. DRAIN AUTOMATIC TRANSAXLE FLUID |
Remove the drain plug and gasket, and drain the ATF.
Install a new gasket and the drain plug.
- Torque:
- 49 N*m{ 500 kgf*cm , 36 ft.*lbf }
| 11. DRAIN TRANSFER OIL |
Remove the drain plug and gasket, and drain the oil.
Install a new gasket and the drain plug.
- Torque:
- 39 N*m{ 398 kgf*cm , 28 ft.*lbf }
| 12. REMOVE HOOD SUB-ASSEMBLY |
Remove the hood sub-assembly (Click here).
| 13. REMOVE V-BANK COVER SUB-ASSEMBLY |
Detach the 3 clips and remove the V-bank cover.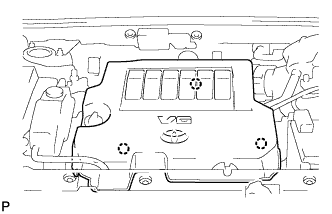
| 14. REMOVE RADIATOR SUPPORT OPENING COVER |
Remove the 9 clips and cover.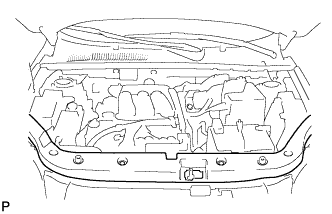
| 15. REMOVE BATTERY CLAMP SUB-ASSEMBLY |
Remove the bolt and loosen the nut.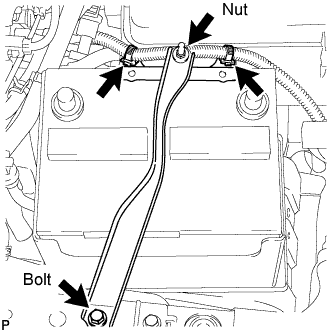
Detach the 2 wire harness clamps.
Detach the hook of the battery clamp from the front battery bracket, and then remove the battery clamp.
| 16. REMOVE BATTERY |
Remove the battery and battery insulator.
| 17. REMOVE FRONT BATTERY BRACKET |
Detach the 2 wire harness clamps.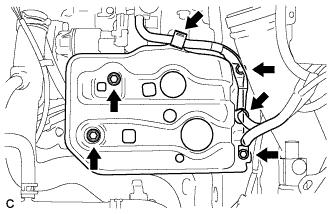
Remove the 4 bolts and front bracket.
| 18. REMOVE BATTERY BRACKET REINFORCEMENT |
Remove the 2 bolts and bracket reinforcement.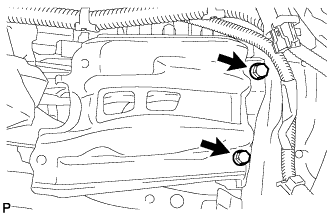
| 19. REMOVE AIR CLEANER CAP SUB-ASSEMBLY |
Disconnect the mass air flow meter connector.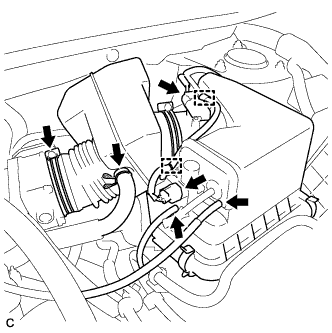
Disconnect the VSV (air intake control) connector.
Disconnect the 2 wire harness clamps and 2 vacuum hoses.
Disconnect the No. 2 ventilation hose from the air cleaner hose.
Loosen the No. 1 air cleaner hose clamp.
Unfasten the 2 hook clamps, and then remove the air cleaner cap.
Remove the air cleaner filter element from the air cleaner case.
| 20. REMOVE AIR CLEANER CASE |
Disconnect the harness clamp.
Remove the 3 bolts and air cleaner case.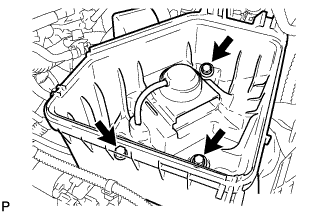
| 21. REMOVE ECM |
Remove the 3 bolts of the ECM bracket.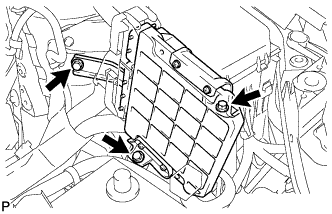
Disconnect the 2 ECM connectors.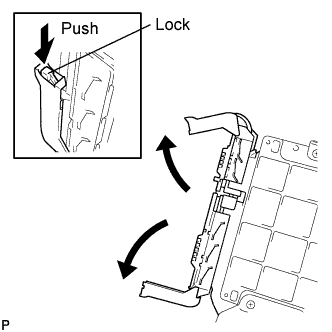
- NOTICE:
- After disconnecting the connector, make sure that dirt, water and other foreign matter does not contact the connecting part of the connector.
Push the locks on the 2 levers, then raise the levers, and disconnect the 2 ECM connectors.
Remove the ECM with bracket.
Remove the 4 screws and 2 ECM brackets.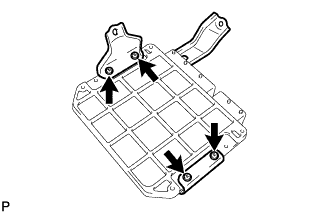
| 22. DISCONNECT ENGINE WIRE |
Remove the engine room junction block cover upper.
Disconnect the engine wire from the engine room junction block.
Remove the bolt and disconnect the 4 clamps.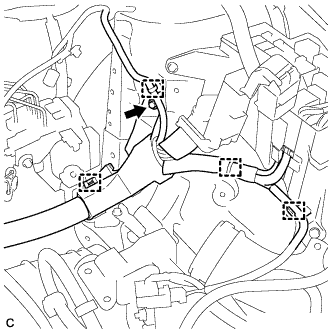
Remove the nut and disconnect the 3 engine wire connectors.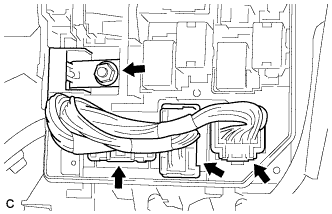
Using a screwdriver, unlock the engine room junction block. Pull the engine room junction block upward.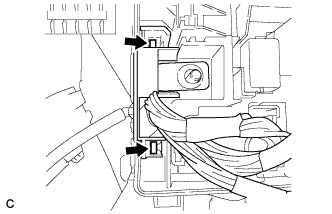
Remove the nut and disconnect the starter wire.
| 23. SEPARATE FUEL TUBE SUB-ASSEMBLY |
Remove the No. 1 fuel pipe clamp.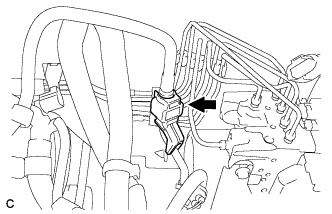
Disconnect the connector from the tube while pinching part A with your fingers as shown in the illustration.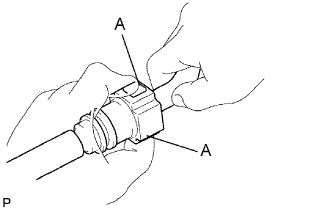
- NOTICE:
- Check for contamination in the pipe and around the connector. Clean if necessary and then disconnect the connector.
- Disconnect the connector by hand.
- Do not bend, kink or twist the nylon tube.
- If the pipe and connector are stuck together, push and pull on the connector to release them.
- Put the pipe and connector ends in vinyl bags to prevent damage and contamination.
- Check for contamination in the pipe and around the connector. Clean if necessary and then disconnect the connector.
| 24. DISCONNECT HEATER INLET WATER HOSE |
Disconnect the heater inlet water hose.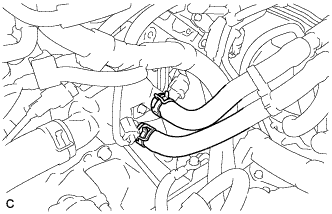
| 25. DISCONNECT HEATER OUTLET WATER HOSE |
Disconnect the heater outlet water hose.
| 26. REMOVE RADIATOR RESERVOIR TANK ASSEMBLY |
Remove the 2 bolts, 2 hoses and reservoir tank.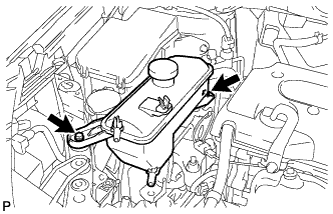
| 27. DISCONNECT NO. 1 FUEL VAPOR FEED HOSE |
Remove the clamp and disconnect the No. 1 fuel vapor feed hose.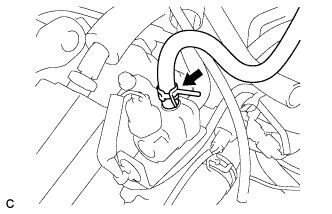
| 28. DISCONNECT UNION TO CHECK VALVE HOSE |
Disconnect the union to check valve hose.
| 29. DISCONNECT NO. 1 COOLER REFRIGERANT SUCTION HOSE |
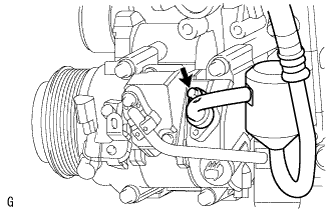 |
Remove the bolt and disconnect the cooler refrigerant suction hose from the cooler compressor.
Remove the O-ring from the cooler refrigerant suction hose.
- NOTICE:
- Seal the openings of the disconnected parts using vinyl tape to prevent moisture and foreign matter from entering them.
| 30. DISCONNECT NO. 1 COOLER REFRIGERANT DISCHARGE HOSE |
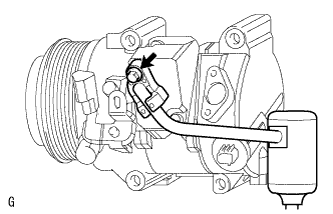 |
Remove the bolt and disconnect the cooler refrigerant discharge hose from the cooler compressor.
Remove the O-ring from the cooler refrigerant discharge hose.
- NOTICE:
- Seal the openings of the disconnected parts using vinyl tape to prevent moisture and foreign matter from entering them.
| 31. DISCONNECT RADIATOR HOSE INLET |
Remove the clamp and disconnect the radiator hose inlet.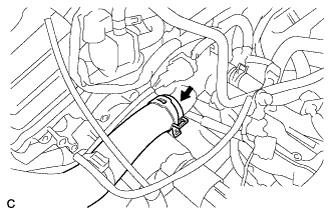
| 32. DISCONNECT RADIATOR HOSE OUTLET |
Remove the clamp and disconnect the radiator hose outlet.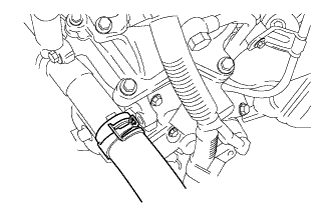
| 33. DISCONNECT TRANSMISSION OIL COOLER HOSE |
Disconnect the 2 hoses from the transmission oil filler tube and oil cooler tube.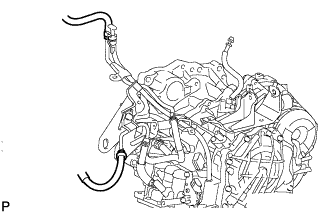
| 34. DISCONNECT TRANSMISSION CONTROL CABLE ASSEMBLY |
Disconnect the transmission control cable assembly (Click here).
| 35. REMOVE HEATED OXYGEN SENSOR |
Remove the heated oxygen sensor (Click here).
| 36. REMOVE NO. 2 EXHAUST PIPE SUB-ASSEMBLY |
Remove the No. 2 exhaust pipe sub-assembly (Click here).
| 37. REMOVE CENTER EXHAUST PIPE ASSEMBLY |
Remove the 2 bolts, 2 nuts, and center exhaust pipe assembly.
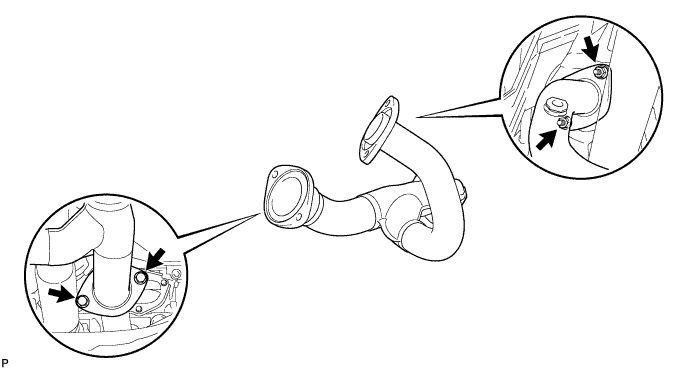
Remove the 2 gaskets.
| 38. REMOVE NO. 1 FRONT EXHAUST PIPE SUPPORT BRACKET |
Remove the 2 bolts and No. 1 exhaust pipe support bracket.
| 39. REMOVE FRONT EXHAUST PIPE ASSEMBLY |
Remove the 2 nuts and front exhaust pipe assembly.
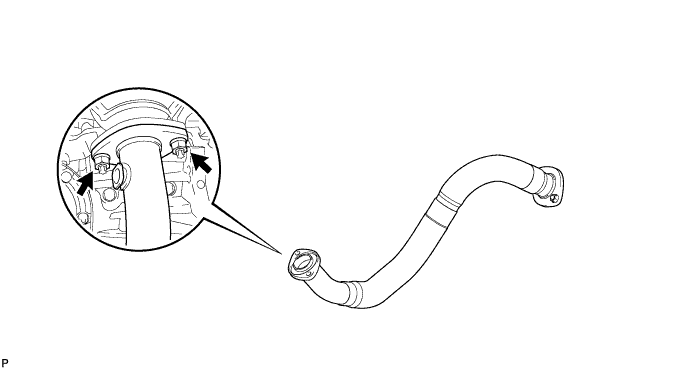
Remove the gasket from the exhaust manifold.
| 40. REMOVE PROPELLER WITH CENTER BEARING SHAFT ASSEMBLY |
Remove the 2 bolts and 2 adjusting washers, and disconnect the propeller with center bearing shaft.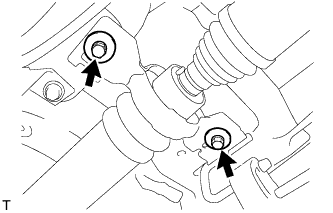
- NOTICE:
- During the removal, do not exert excessive force on the universal joint.
- When removing, transporting or storing the propeller with center bearing shaft assembly, do not allow the No. 2 joint angle to exceed 20°.
- During the removal, do not exert excessive force on the universal joint.
Place matchmarks on the differential carrier and propeller shaft.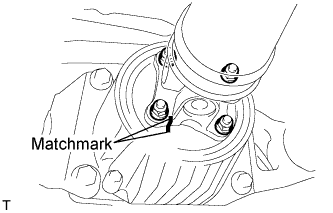
Remove the 4 nuts and 4 washers, and disconnect the propeller shaft and differential carrier.
Place matchmarks on the transfer and propeller shaft.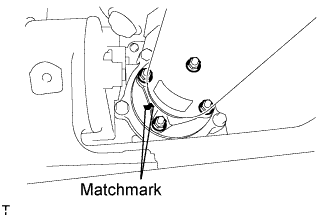
Remove the 4 nuts and 4 washers, and disconnect the propeller shaft from the transfer.
| 41. REMOVE FRONT WHEELS |
| 42. REMOVE FRONT DRIVE SHAFT LH |
Remove the front drive shaft LH (Click here).
| 43. REMOVE FRONT DRIVE SHAFT RH |
Remove the front drive shaft RH (Click here).
| 44. REMOVE COLUMN HOLE COVER SILENCER SHEET |
Remove the floor carpet, 2 clips and column hole cover silencer.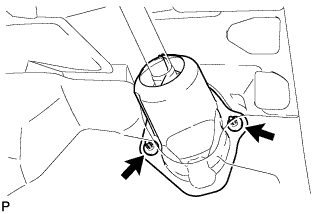
| 45. DISCONNECT STEERING INTERMEDIATE SHAFT |
Use a seat belt to fix the steering wheel in place to avoid breakage of the spiral cable.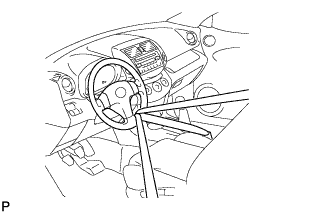
Place matchmarks on the sliding yoke of the steering intermediate shaft.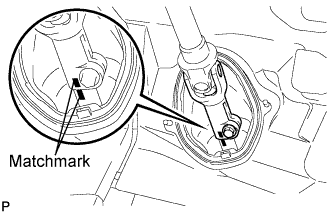
Remove the bolt and disconnect the sliding yoke.
| 46. REMOVE NO. 1 STEERING COLUMN HOLE COVER SUB-ASSEMBLY |
Remove clip A, detach clip B from the body and disconnect the No. 1 steering column hole cover.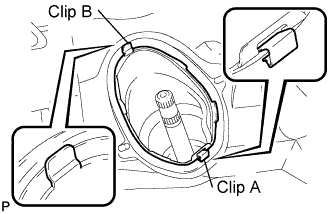
- NOTICE:
- Do not damage clips A and B.
| 47. DISCONNECT TIE ROD END SUB-ASSEMBLY LH |
Remove the cotter pin and castle nut.
Using SST, disconnect the tie rod end from the steering knuckle.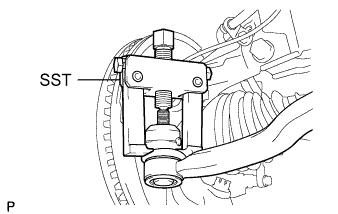
- NOTICE:
- Do not damage the tie rod end dust cover.
- SST
- 09628-62011
| 48. DISCONNECT TIE ROD END SUB-ASSEMBLY RH |
- HINT:
- Use the same procedures described for the LH side.
| 49. REMOVE NO. 2 ENGINE MOUNTING STAY RH |
Remove the bolt, 2 nuts and No. 2 engine mounting stay RH.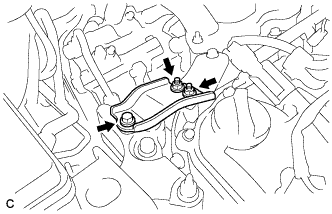
| 50. REMOVE ENGINE WITH TRANSAXLE |
Install the No. 1 and No. 2 engine hangers with the 4 bolts as shown in the illustration.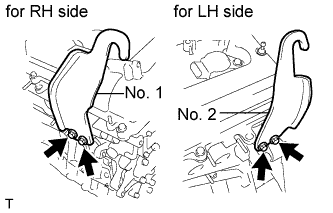
- Torque:
- 33 N*m{ 337 kgf*cm , 24 ft.*lbf }
Part Name
Part No.
No. 1 engine hanger
12281-31120
No. 2 engine hanger
12282-31100
Bolt
91671-10825
- HINT:
- Insert the claw of the hanger into hole of the cylinder head.
- Fit the fork part of the hanger onto the rib of the cylinder head.
- Insert the claw of the hanger into hole of the cylinder head.
Install an engine sling device to the engine and hold the engine with a chain block.
- CAUTION:
- Do not raise the engine more than necessary. If the engine is raised excessively, the vehicle may also be lifted up.
Set an engine lifter underneath the engine.
Remove the 2 bolts and 2 nuts, and disconnect the engine mounting insulator RH.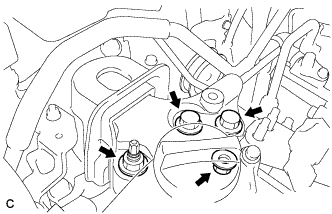
Remove the bolt and nut, and disconnect the engine mounting insulator LH.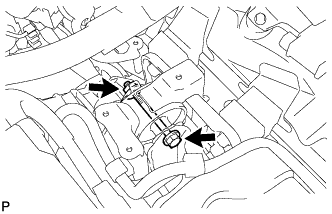
Remove the 6 bolts and front suspension member brace rear RH and LH.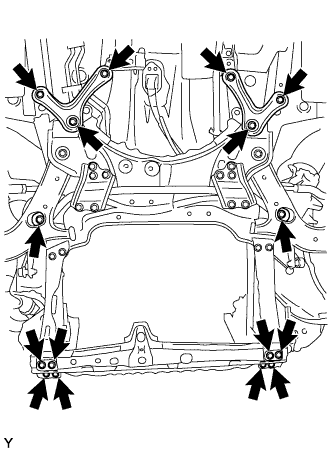
Remove the 6 bolts, crossmember and suspension member.
Using the chain block, slowly remove the engine from the vehicle and the intermediate shaft from the pinion. Then set the engine on the engine lifter.
- NOTICE:
- Make sure that the engine is clear of all wiring and hoses.
- While lowering the engine from the vehicle, do not allow it to contact the vehicle.
- Make sure that the engine is clear of all wiring and hoses.
- HINT:
- Place the engine on wooden blocks or equivalent so that the engine is level.
| 51. REMOVE FRONT CROSS MEMBER SUB-ASSEMBLY |
Remove the bolt, nut and crossmember.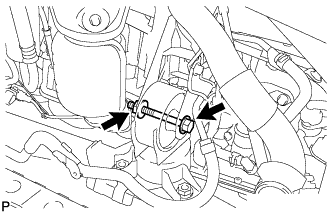
| 52. REMOVE FRONT SUSPENSION CROSSMEMBER SUB-ASSEMBLY |
Remove the bolt and suspension crossmember.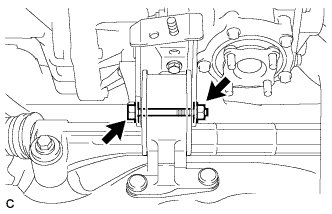
| 53. REMOVE ENGINE WIRE |
Remove the engine wire from the engine.
| 54. REMOVE STARTER ASSEMBLY |
Disconnect the starter connector.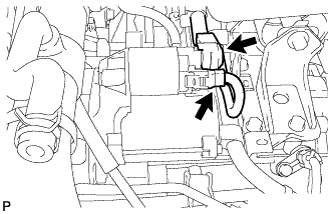
Open the terminal cap, remove the nut and disconnect the starter wire.
Remove the 2 bolts and starter.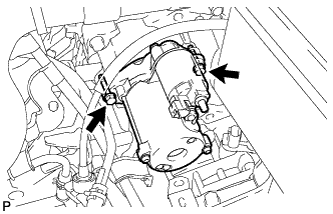
| 55. REMOVE AUTOMATIC TRANSAXLE ASSEMBLY |
Remove the 2 bolts and flywheel housing under cover.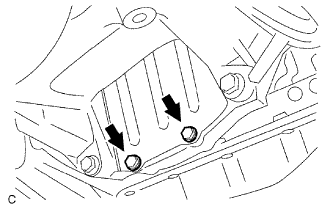
Turn the crankshaft to gain access and remove the 6 bolts while holding the crankshaft pulley bolt with a wrench.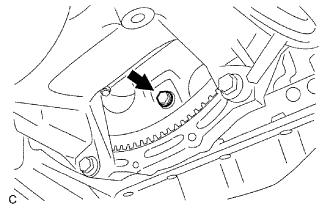
Remove the 3 lower side mounting bolts.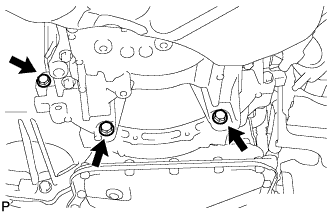
Remove the 7 upper side mounting bolts.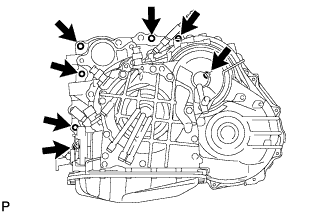
Separate and remove the automatic transaxle.
| 56. REMOVE TRANSFER ASSEMBLY |
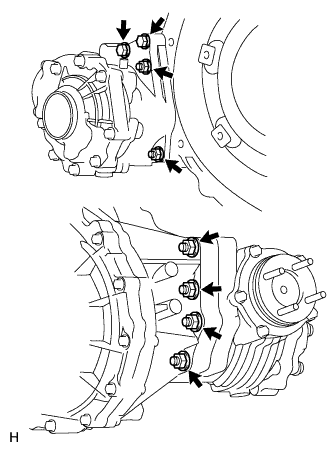 |
Remove the 6 nuts, 2 bolts and transfer from the transaxle.
| 57. REMOVE DRIVE PLATE AND RING GEAR SUB-ASSEMBLY |
Using SST, hold the crankshaft.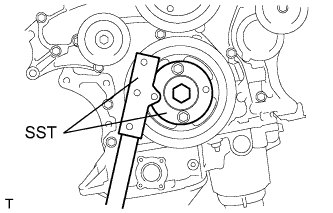
- SST
- 09213-70011
(09213-70020)
09330-00021
Remove the 8 bolts, front spacer, drive plate and rear spacer.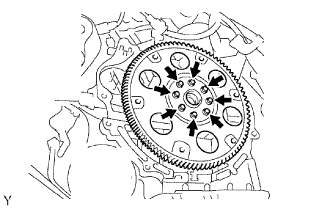
- NOTICE:
- Do not reuse the bolts.
| 58. INSTALL ENGINE TO ENGINE STAND |
Install the engine to an engine stand. Remove the sling device and chain block from the engine.
| 59. REMOVE INTAKE AIR SURGE TANK ASSEMBLY |
Disconnect the 2 water by-pass hoses from the throttle body.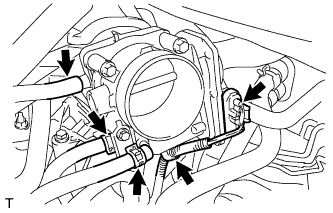
Disconnect the vapor feed hose.
Disconnect the throttle body connector and clamp.
Disconnect the connector.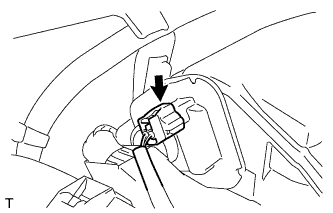
Disconnect the No. 1 ventilation hose and vacuum hose.
Remove the 2 bolts and throttle body bracket.
Remove the 2 bolts and No. 1 surge tank stay.
Using a 5 mm socket hexagon wrench, remove the 4 bolts.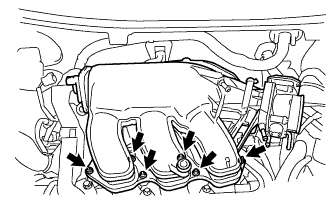
Remove the 2 nuts and surge tank.
Remove the gasket from the surge tank.
| 60. REMOVE IGNITION COIL ASSEMBLY |
Remove the 6 bolts and 6 coils from the cylinder head.
| 61. REMOVE NO. 2 ENGINE MOUNTING STAY RH |
Remove the bolt and mounting stay.
| 62. REMOVE INTAKE MANIFOLD |
Remove the 6 bolts, 4 nuts, intake manifold and 2 gaskets.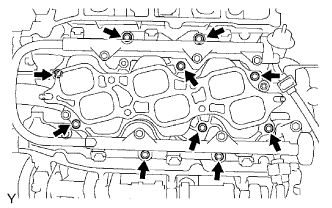
| 63. REMOVE MANIFOLD STAY |
Remove the 2 bolts, nut and manifold stay.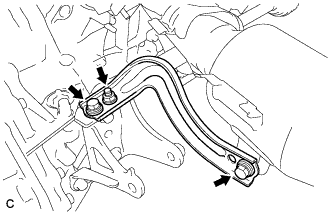
| 64. REMOVE EXHAUST MANIFOLD SUB-ASSEMBLY RH |
Disconnect the air fuel ratio sensor connector clamp.
Uniformly loosen and remove the 6 nuts.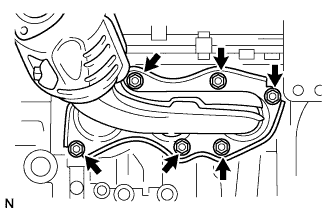
Remove the manifold and gasket.
| 65. REMOVE V-RIBBED BELT |
Rotate the tensioner pulley counterclockwise to loosen the belt tension. Then remove the V-ribbed belt.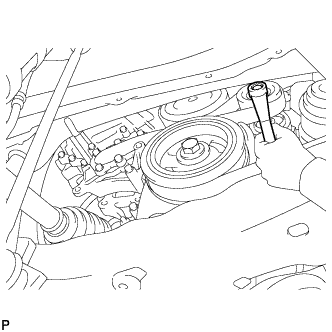
While turning the belt tensioner counterclockwise, align its holes, and then insert a 5 mm bi-hexagon wrench into the holes to fix the V-ribbed belt tensioner in place.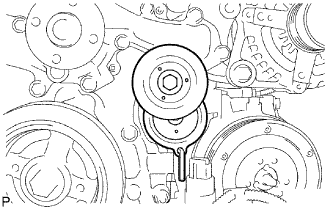
| 66. REMOVE NO. 2 IDLER PULLEY SUB-ASSEMBLY |
Remove the bolt, plate and idler pulley.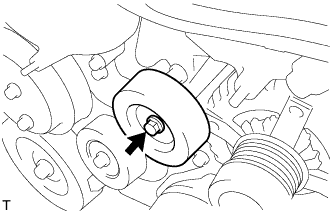
| 67. REMOVE COOLER COMPRESSOR ASSEMBLY |
Disconnect the connector.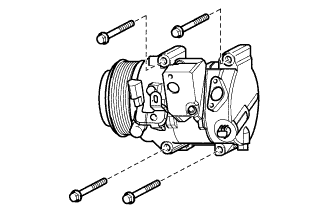
Remove the 4 bolts and cooler compressor.
| 68. REMOVE GENERATOR ASSEMBLY |
Disconnect the 2 wire harness clamps.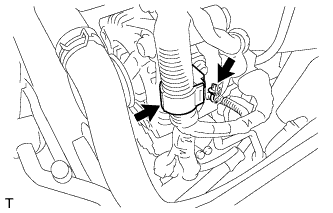
Remove the terminal cap.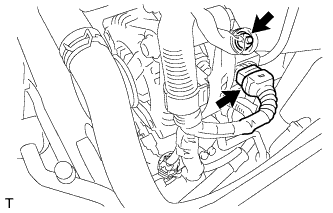
Remove the nut and disconnect the generator wire from terminal B.
Disconnect the generator connector from the generator.
Remove the bolt from the cylinder block.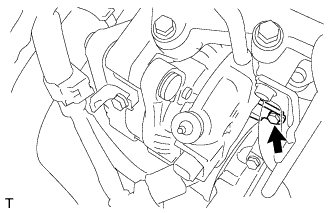
Remove the 2 bolts and generator.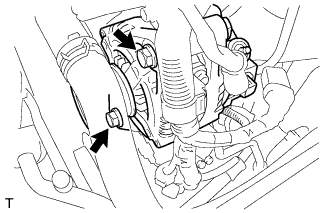
| 69. REMOVE OIL DIPSTICK GUIDE |
Remove the dipstick.
Remove the 2 bolts, and the No. 1 and No. 2 guides.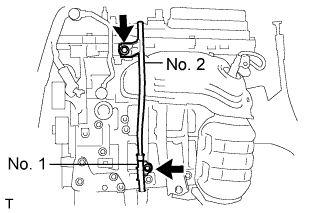
Remove the O-rings from the guide.
| 70. REMOVE NO. 2 MANIFOLD STAY |
Remove the bolt, nut and manifold stay.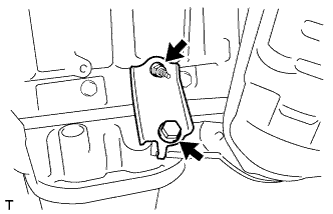
| 71. REMOVE NO. 2 EXHAUST MANIFOLD HEAT INSULATOR |
Remove the 3 bolts and insulator.
| 72. REMOVE EXHAUST MANIFOLD SUB-ASSEMBLY LH |
Uniformly loosen and remove the 6 nuts.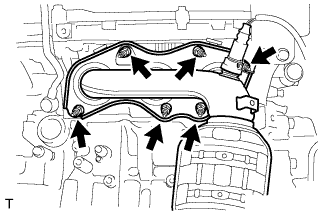
Remove the manifold and gasket.
| 73. REMOVE DRIVE SHAFT BEARING BRACKET |
Remove the 3 bolts and drive shaft bearing bracket.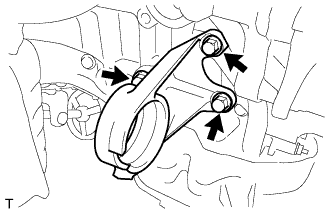
| 74. REMOVE V-RIBBED BELT TENSIONER ASSEMBLY |
Remove the 5 bolts and V-ribbed belt tensioner assembly.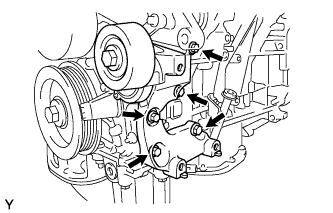
| 75. REMOVE NO. 2 TIMING GEAR COVER |
Remove the 2 bolts and gear cover.
| 76. REMOVE WATER PUMP PULLEY |
Using SST, hold the water pump pulley.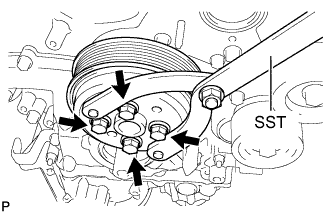
- SST
- 09960-10010
(09962-01000, 09963-00700)
Remove the 4 bolts and water pump pulley.
| 77. REMOVE RADIO SETTING CONDENSER |
Remove the 2 bolts and 2 radio setting condensers.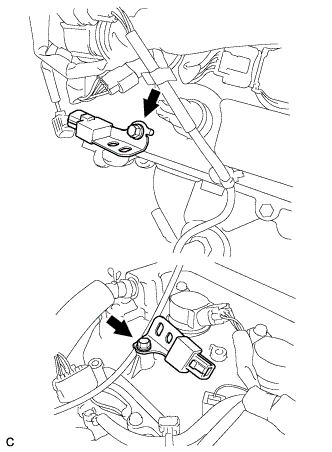
| 78. REMOVE NO. 1 VACUUM SWITCHING VALVE ASSEMBLY |
Remove the bolt and No. 1 vacuum switching valve.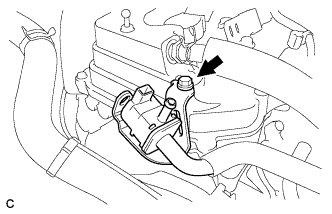
| 79. REMOVE ENGINE OIL PRESSURE SWITCH ASSEMBLY |
Using a 24 mm deep socket wrench, remove the pressure switch.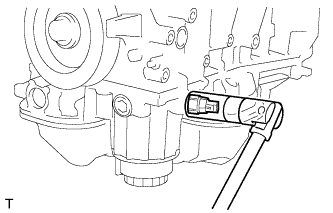
| 80. REMOVE KNOCK SENSOR |
Disconnect the 2 sensor connectors.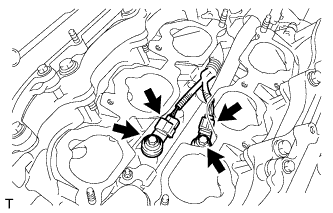
Remove the 2 bolts and 2 sensors.
| 81. REMOVE ENGINE COOLANT TEMPERATURE SENSOR |
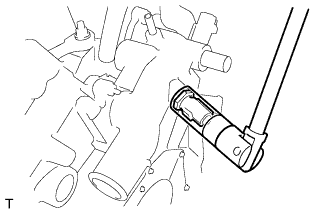
Using a 19 mm deep socket wrench, remove the sensor and gasket.