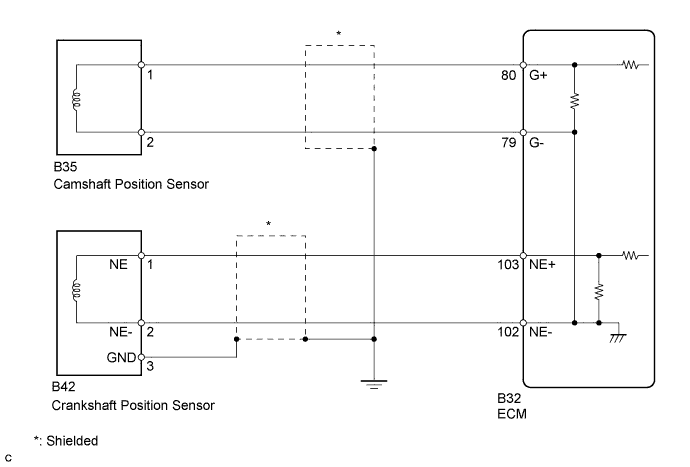
DTC P0335 Crankshaft Position Sensor "A" Circuit |
DTC P0339 Crankshaft Position Sensor "A" Circuit Intermittent |
| DTC Detection Drive Pattern | DTC Detection Condition | Trouble Area |
| Crank or start engine | When the following condition is met (for 5 seconds during cranking or 0.5 seconds during engine start) (1 trip detection logic): No crankshaft position sensor signal is sent to the ECM while cranking. |
|
| DTC Detection Drive Pattern | DTC Detection Condition | Trouble Area |
| Engine running at 1000 rpm or more with vehicle stationary | No crankshaft position sensor signal is input to the ECM for 0.05 seconds or more, and conditions (a), (b) and (c) are met (1 trip detection logic):
|
|
| DTC No. | Data List |
| P0335 | Engine Speed |
| P0339 |
| 1.INSPECT CRANKSHAFT POSITION SENSOR |
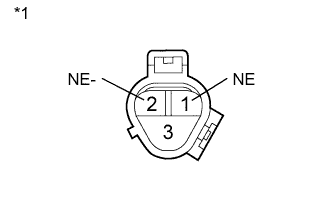 |
Disconnect the crankshaft position sensor connector.
Measure the resistance according to the value(s) in the table below.
| Tester Connection | Condition | Specified Condition |
| 1 (NE) - 2 (NE-) | Cold | 835 to 1400 Ω |
| 1 (NE) - 2 (NE-) | Hot | 1060 to 1645 Ω |
| *1 | Component without harness connected (Crankshaft Position Sensor) |
Reconnect the crankshaft position sensor connector.
|
| ||||
| OK | |
 |
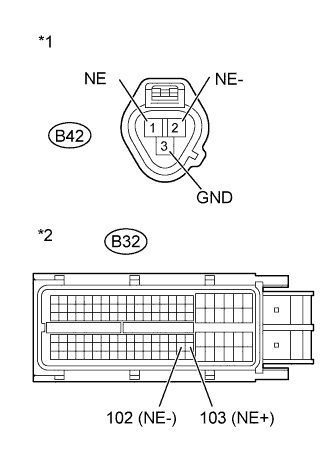
| 2.CHECK HARNESS AND CONNECTOR (CRANKSHAFT POSITION SENSOR - ECM) |
 |
Disconnect the crankshaft position sensor connector.
Disconnect the ECM connector.
Measure the resistance according to the value(s) in the table below.
| Tester Connection | Condition | Specified Condition |
| B42-1 (NE) - B32-103 (NE+) | Always | Below 1 Ω |
| B42-2 (NE-) - B32-102 (NE-) | Always | Below 1 Ω |
| B42-3 (GND) - Body ground | Always | Below 1 Ω |
| Tester Connection | Condition | Specified Condition |
| B42-1 (NE) or B32-103 (NE+) - Body ground | Always | 10 kΩ or higher |
| B42-2 (NE-) or B32-102 (NE-) - Body ground | Always | 10 kΩ or higher |
| *1 | Front view of wire harness connector (to Crankshaft Position Sensor) |
| *2 | Front view of wire harness connector (to ECM) |
Reconnect the crankshaft position sensor connector.
Reconnect the ECM connector.
|
| ||||
| OK | |
|
| 3.CHECK CRANKSHAFT POSITION SENSOR (SENSOR INSTALLATION) |
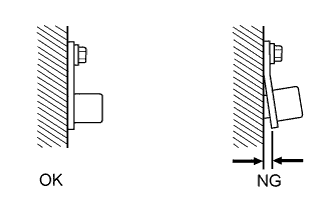 |
Check the sensor installation.
|
| ||||
| OK | |
|
| 4.CHECK NO. 1 CRANKSHAFT POSITION SENSOR PLATE |
Check the teeth of the sensor plate.
|
| ||||
| OK | |
|
| 5.REPLACE ECM |
Replace the ECM (Click here).
|
| ||||
| 6.REPLACE CRANKSHAFT POSITION SENSOR |
Replace the crankshaft position sensor (Click here).
|
| ||||
| 7.REPAIR OR REPLACE HARNESS OR CONNECTOR |
Repair or replace the harness or connector.
|
| ||||
| 8.SECURELY REINSTALL SENSOR |
Securely reinstall the sensor (Click here).
|
| ||||
| 9.REPLACE NO. 1 CRANKSHAFT POSITION SENSOR PLATE |
Replace the No. 1 crankshaft position sensor plate .
| NEXT | |
|
| 10.CONFIRM WHETHER MALFUNCTION HAS BEEN SUCCESSFULLY REPAIRED |
Connect the intelligent tester to the DLC3.
Clear the DTCs (Click here).
Turn the ignition switch off for 30 seconds or more.
Start the engine and run it at 1000 rpm or more for 5 seconds or more.
Confirm that the DTC is not output again.
| NEXT | ||
 | ||
| ||
